接线与配置
缓冲器内部接线图
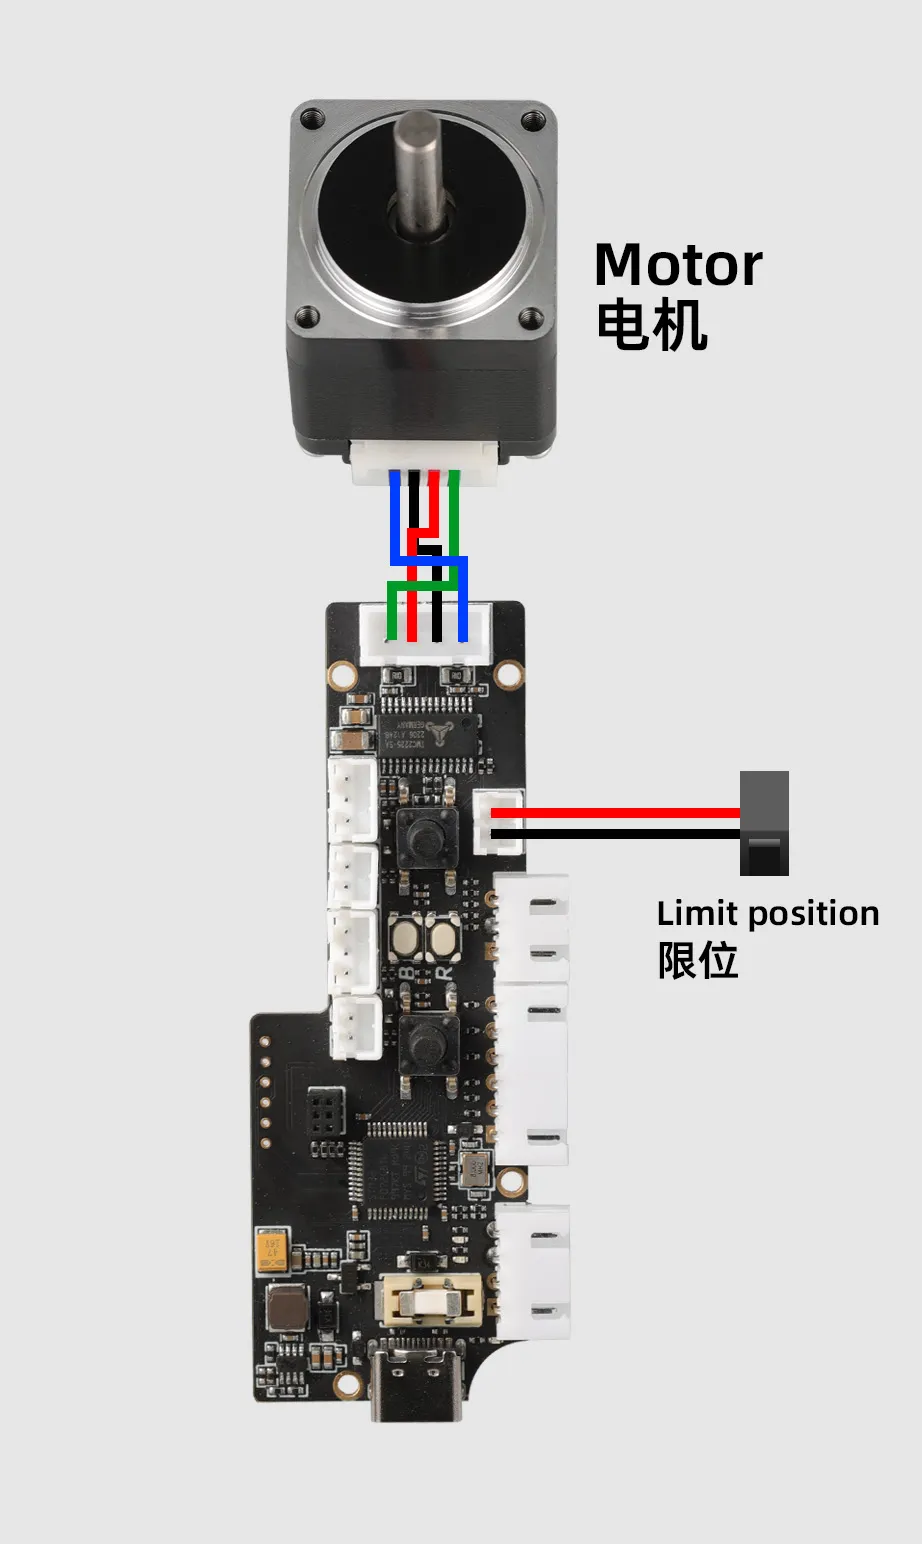
安装视频
缓冲器接到主板与配置方法
- 基础功能
- 使用触发缓冲器进料或者退料功能
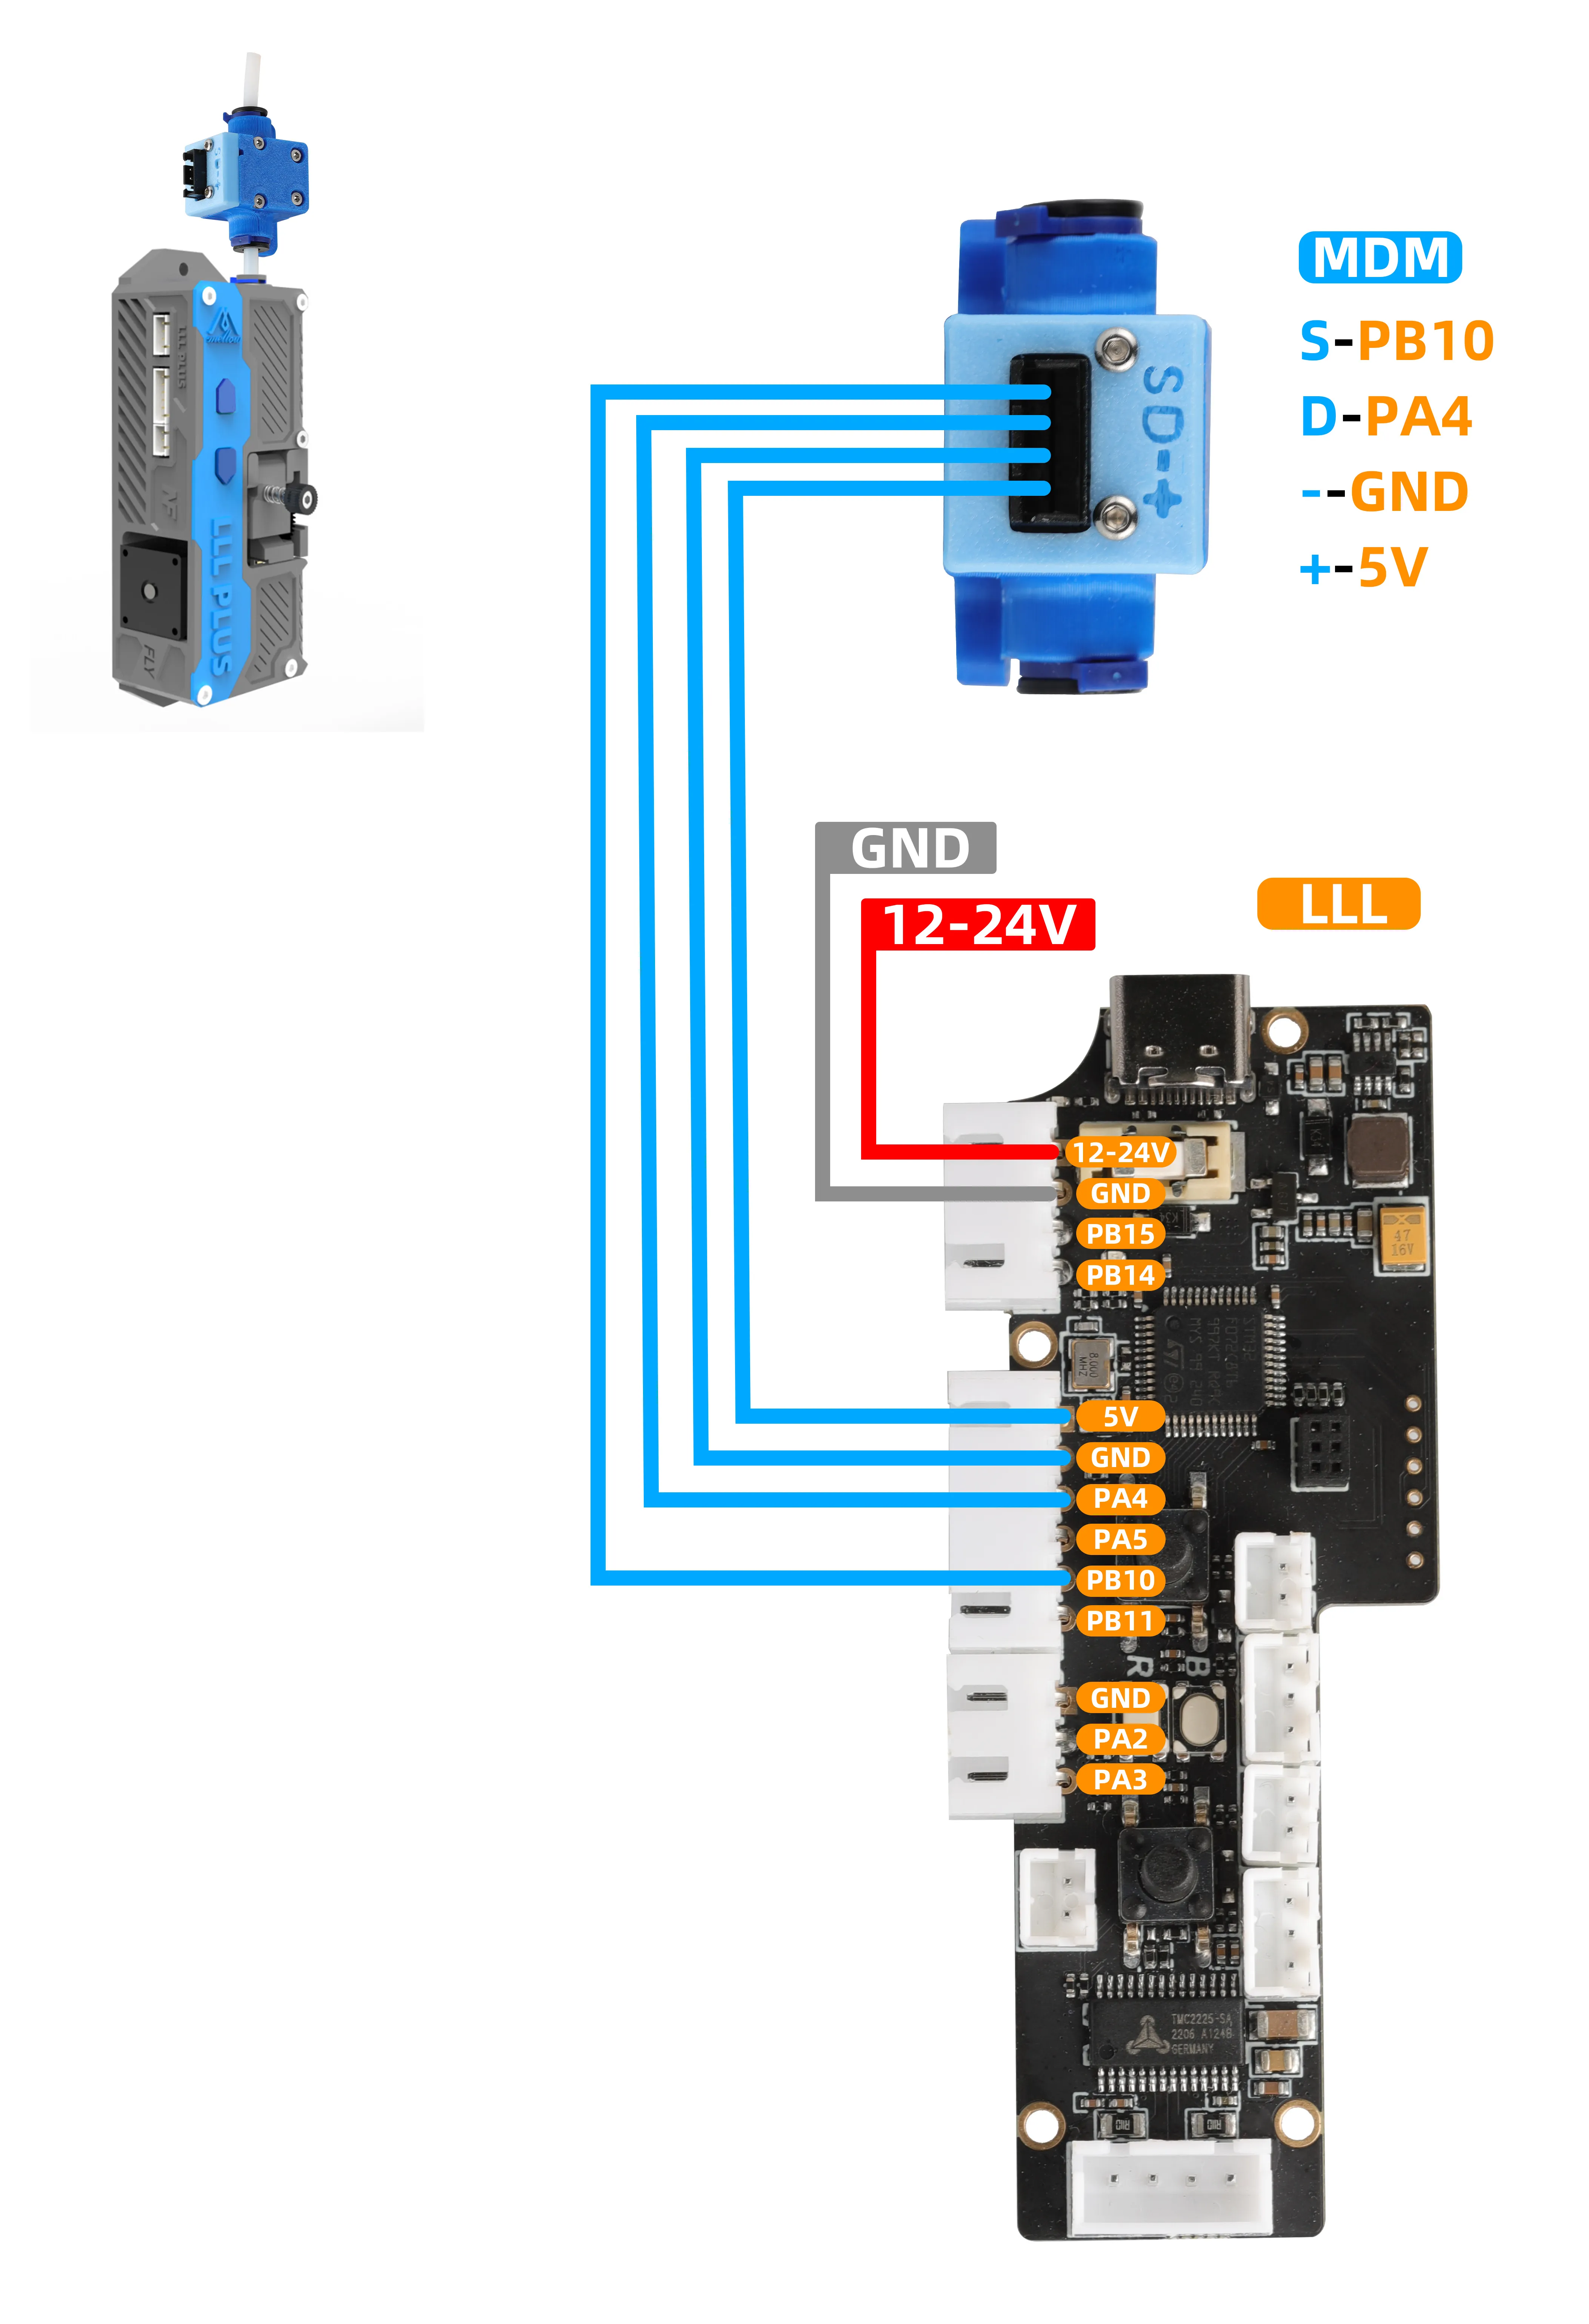
- 使用MDM传感器接线与配置方法
-
本缓冲器集成断料检测与手动控制功能:
-
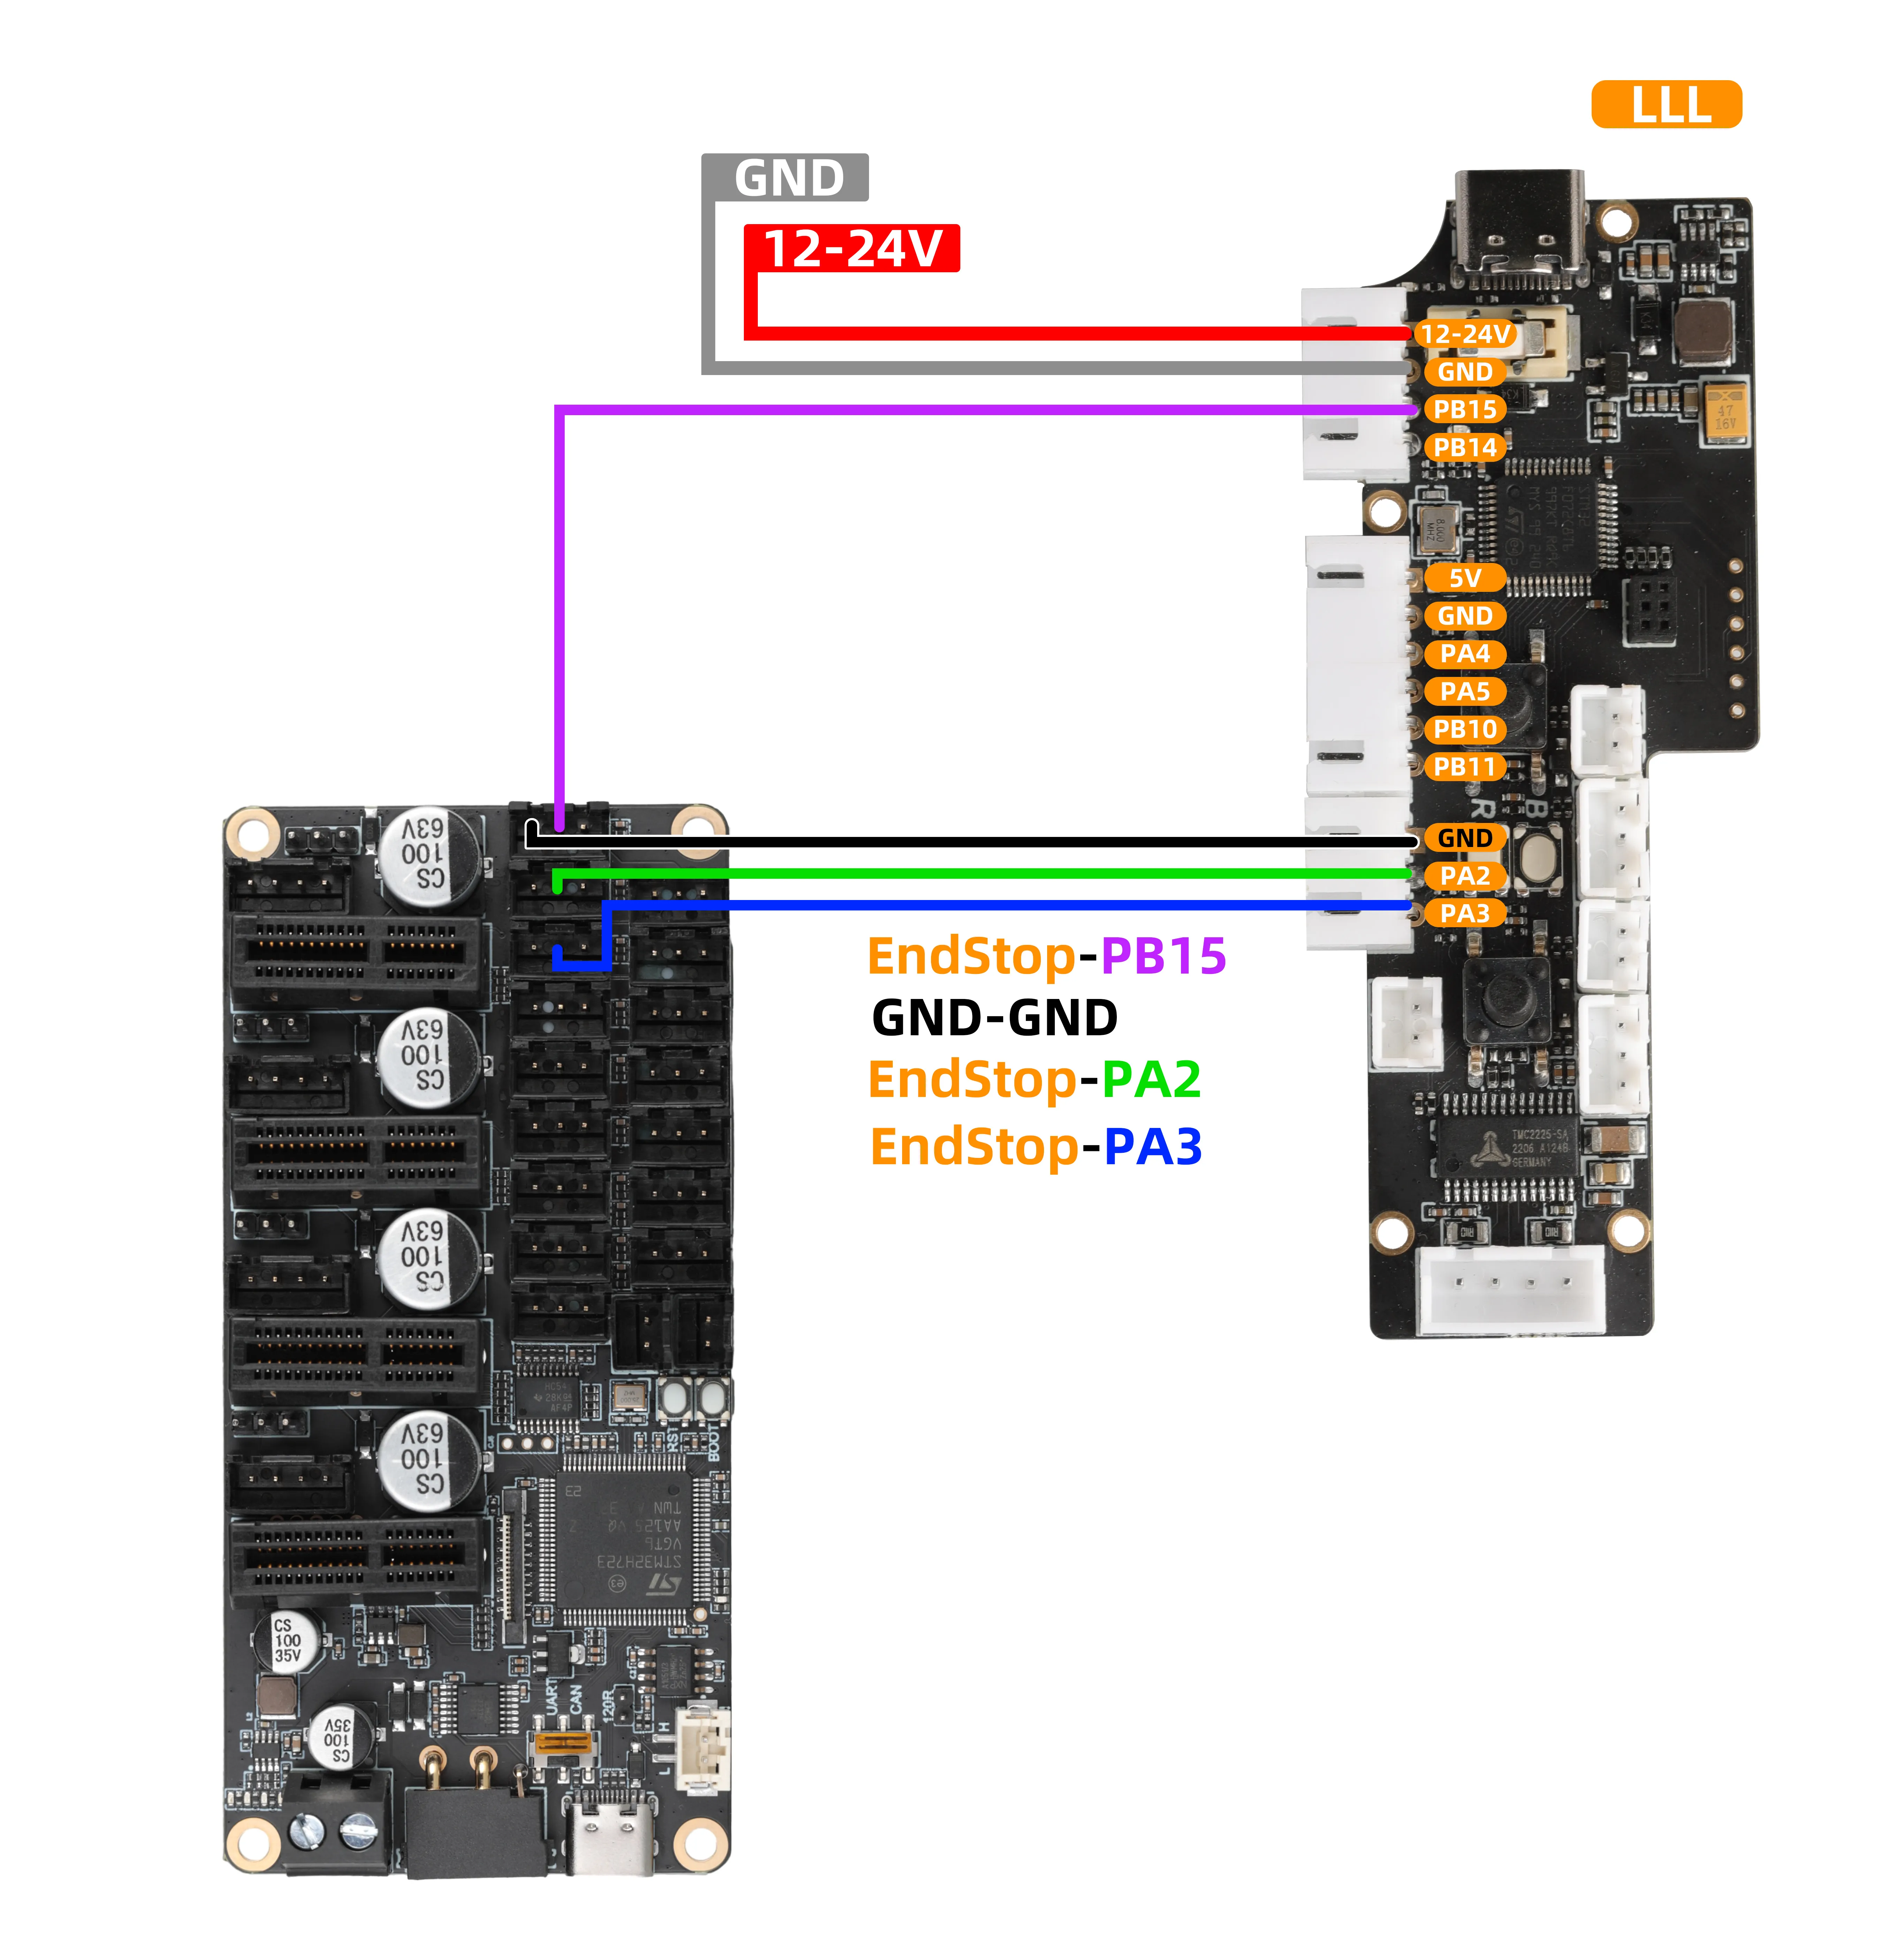
断料检测 (FILAMENT_SENSOR)
- 信号输出: 触发断料后,缓冲器的
PB15引脚输出低电平信号。
- 信号输出: 触发断料后,缓冲器的
-
进料按钮 (FEED)
- 单击: 缓冲器的
PA2引脚输出 3S 的高电平脉冲信号。 - 长按: 缓冲器将执行持续进料动作,直至松开按钮。
- 单击: 缓冲器的
-
退料按钮 (RETRACT)
- 单击: 缓冲器的
PA3引脚输出 3S 的低电平脉冲信号。 - 长按: 缓冲器将执行持续退料动作,直至松开按钮。
- 单击: 缓冲器的
接线指南
-
使用上述功能时,请参照下图接线:
重要提示
- 图示中的
MMU工具板仅为接口定义参考。实际使用时,您需要:
- 将线缆直接连接至您的主板(如Klipper、Marlin主板)的限位信号端口。
- 在配置文件(如
printer.cfg)中,修改并确认PD3、PD4与PD5对应的端口号配置,以确保功能正常。
配置参考
[mcu LLL_PLUS]
serial:/dev/serial/by-id/usb-Klipper_stm32h723xx_12345-if00

[filament_switch_sensor Material_breakage_detection]
pause_on_runout: true
switch_pin: ^LLL_PLUS:PD3
runout_gcode:
    PAUSE
    RESPOND MSG="material shortage"
insert_gcode:
    RESPOND MSG="Detected"
event_delay: 1.0
pause_delay: 0.5

[gcode_button Load_consumables]
pin:^LLL_PLUS:PD4 # 替换成自己使用的引脚, 连接到进料的引脚
press_gcode:
    _Load_consumables

[gcode_button RETRACT]
pin:^!LLL_PLUS:PD5 # 替换成自己使用的引脚, 连接到退料的引脚
press_gcode:
    _RETRACT

[gcode_macro CONFIG]
description: 挤出机配置
variable_extruder_temp: 200    ## 温度
variable_extruder_length: 50   ## 长度
variable_extruder_speed: 5    ## 速度 (mm/s)
gcode:

[gcode_macro _Load_consumables]  ## 进料
gcode:
    {% set temp = printer["gcode_macro CONFIG"].extruder_temp %}
    {% set length = printer["gcode_macro CONFIG"].extruder_length %}
    {% set speed = printer["gcode_macro CONFIG"].extruder_speed %}
    {% set feedrate = speed * 60 %}

    RESPOND MSG="Heat the extruder to {temp} °C"
    RESPOND MSG="加热挤出机到 {temp} °C"
    M109 S{temp}

    RESPOND MSG="Start feeding {length}mm"
    RESPOND MSG="开始进料{length}mm"
    G91  ; 相对坐标模式
    G1 E{length} F{feedrate}
    G90  ; 绝对坐标模式

    RESPOND MSG="Extrusion completed"
    RESPOND MSG="挤出完成"
    M104 S0

[gcode_macro _RETRACT]  ##退料
gcode:
    {% set temp = printer["gcode_macro CONFIG"].extruder_temp %}
    {% set length = printer["gcode_macro CONFIG"].extruder_length %}
    {% set speed = printer["gcode_macro CONFIG"].extruder_speed %}
    {% set feedrate = speed * 60 %}

    RESPOND MSG="Heat the extruder to {temp} °C"
    RESPOND MSG="加热挤出机到 {temp} °C"
    M109 S{temp}

    RESPOND MSG="Start material return {length}mm"
    RESPOND MSG="开始退料{length}mm"
    G91  ; 相对坐标模式
    G1 E-{length} F{feedrate}
    G90  ; 绝对坐标模式

    RESPOND MSG="Return of materials completed"
    RESPOND MSG="退料完成"
    M104 S0
-
需要将固件更新到
V1.1.0 -
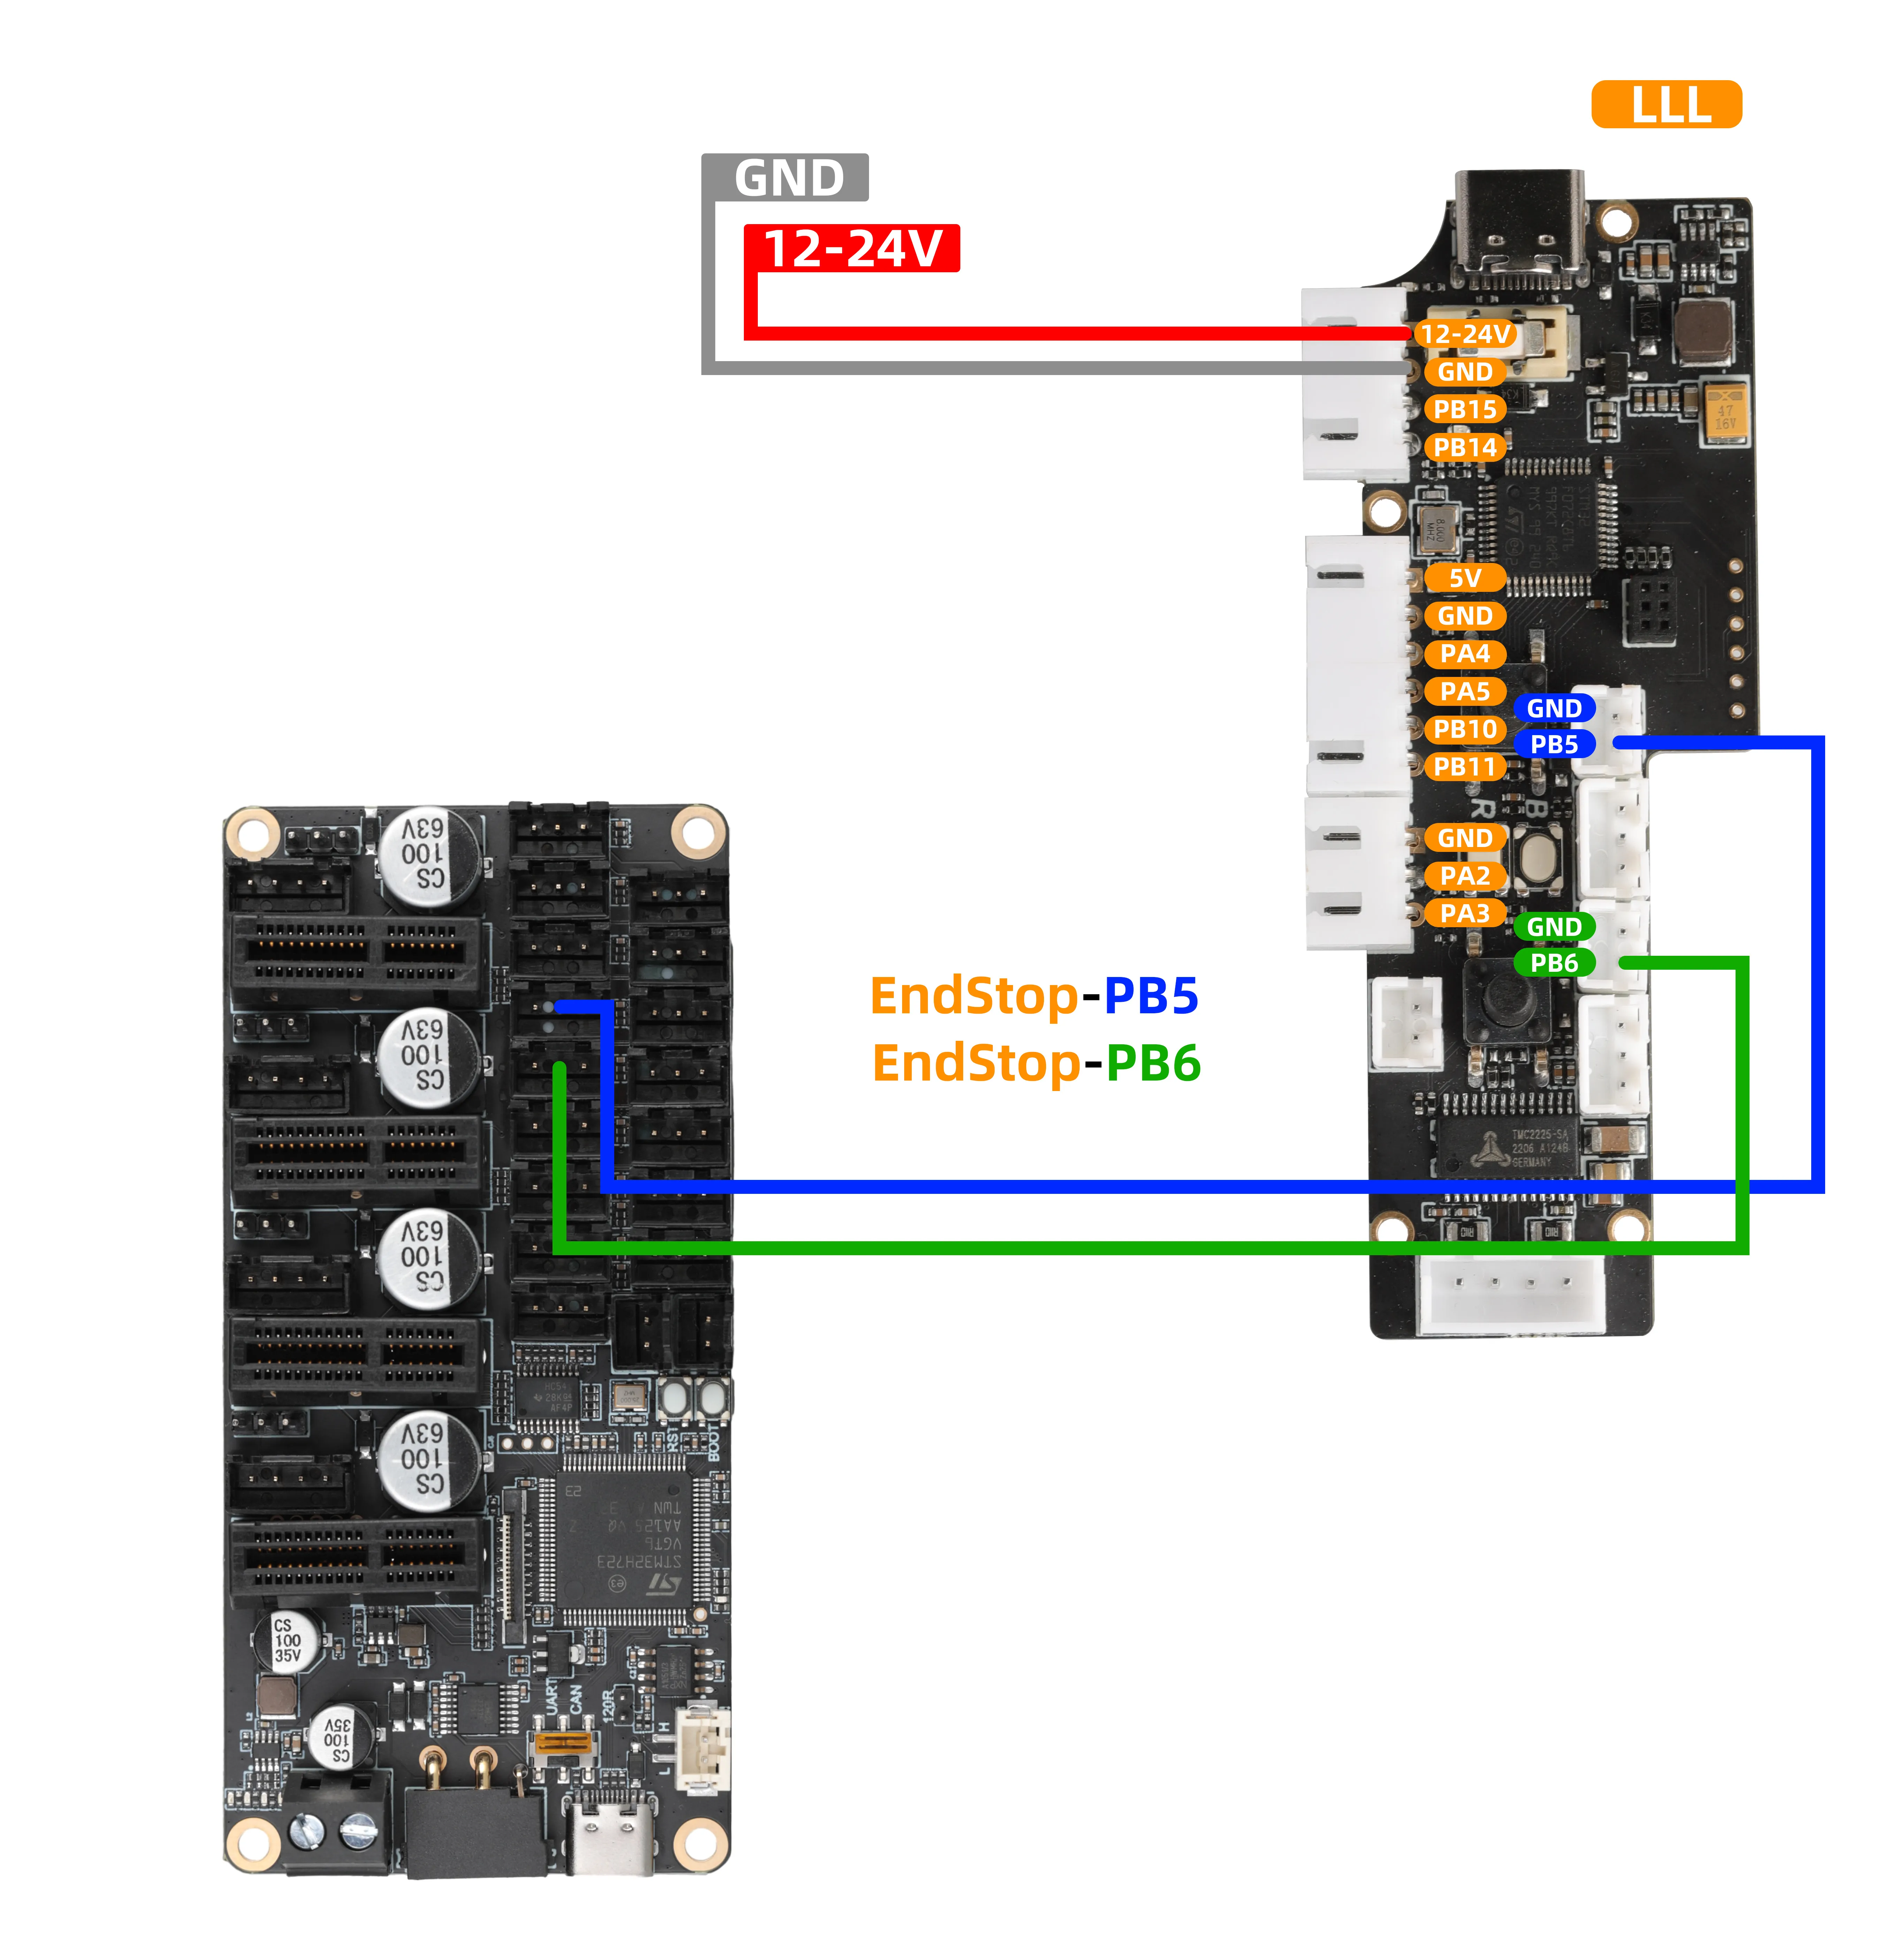
缓冲器可通过检测以下引脚电平状态,实现自动持续送料:
-
自动进料:当引脚
PB5检测到低电平信号时,缓冲器将执行持续进料。 -
自动退料:当引脚
PB6检测到低电平信号时,缓冲器将执行持续退料。
接线指南
- 使用上述功能时,请参照下图接线:
重要提示
- 图示中的
MMU工具板仅为接口定义参考。实际使用时,您需要:
- 将线缆直接连接至您的主板(如Klipper、Marlin主板)的限位信号端口。
- 在配置文件(如
printer.cfg)中,修改并确认PB5与PB6对应的端口号配置,以确保功能正常。
参考配置
- 添加配置
- 请注意此配置是需要添加基础功能后在添加下方配置
[output_pin _feeding]
pin:LLL_PLUS:PD6
shutdown_value: 0
value:0

[output_pin _material_return]
pin:LLL_PLUS:PD7
shutdown_value: 0
value:0

[gcode_macro Buffer_feeding]  ## 缓冲器进料
gcode:
    {% set temp = printer["gcode_macro CONFIG"].extruder_temp %}
    {% set length = printer["gcode_macro CONFIG"].extruder_length %}
    {% set speed = printer["gcode_macro CONFIG"].extruder_speed %}
    {% set feedrate = speed * 60 %}

    RESPOND MSG="Heat the extruder to {temp} °C"
    RESPOND MSG="加热挤出机到 {temp} °C"
    M109 S{temp}

    RESPOND MSG="Start feeding {length}mm"
    RESPOND MSG="开始进料{length}mm"
    SET_PIN PIN=_feeding VALUE=1
    G91  ; 相对坐标模式
    G1 E{length} F{feedrate}
    G90  ; 绝对坐标模式


    RESPOND MSG="Extrusion completed"
    RESPOND MSG="挤出完成"
    SET_PIN PIN=_feeding VALUE=0
    M104 S0

[gcode_macro RBuffer_material_return]  ## 缓冲器退料
gcode:
    {% set temp = printer["gcode_macro CONFIG"].extruder_temp %}
    {% set length = printer["gcode_macro CONFIG"].extruder_length %}
    {% set speed = printer["gcode_macro CONFIG"].extruder_speed %}
    {% set feedrate = speed * 60 %}

    RESPOND MSG="Heat the extruder to {temp} °C"
    RESPOND MSG="加热挤出机到 {temp} °C"
    M109 S{temp}

    RESPOND MSG="Start material return {length}mm"
    RESPOND MSG="开始退料{length}mm"
    SET_PIN PIN=_material_return VALUE=1
    G91  ; 相对坐标模式
    G1 E-{length} F{feedrate}
    G90  ; 绝对坐标模式
    SET_PIN PIN=_material_return VALUE=0

    RESPOND MSG="Return of materials completed"
    RESPOND MSG="退料完成"
    M104 S0
功能简介
- 搭配
FLY-MDM断料/堵料传感器使用,可让缓冲器实现堵料检测功能 - 需要将固件更新到
V1.1.0
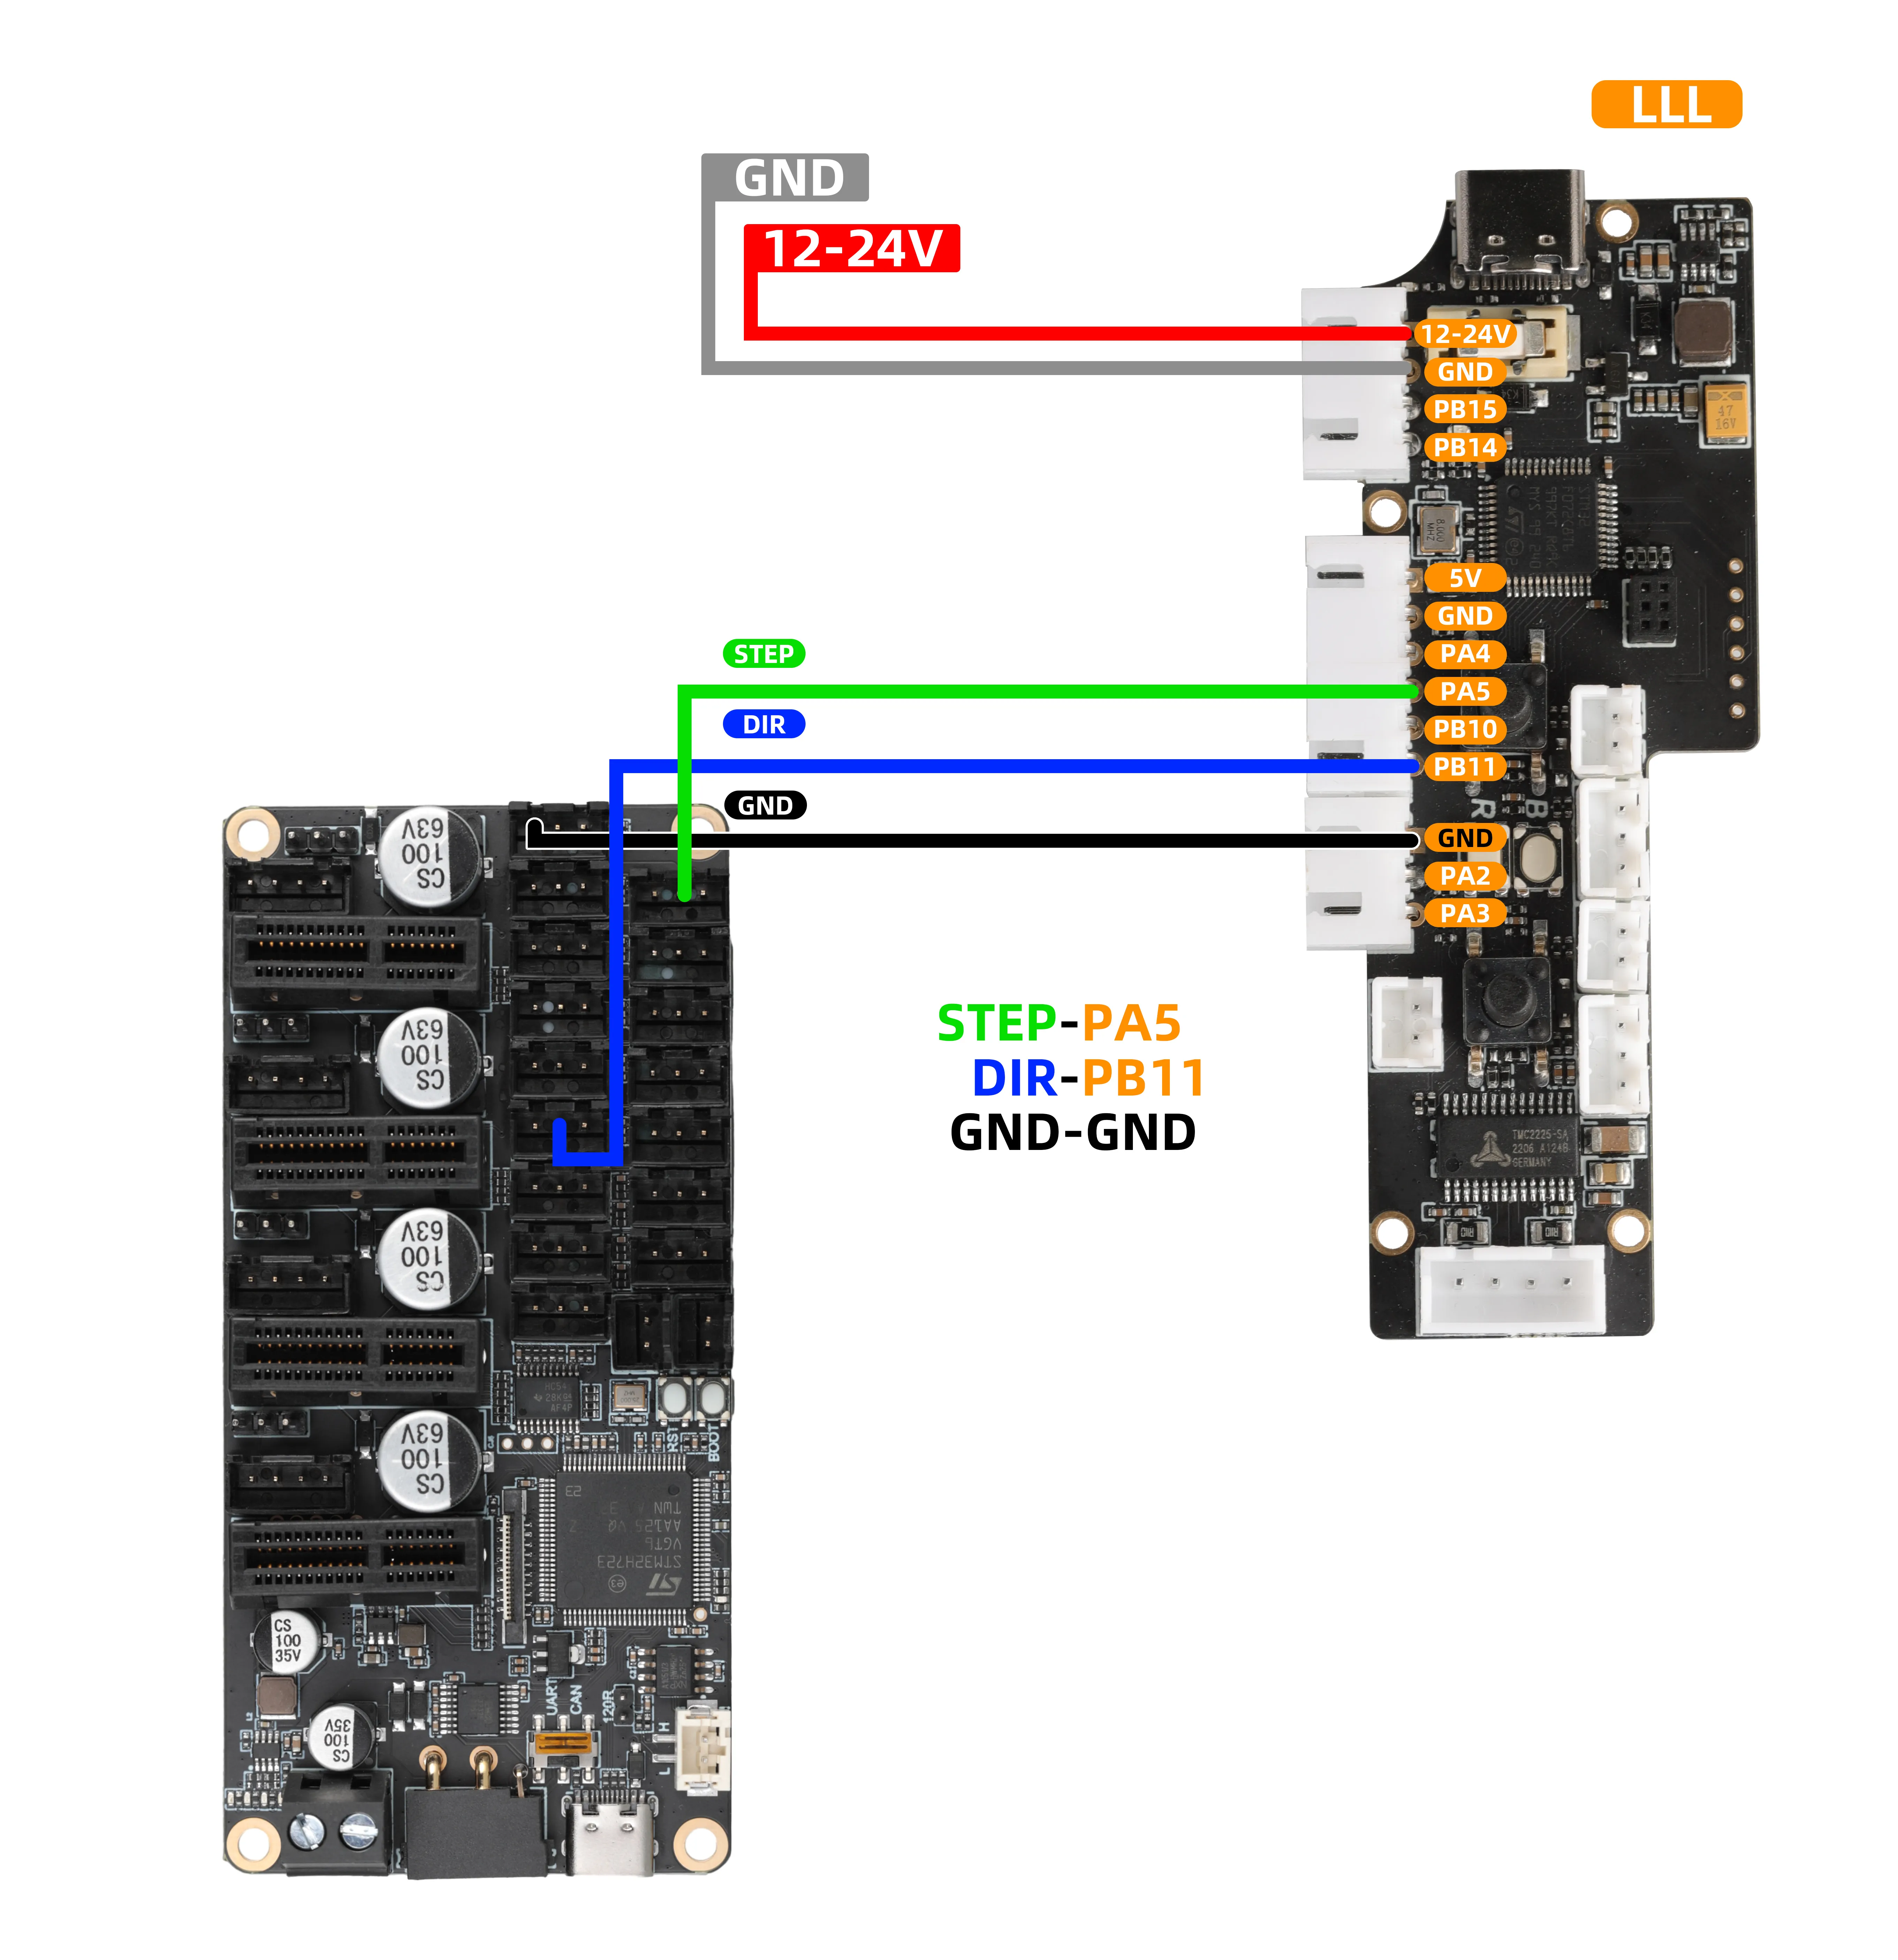
硬件接线
- 缓冲器的信号线应连接到主板上任何未被使用的通用数字输出引脚,例如:
STEP缓冲器的PA5连接到主板的PWM、RGB、12864其中之一即可。请注意BL-Touch的舵机口也可以使用DIR缓冲器的PB11连接到主板的限位口即可
-
此连接用于监控挤出机电机的工作状态,是实现堵料检测的关键。
-
使用上述功能时,请参照下图接线:
重要提示
- 图示中的
MMU工具板仅为接口定义参考。实际使用时,您需要:
- 将线缆直接连接至您的主板(如Klipper、Marlin主板)的限位信号端口。
- 在配置文件(如
printer.cfg)中,修改并确认PD3与PC0对应的端口号配置,以确保功能正常。
- MDM参考接线
参考配置
- 添加配置
- 请注意此配置是需要添加基础功能后在添加下方配置
- 请注意下方配置中的
STEP与DIR要修改您接线的端口号 - 并且其他配置要修改成您挤出机配置,否则会导致堵料检测失败
[extruder_stepper my_extra_stepper]
extruder = extruder
step_pin: LLL_PLUS:PE10
dir_pin: LLL_PLUS:PD4
rotation_distance: 17.472
gear_ratio:50:10
microsteps:16
full_steps_per_rotation: 200
缓冲器参数配置
串口工具助手获取- 使用
usb数据线连接模块跟电脑,打开串口工具助手,选择对应的端口号,波特率115200,点击连接。
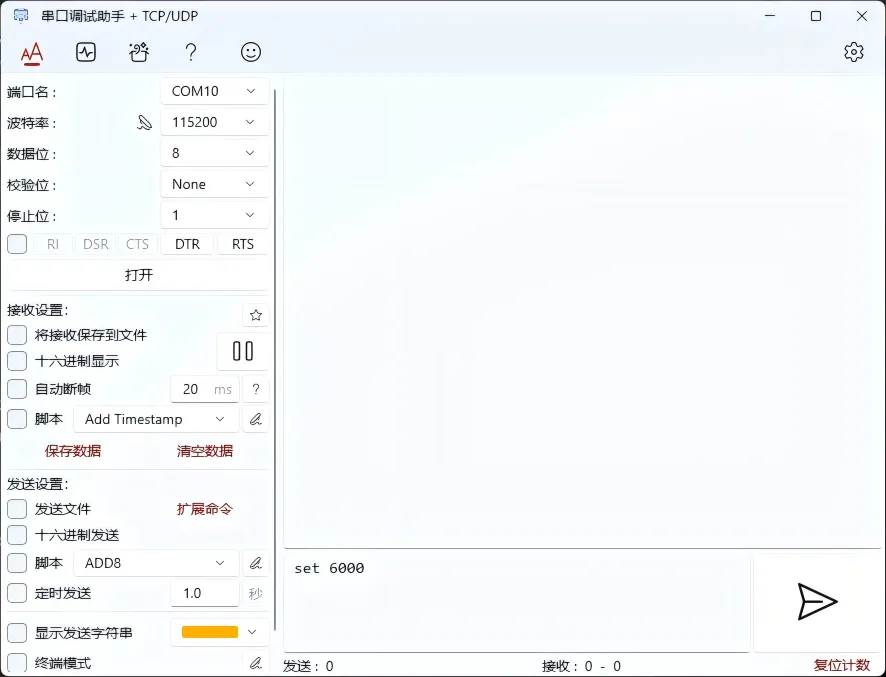
注意事项
- 如果挤出机配置中没有
gear_ratio则将驱动齿轮数与从动齿轮数改为1
Loading...
参数说明
| 功能说明 | 配置命令 (请在串口工具中输入) | 默认值 | 单位 | 备注 |
|---|---|---|---|---|
| 查看当前所有参数 | Loading... | - | - | 发送命令以读取当前所有配置。 |
| 设置电机脉冲数 | Loading... | 916 | - | 设置电机每毫米移动所需的脉冲数。 |
| 设置编码器检测距离 | Loading... | 1.73 | mm | 设置每个编码器信号所代表的耗材移动距离。 |
| 设置运行超时时间 | Loading... | 60000 | ms | 设置无触发状态下的自动停止时间,防止持续挤出。 |
| 设置误差缩放系数 | Loading... | 2.0 | - | 允许误差 = encoder值 × scale值。例: 1.73 * 2.0 = 3.46 mm |
操作须知:
- 命令格式:在上表“配置命令”列中,整行命令(如
steps 916)即为需要完整输入的内容。 - 发送方式:在串口助手的发送区输入命令后,点击发送按
- 自动保存:命令发送成功后,参数会立即生效并自动保存,无需额外执行保存操作。
- 确认配置:修改任何参数后,可发送
info命令查询当前所有参数,以验证配置是否正确。
Loading...