CAN Firmware Compilation
Start Compilation
- A host machine with the installed
klipperservice is required Connect via SSH over the network - Make sure the device is connected to the host machine
- Note: Please use a regular host machine, such as a Raspberry Pi FLY board, etc. If it's a modified host machine (e.g., WiFi stick, Redmi, etc.), due to too many issues, we cannot provide technical support for these machines
- To switch from the
ROOTuser to a regular user, you can enter the command below - Do not use the
ROOTuser - For the fly user, you can directly enter:
su fly. For non-fly users, please replace<your host machine username>with your host machine's username!
su <your host machine username>
- 请确保上位机可以正常联网
- 固件编译前需要使用SSH通过网络登录上位机
- 请不要使用串口工具登录上位机
Klipper固件编译和配置页面操作说明
请确保键盘输入法为半角模式,即英文模式
- 键盘上键
↑,下键↓,用于上下移动光标来选中菜单项 - 确认键
Enter或 空格键Space,用于勾选菜单或进入子菜单 - 退出键
ESC,用于返回上一级菜单 Q键,用于退出Klipper固件配置页面Y键,在退出Klipper固件配置页面时,如果有提示,则点击Y键保存配置文件
如果配置页面选项比较少,请先勾选[ ] Enable extra low-level configuration options,用于显示部分隐藏选项
Below is the introduction on how to compile the firmware:
-
After connecting to SSH, enter the following command and press Enter:
cd ~/klipper && rm -rf ~/klipper/.config && rm -rf ~/klipper/out && make menuconfig -
Among them,
rm -rf ~/klipper/.config && rm -rf ~/klipper/outis to delete previous compilation data and firmware, andmake menuconfigis to compile the firmware. After execution, the following interface should appear: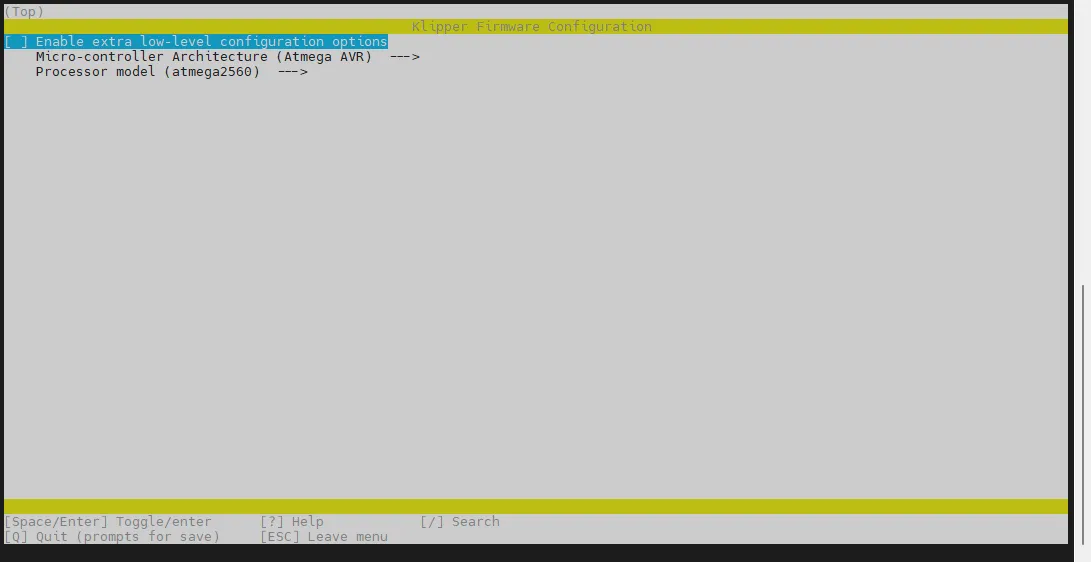
-
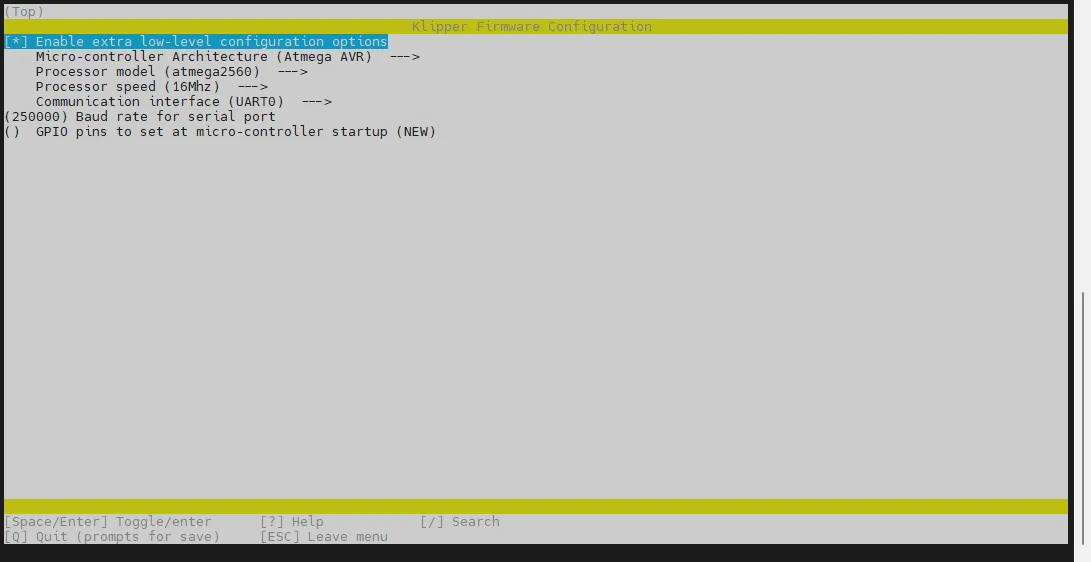
Select Enable extra low-level configuration options and press Enter
-
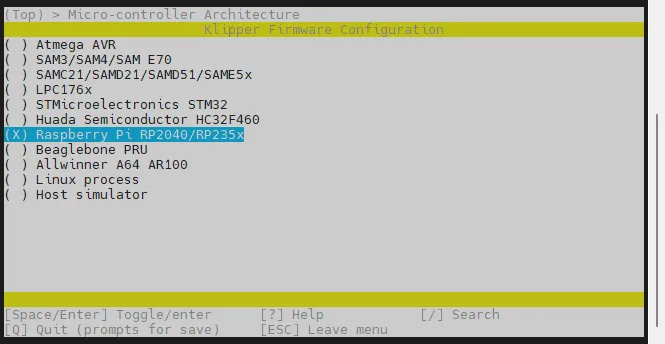
Enter the menu Micro-controller Architecture and then select Raspberry Pi RP2040/RP235x and press Enter
-
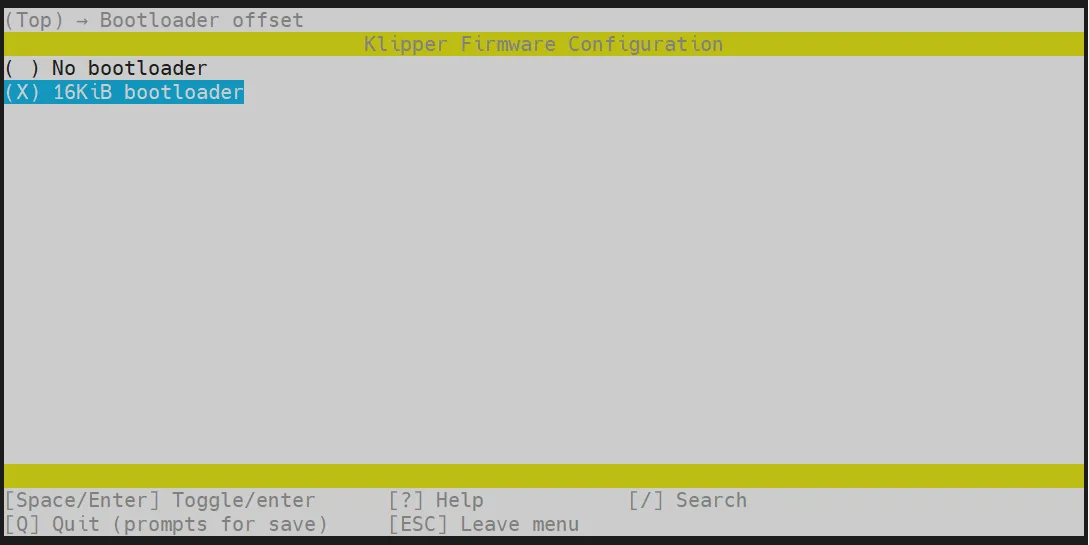
Select Bootloader offset, select: 16KiB bootloader
-
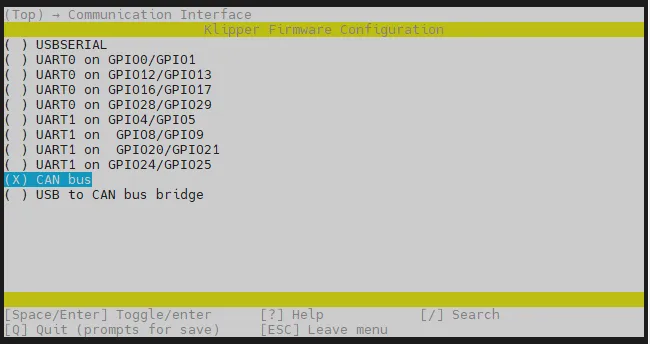
Select Communication interface, select: CAN bus
-
Select
(4) CAN RX gpio number, delete4and input1 -
Select
(5) CAN TX gpio number, delete5and input0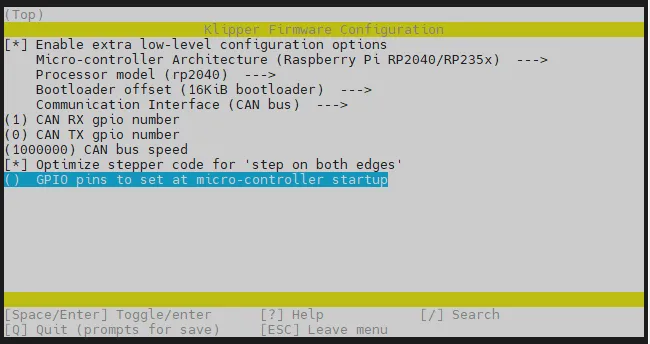
- Select GPIO pins to set at micro-controller startup, input: !gpio18
Please enter !gpio18 in English input mode.
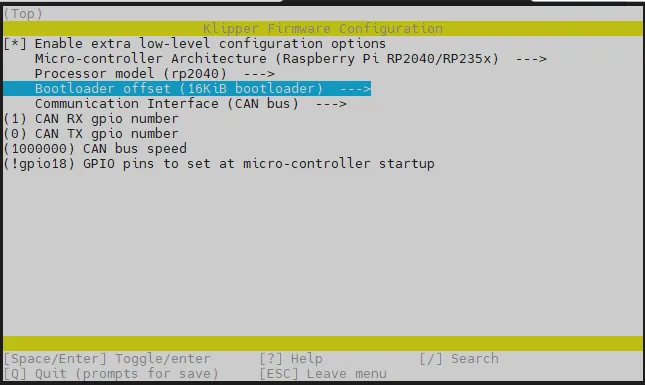
- Please check against the above image to ensure it matches the image, then proceed to the next step
- Press
Qkey, a Save configuration message will appear, pressYagain at this time
- Now the configuration should be saved and exited back to the command line interface
- Enter the following command to start compiling, it may take some time
make -j4
-
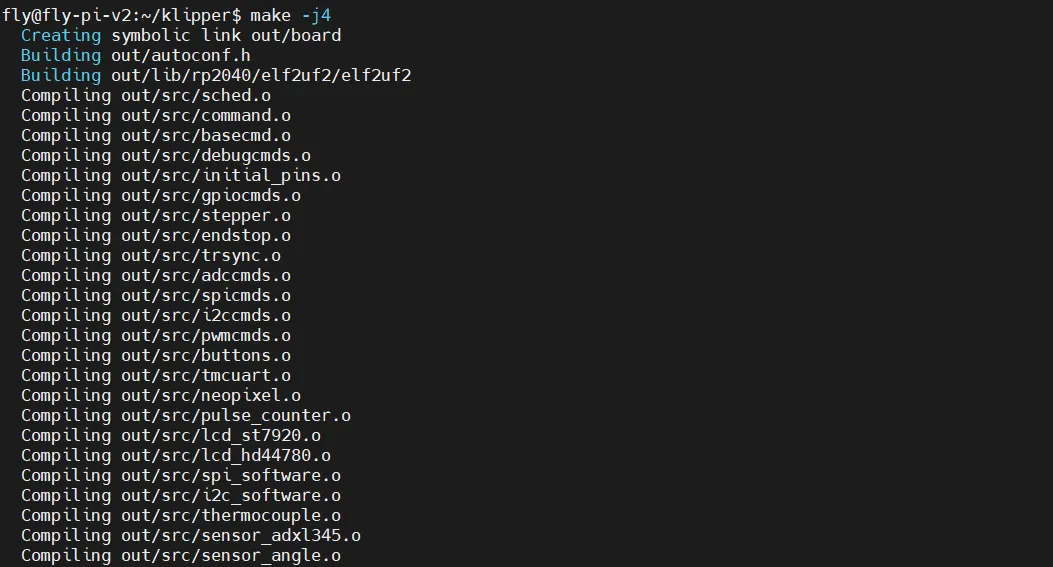
If the output is as follows, compilation is successful
Linking out/klipper.elf
Creating bin file out/klipper.bin
Host Computer Configuration
If your host computer is a FLY host computer, skip the Host Computer Configuration step.
If your host computer is a non-FLY host computer, please execute the following steps
Check if the Host Computer Supports CAN
- If it is a FLY host computer, no action is required for this step
- If your system is
Ubuntu, you need to configureUbuntu CAN0, but this document has not been updated yet - Enter the following command to check if the system supports CAN
sudo modprobe can && echo "Your kernel supports CAN" || echo "Your kernel does not support CAN"
- After entering the above command, if your kernel supports CAN, it will return:
Your kernel supports CAN; if it does not support, it will return:Your kernel does not support CAN.
If the return is Your kernel supports CAN, you can proceed to the next step of configuring CAN0; if the return is Your kernel does not support CAN, please replace the host computer system or change the host computer!
Configure CAN0
- This command overrides the original system CAN0 configuration, and the system needs to be restarted after execution
- Choose one according to the actual situation (Klipper default CAN speed is 1M, it is recommended to use 1M speed)
For 1M speed, enter the following command
sudo /bin/sh -c "cat > /etc/network/interfaces.d/can0" << EOF
    allow-hotplug can0
    iface can0 can static
        bitrate 1000000
        up ifconfig $IFACE txqueuelen 1024
        pre-up ip link set can0 type can bitrate 1000000
        pre-up ip link set can0 txqueuelen 1024
EOF
For 500K speed, enter the following command
sudo /bin/sh -c "cat > /etc/network/interfaces.d/can0" << EOF
allow-hotplug can0
iface can0 can static
    bitrate 500000
    up ifconfig $IFACE txqueuelen 1024
    pre-up ip link set can0 type can bitrate 500000
    pre-up ip link set can0 txqueuelen 1024
EOF
- Restart the device
sudo reboot
Confirm Whether Entering Burning Mode
- Ensure that the host computer can connect to the network normally and that the data cable connecting the lower-level machine to the host computer has data transmission function.
- After SSH connecting to the host computer, enter
lsusband press Enter. If the information circled in the image below appears, you can proceed to the next step.- If there is no feedback, this indicates an issue with the host computer system, and we are unable to help. You need to replace with a confirmed normal system or change the host computer.
- If the prompt says there is no
lsusbcommand, you can run the following command to install it:sudo apt-get install usbutils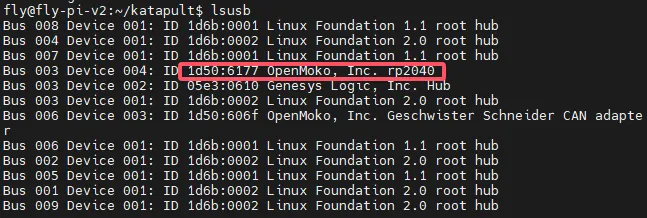
- The suffix of
OpenMoko, Inc. Geschwister Schneider CAN adapterserves as a basis for judgment.- Some host computers may display incomplete or no information due to system issues.
Burn Firmware
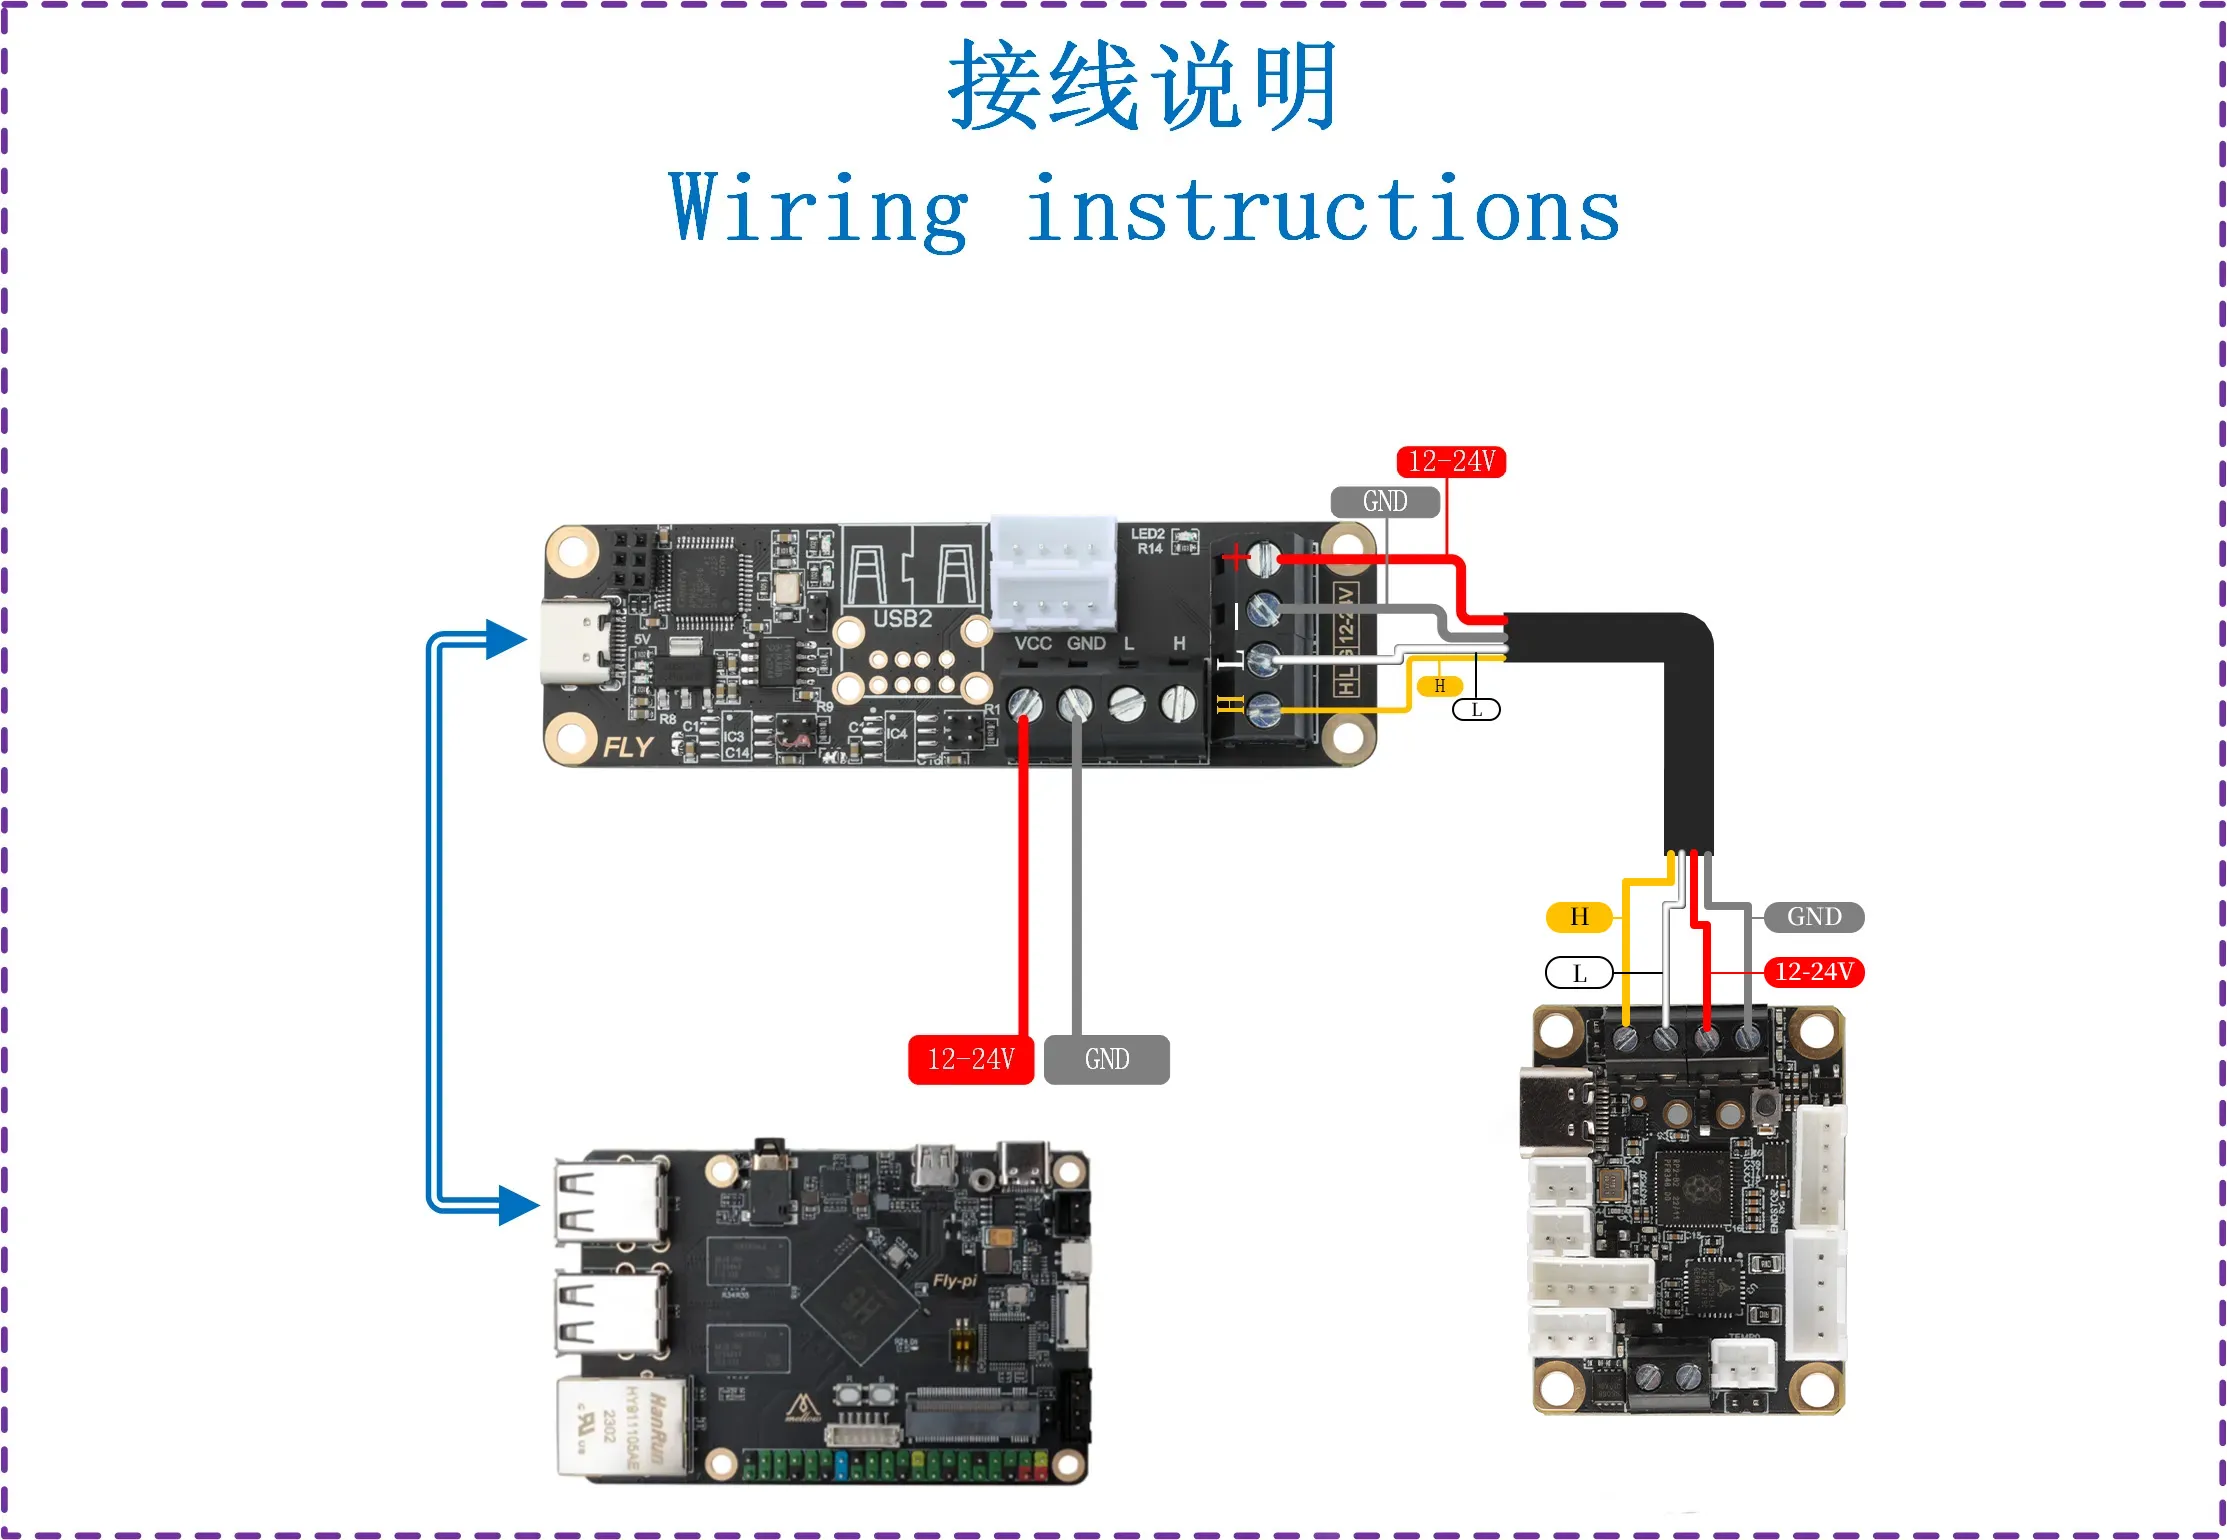
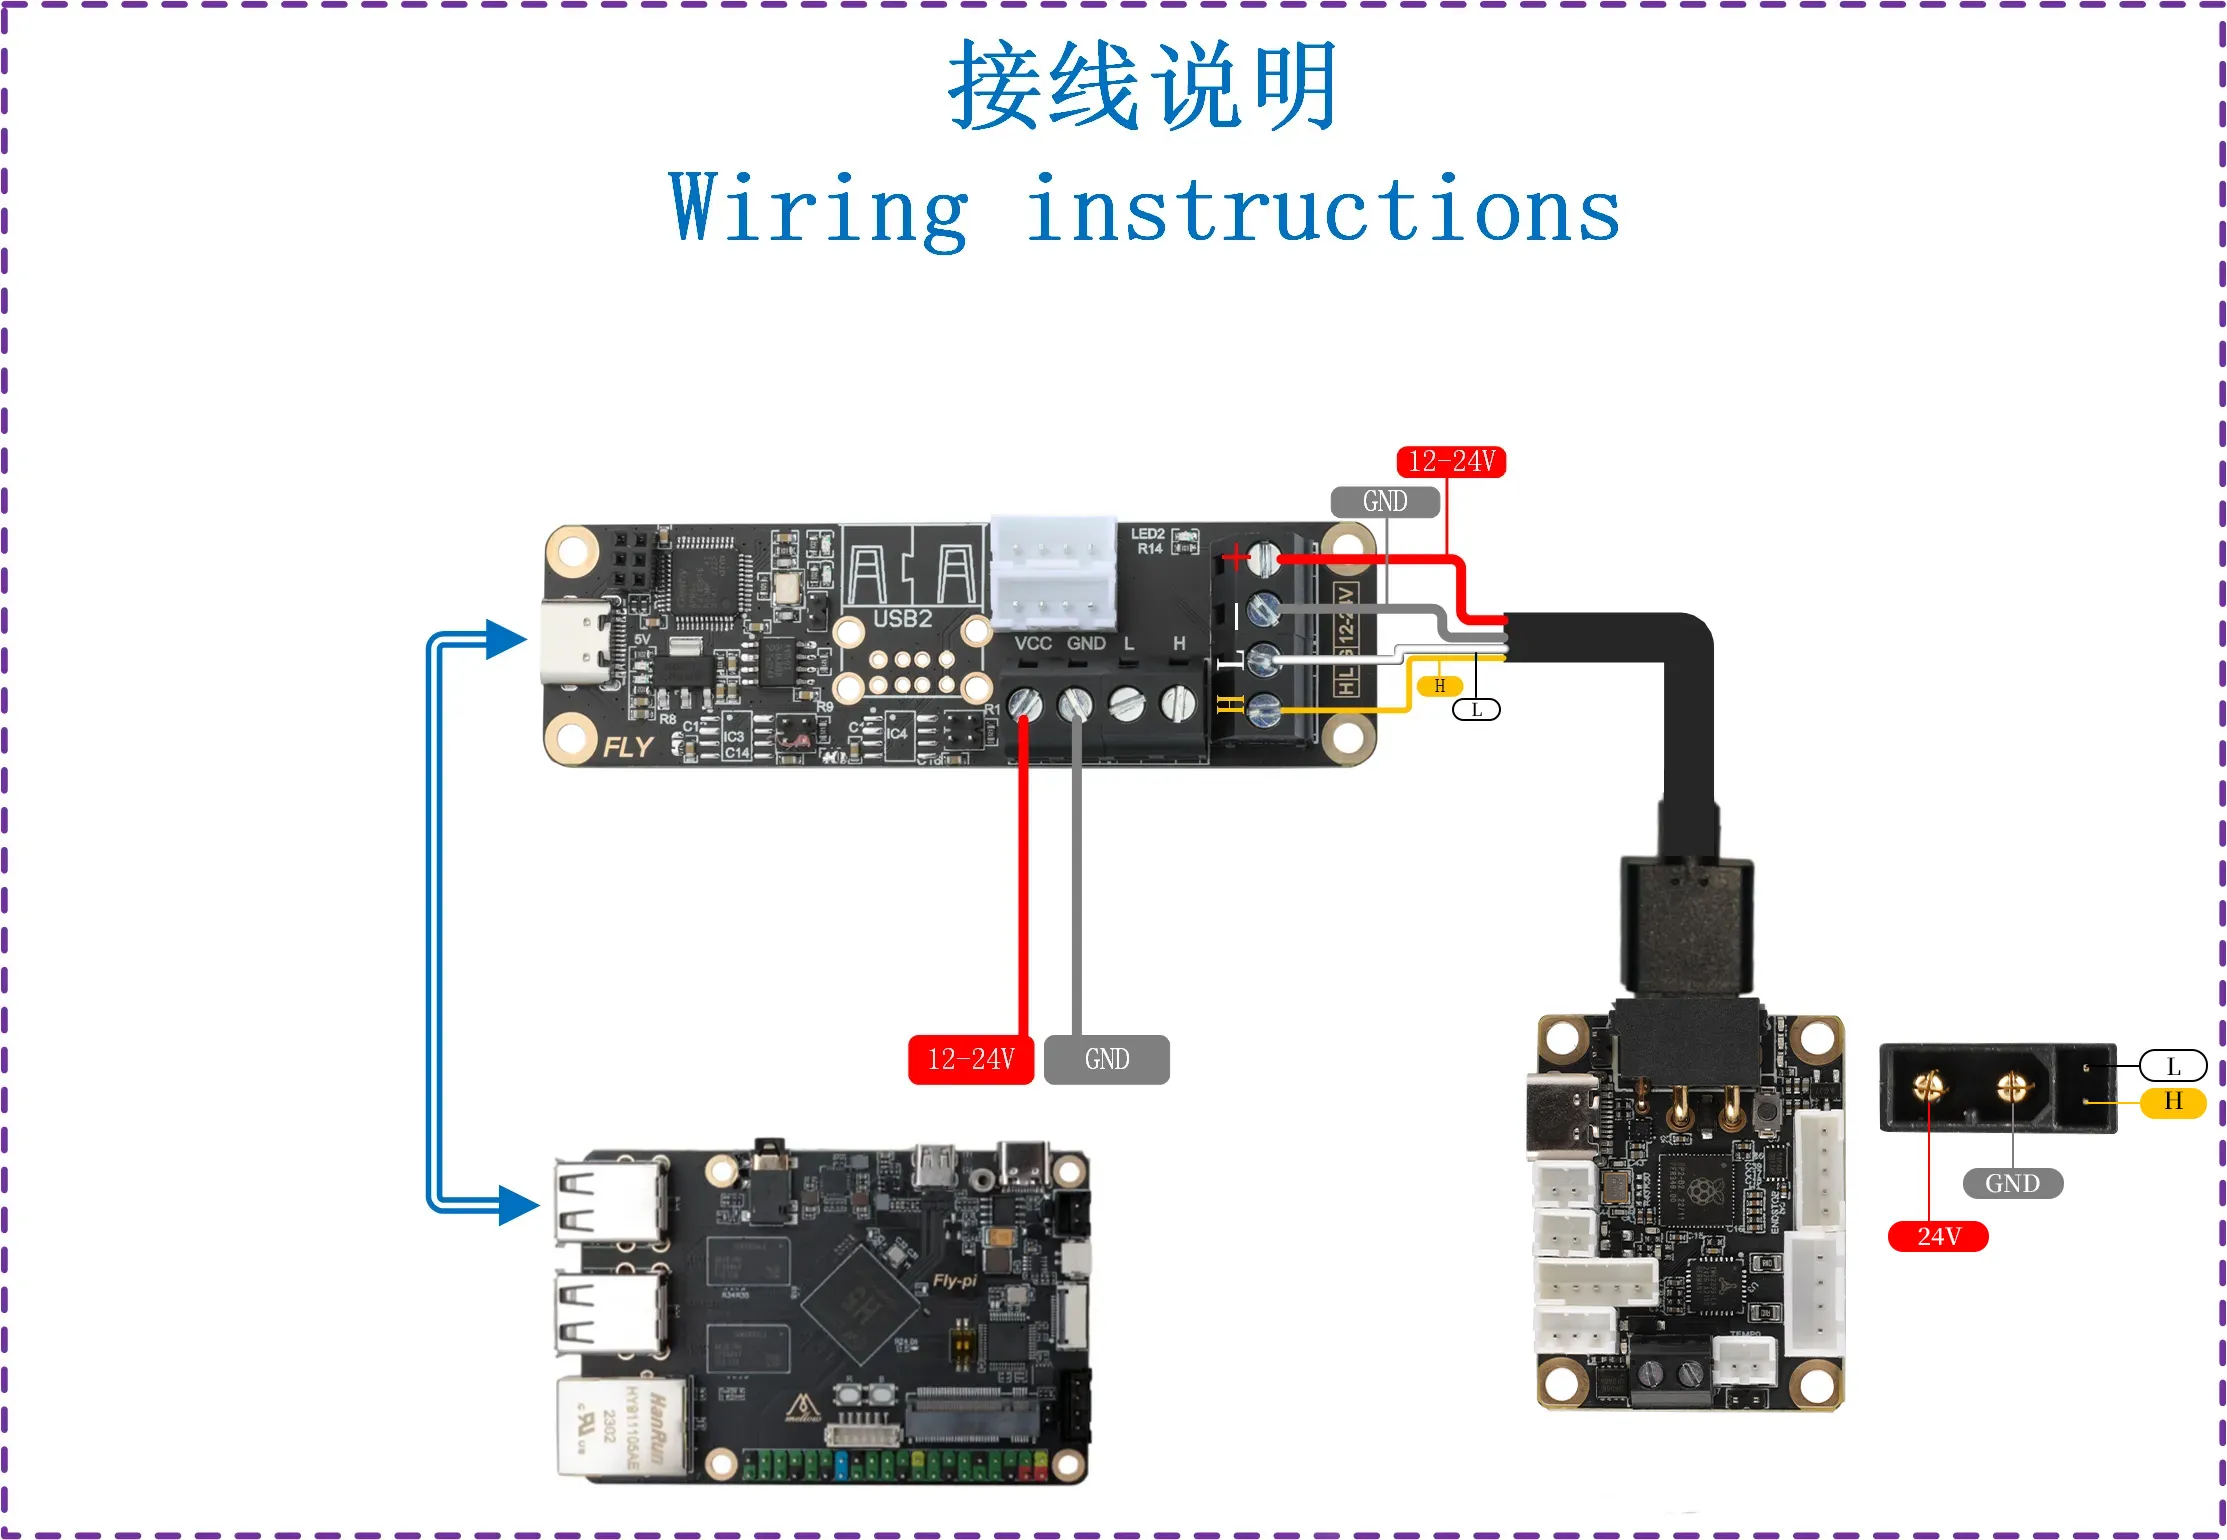
- Before burning the firmware, use an XT30 data cable to connect the tool board to UTOC or the main board flashed with bridge firmware. Below is the reference wiring diagram
- Pay attention to whether the DIP switch is set to the corresponding position
KF Interface Diagram
XT30 Interface Diagram
- Ensure that the resistance between CAN H and CAN L is measured with a multimeter in the range of
60Ωwhen powered off. If it is120Ω, a120Ωjumper must be connected; if it is around40Ω, the jumper must be removed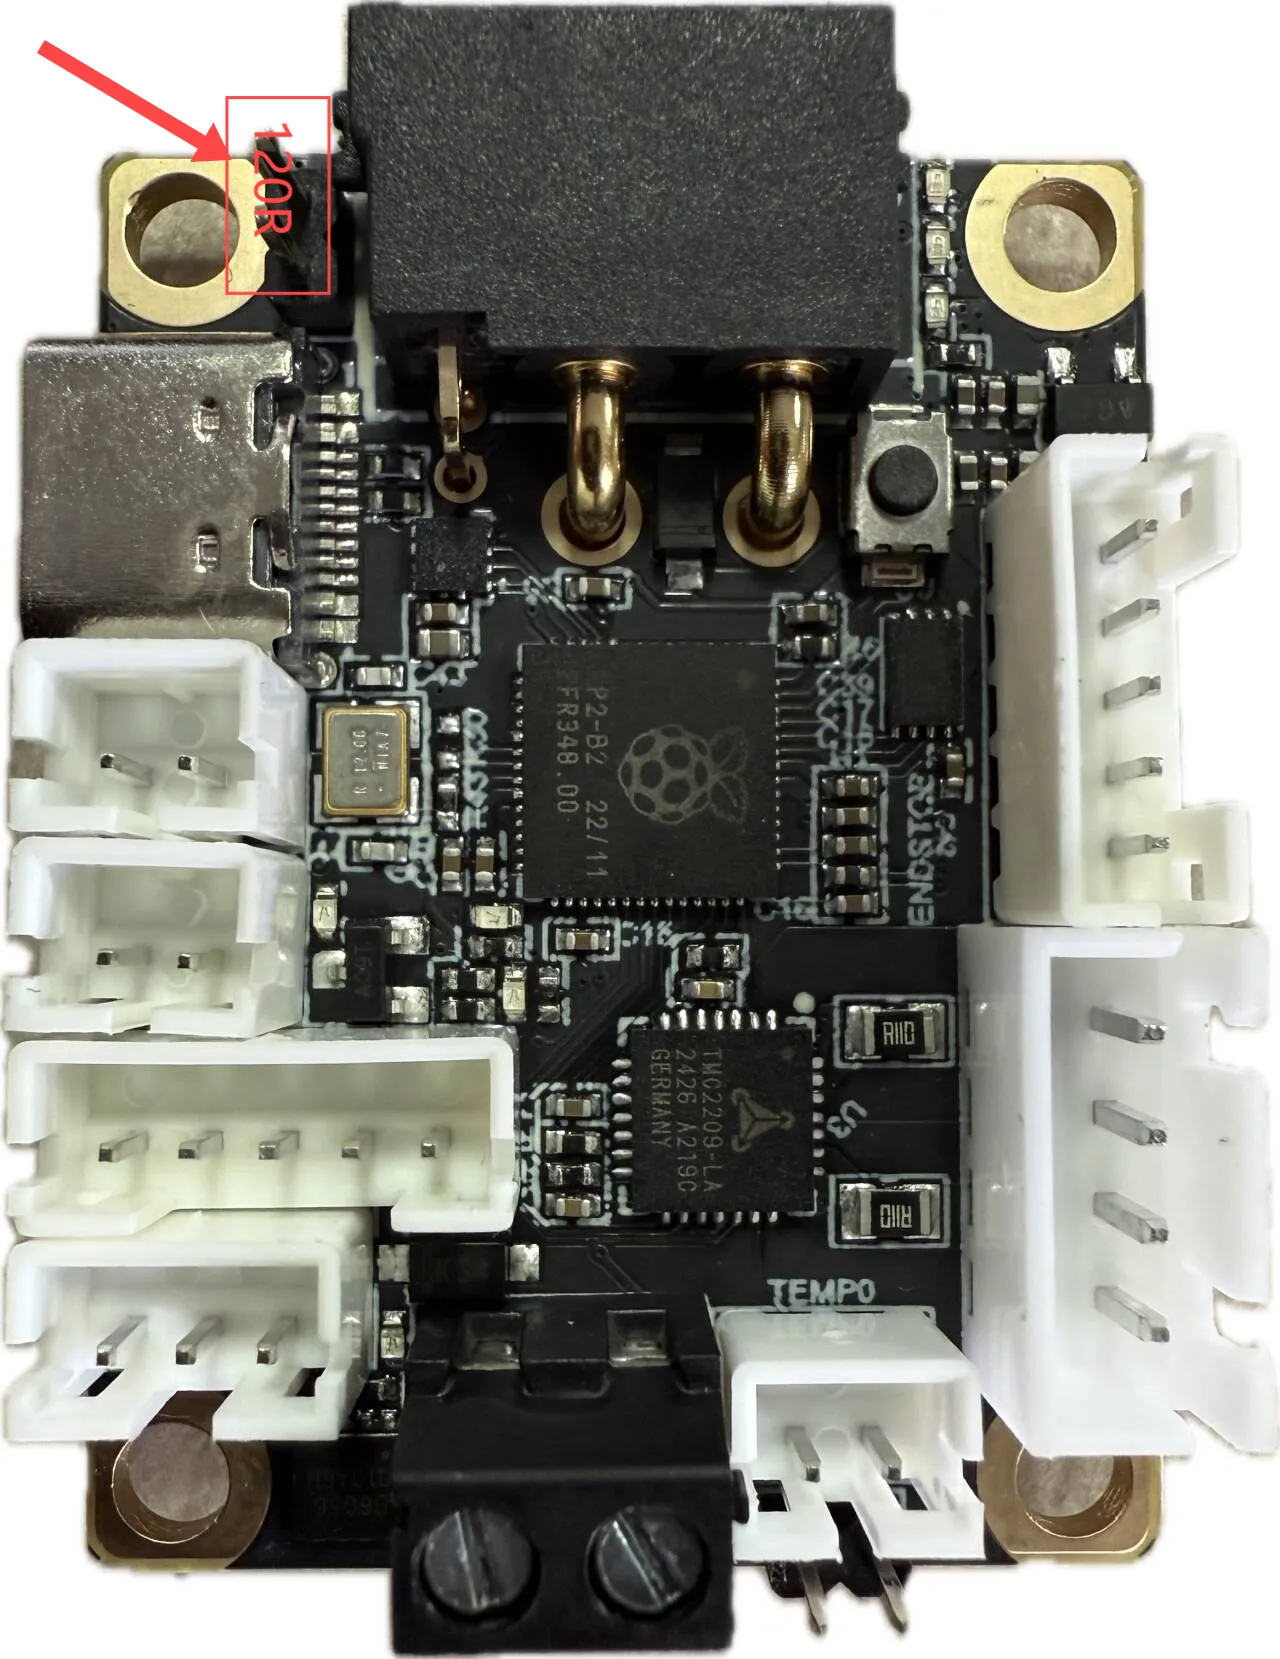
- It is recommended not to find the ID or flash the firmware during the printing process.
- The CAN firmware of the same motherboard or tool board Katapult and the CAN firmware of Klipper have completely consistent IDs.
- Please ensure that the CAN network of the host computer has been configured.
- You can use the following command to search for the CAN ID only when
1d50:606fappears after runninglsusb. - The CAN rate of the tool board must be consistent with the host computer, otherwise the ID cannot be found and burned.
-
Execute the following command to query the CANBus UUID:
~/klippy-env/bin/python ~/klipper/scripts/canbus_query.py can0Use this command to burn the
fastsystem, replace<your motherboard ID>with the ID queried in the previous step.python ~/klipper/scripts/canbus_query.py can0-
After inputting, one of the following situations will appear depending on your machine, the following are references:
- First type: The motherboard with the bridge firmware installed will display an ID and prompt
Application: Klipper
- Second type: The motherboard with the bridge firmware installed and the tool board that needs to be burned with firmware will display two IDs

- Third type: Using UTOC with the tool board that needs to be burned
- Tip: UTOC does not display the ID

- Fourth type: No ID prompt, usually because the klipper is occupied, the CAN0 rate of the host computer is incorrect, or there is a wiring anomaly

- First type: The motherboard with the bridge firmware installed will display an ID and prompt
-
Normally, if the tool board that needs to be burned is in the CANBOOT state, it will prompt
Application: CanBootand the corresponding firmware light will flash. At this time, you need to burn the Klipper firmware, otherwise it cannot be connected!!! -
Tip: If it is Klipper firmware and the ID has been entered into the configuration, the ID will not be displayed and will be occupied by Klipper. You need to disable the corresponding ID and restart the motherboard completely after cutting off the power.
warning- If the UUID is not queried, please refer to the documentation below.
- CAN Problem Collection
-
Firmware Burning
-
Replace
241696050c56in the following command with the UUID found in the UUID query, note that there is a space after-upython3 ~/klipper/lib/canboot/flash_can.py -u 241696050c56 -
As shown in the figure below, if
CAN Flash Successappears, the burning is successful.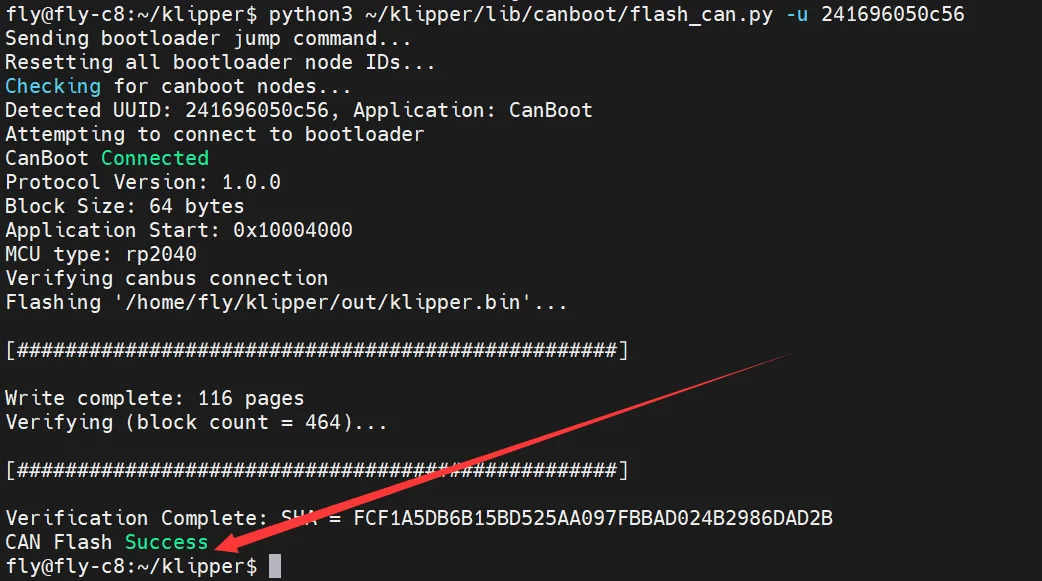
Firmware Update
- If you need to update the firmware, you only need to re-execute the burning instruction after compiling the firmware.
- But please make sure that the corresponding ID can be found or Klipper is already connected.
python3 ~/klipper/lib/canboot/flash_can.py -u <MCU ID>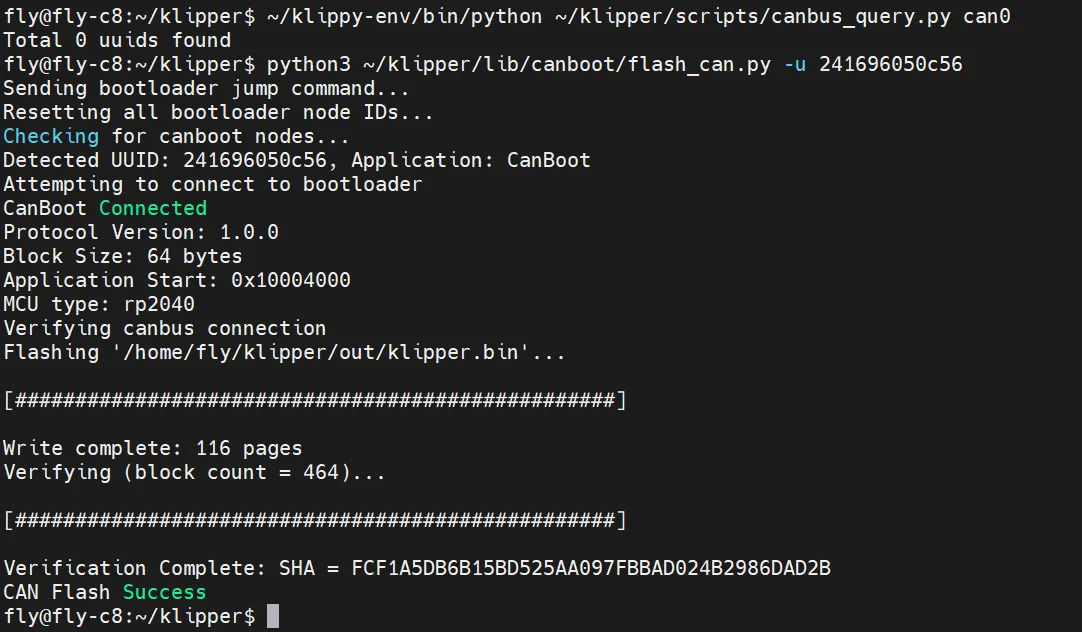
Confirm Whether the Firmware Has Started
- If the firmware starts normally, the LED will light up