CAN Firmware Compilation
Before Flashing
Confirm Current Mode and Operation Path
- Important Note: If the tool board is currently in Klipper-CAN mode, you can directly flash it via command after compiling the firmware. The command will automatically reset it into
Katapultand complete the flashing. - Factory State: The board comes pre-flashed with
Katapultfirmware in CAN mode at a rate of 1M. - Status Check (Observe LED): If the onboard LED is blinking (as shown below), it indicates it is in
Katapultmode and ready for flashing.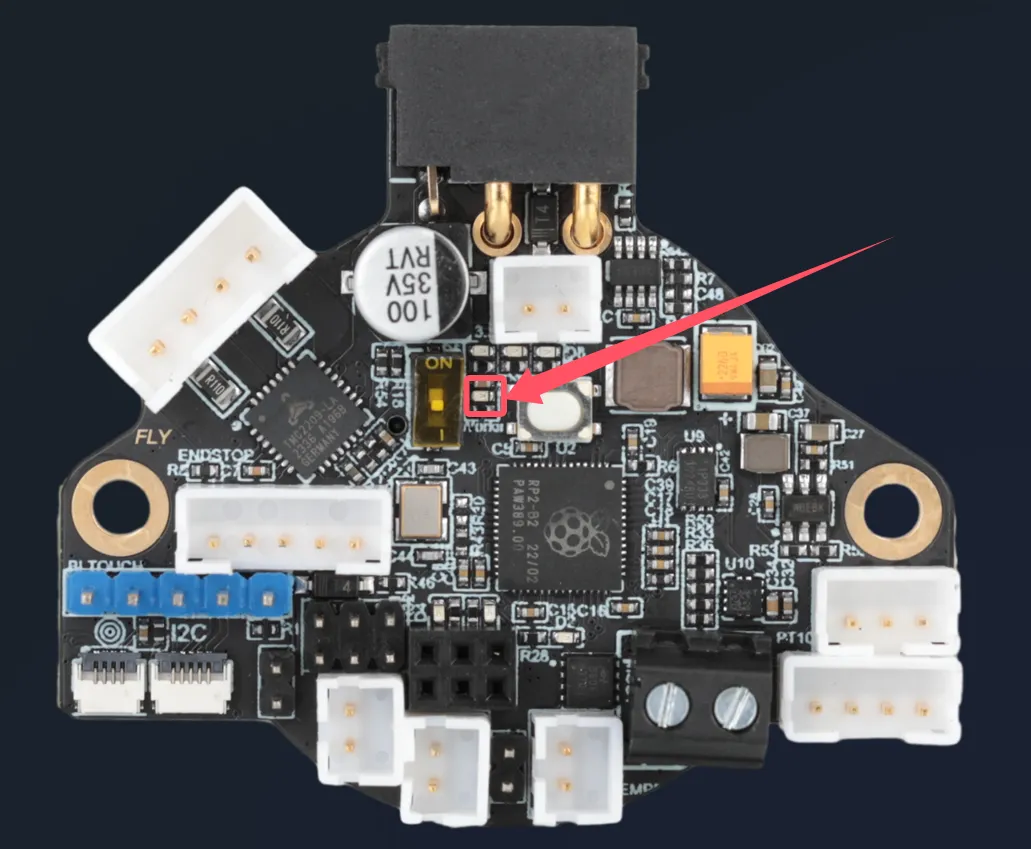
- Mode Exception: If the LED is not blinking, it means the firmware is not
Katapult. You must first re-flash it following the guide in the link below: Click here to flash Katapult firmware
Set DIP Switches and Physical Connection
-
DIP Switch Setting: Regardless of the current state, please first set the onboard DIP switch to CAN mode, and turn the
120Ωswitch ON (as shown below).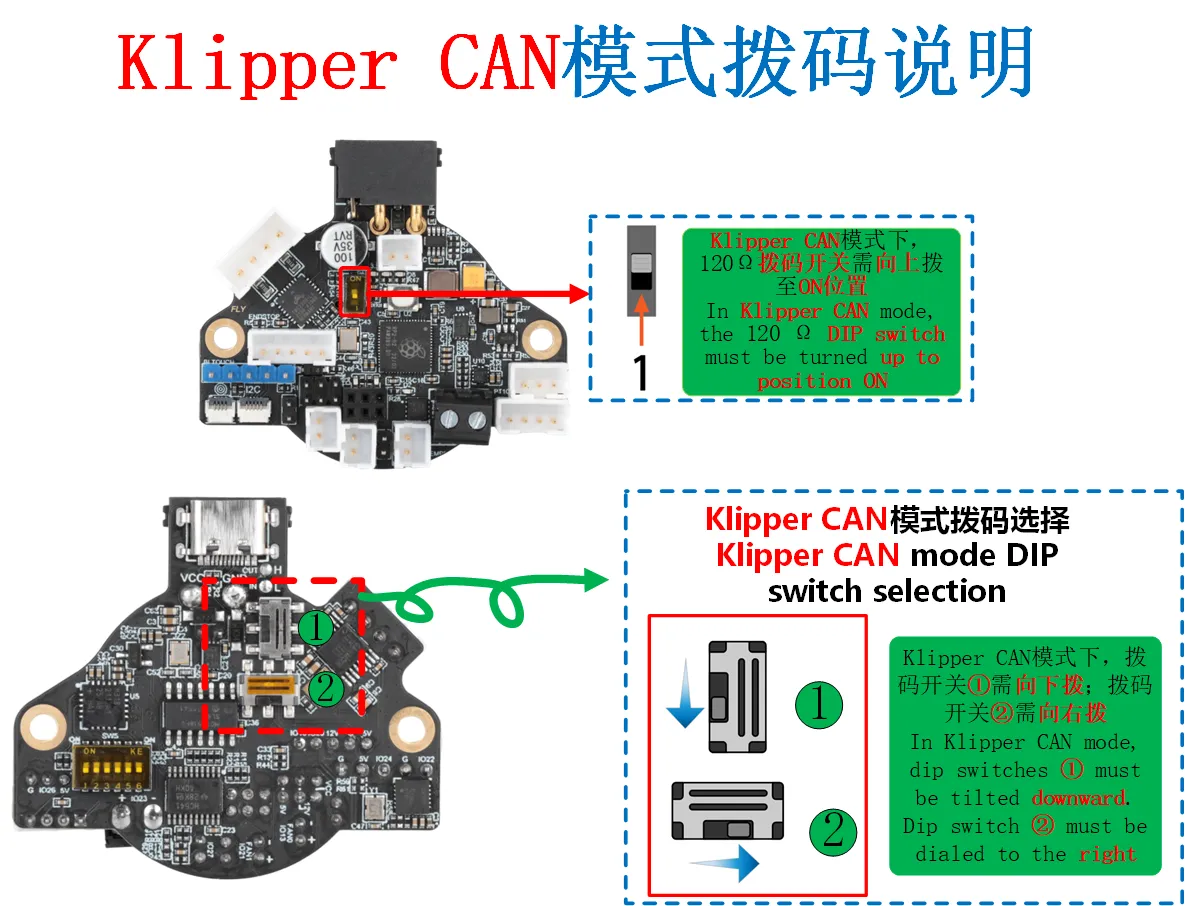
-
Device Connection: Use a CAN cable to connect the tool board to a UTOC or a mainboard that already has the bridge firmware flashed. Refer to the image below for wiring:

-
Critical Check (Termination Resistor): With the system completely powered off, use a multimeter to measure the resistance between the CAN_H and CAN_L pins.
Device Instructions Tool Board Locate and install the jumper cap labeled 120Ω.Mainboard If connected to a mainboard, also install its 120Ωjumper cap.UTOC Module Has built-in resistor. How to Check:
- Ensure the system is completely powered off.
- Use a multimeter to measure the resistance between CAN-H and CAN-L on the tool board's CAN port.
- Result Interpretation:
- Approx. 60Ω: Normal. Termination resistors at both ends are correctly connected.
- Approx. 140Ω: Possible reversal of CAN-H and CAN-L connections.
- Approx. 120Ω: The
120Ωresistor is not installed or there is a broken wire. - Approx. 90Ω: Only one
120Ωresistor is installed. - Approx. 40Ω: Possibly extra resistors present. Please check intermediate nodes.
Start Compilation
- A host computer with the
klipperservice installed Connect via SSH over network - And the device should be properly connected to the host computer
- Note: Please use a standard host computer, such as Raspberry Pi, FLY board, etc. If it is a modified host computer (e.g., WiFi dongle, Redmi devices), we cannot provide technical support due to numerous issues with such hosts
- Firmware Compilation Guide for Standard Host
- FAST System Firmware Compilation Guide
- Applies to standard host computers running systems like Raspberry Pi, FLY board, etc.
- Do not use the
ROOTuser for any operations on such hosts - Please perform operations using a regular user account
- To switch users, for the
FlyOS-Armbiansystem, please use the commandsu flyto switch to the regular user - For other systems, use the command
su <your host username>to switch to the regular user
su <your host username>
- Notes for the
FlyOS-FASTsystem- The default username for the
FAST systemisroot, and the password ismellow - Firmware compilation must be performed using the
rootuser - The
FAST systemonly has theROOTuser—you do not need to switch users!!!
- The default username for the
::: tip
- Please ensure that the host machine can connect to the network normally.
- Before compiling the firmware, use SSH to log in to the host machine via the network.
- Do not use a serial port tool to log in to the host machine.
:::
Klipper Firmware Compilation and Configuration Page Operation Instructions
::: tip
Please make sure that the keyboard input method is in half-width mode, i.e., English mode.
:::
- The key
↑(up arrow) and↓(down arrow) on the keyboard are used to move the cursor up and down to select menu items. - The confirm key
Enteror spacebarSpaceis used to check the menu or enter a sub-menu. - The exit key
ESCis used to return to the previous menu. - The
Qkey is used to exit the Klipper firmware configuration page. - When exiting the Klipper firmware configuration page and there is a prompt, press the
Ykey to save the configuration file.
::: warning
If there are fewer options in the configuration page, please first check [ ] Enable extra low-level configuration options to display some hidden options.
:::
Below is the introduction on how to compile the firmware:
-
After connecting to SSH, enter the following command and press Enter:
cd ~/klipper && rm -rf ~/klipper/.config && rm -rf ~/klipper/out && make menuconfig -
Among them,
rm -rf ~/klipper/.config && rm -rf ~/klipper/outis to delete previous compilation data and firmware, andmake menuconfigis to compile the firmware. After execution, the following interface should appear: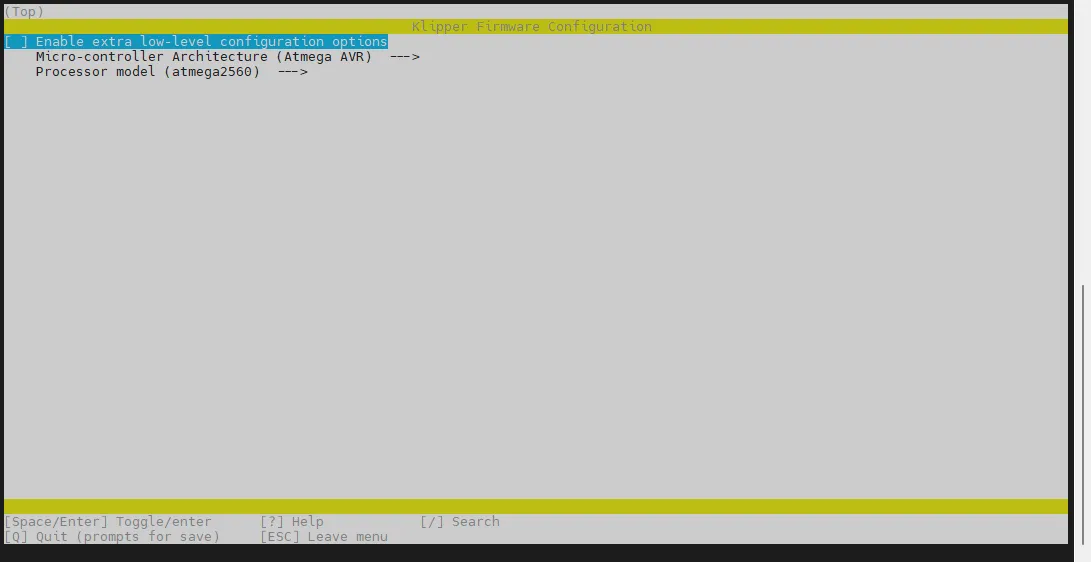
-
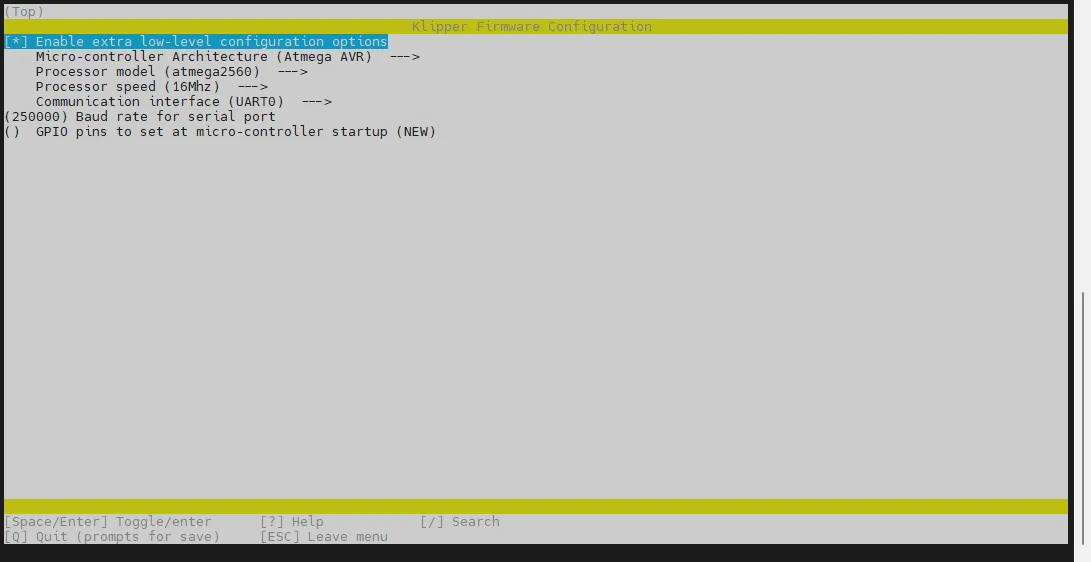
Select Enable extra low-level configuration options and press Enter
-
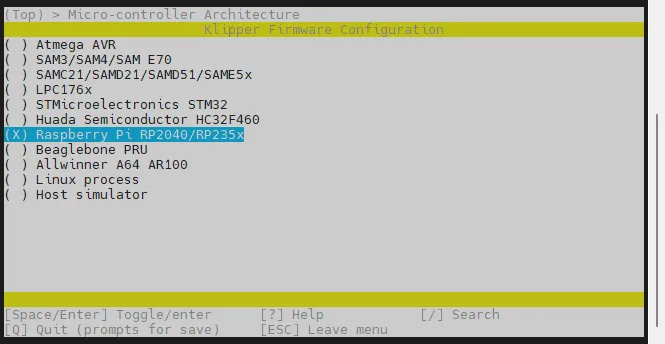
Enter the menu Micro-controller Architecture and then select Raspberry Pi RP2040/RP235x and press Enter
-
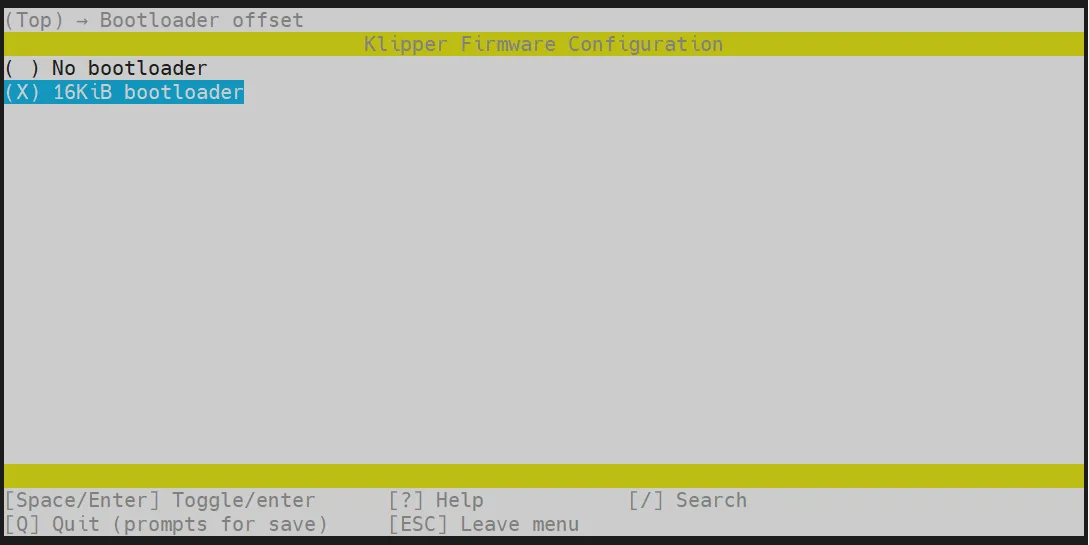
Select Bootloader offset, select: 16KiB bootloader
-
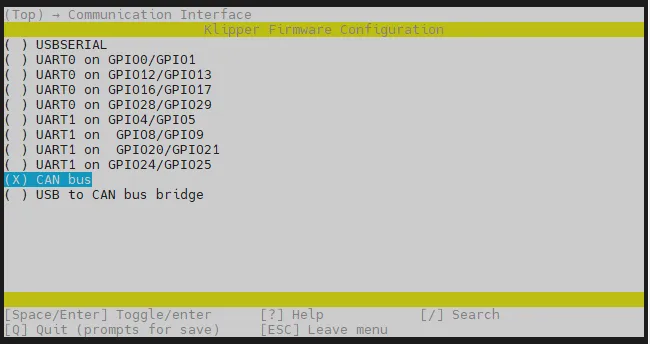
Select Communication interface, select: CAN bus
-
Select
(4) CAN RX gpio number, delete4and input1 -
Select
(5) CAN TX gpio number, delete5and input0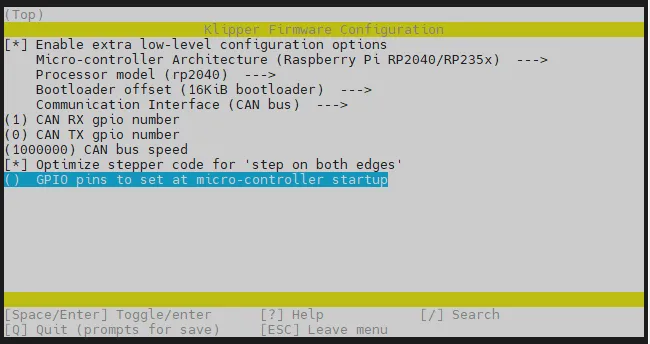
- Select GPIO pins to set at micro-controller startup, enter:
!gpio5
Please input in English keyboard layout:
!gpio5
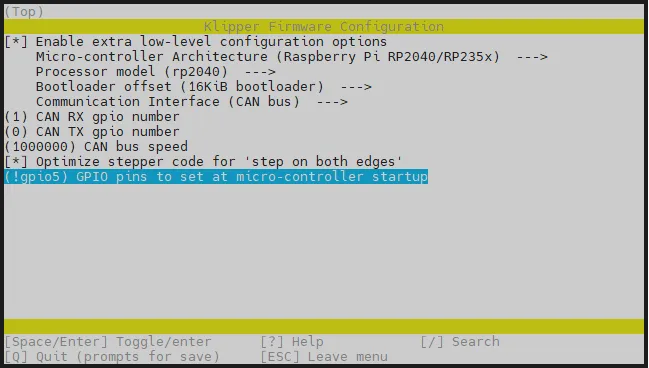
- Please compare with the image above to verify, ensure it matches exactly, then proceed to the next step
- Press the
Qkey, when Save configuration appears, then press theYkey
- You should now have saved the configuration and returned to the command line interface
- Enter the command below to start compilation. This will take some time.
make -j4
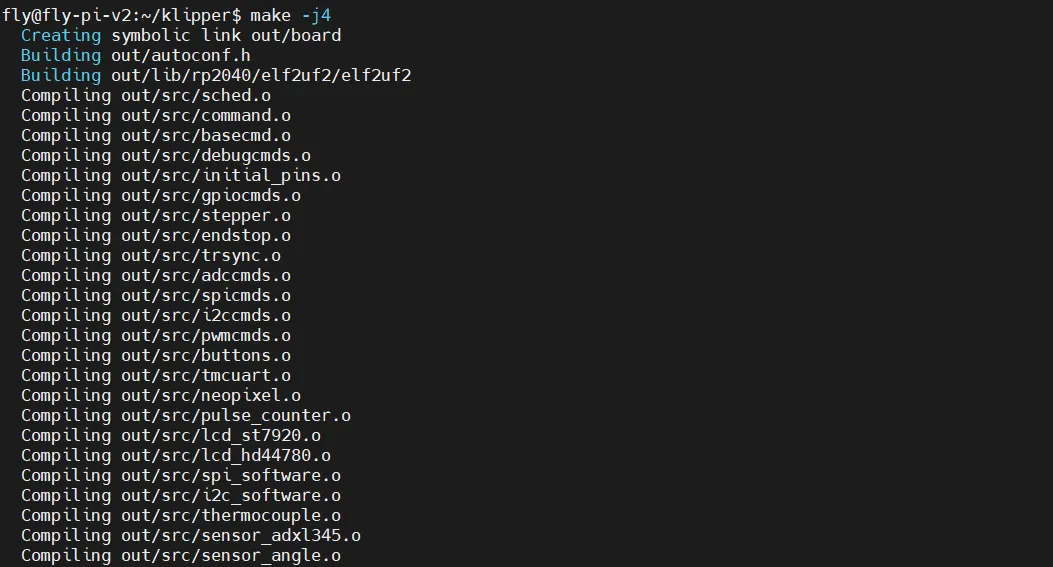
- Compilation is successful if the final output shows the following content.
- Due to Klipper version differences, the appearance of
out/klipper.binindicates success.Linking out/klipper.elf
Creating bin file out/klipper.bin
Search for ID and Flash
Search for Devices
- Now that you have successfully logged into the host computer, you can enter
lsusbto search for devices. You may encounter one of the following situations:- If entering
lsusbprompts that thelscommand is not found, you can install the required utility by entering the following command:sudo apt-get install usbutils - If there is no response after entering
lsusb, this is a system issue and cannot be resolved here. You will need to change the system or use a known working system. - If information like that shown in the image below appears, please note that this is only a reference. You only need to confirm that
1d50:606fappears:
- If entering
1d50:606fis the device you will use in this instance.- If multiple
1d50:606fdevices appear, one must be excluded, as multiple entries may affect subsequent flashing and firmware connection. For example, withFLY MINI PAD, it is recommended to use the onboardUTOCand avoid using other CAN bridges. - If the device does not appear, please check whether the data cable is properly connected and whether the correct firmware has been flashed.
You can proceed to search for the CAN ID only when 1d50:606f appears.
- It is recommended not to search for IDs or flash firmware during printing
- The CAN firmware ID of Katapult and the CAN firmware ID of Klipper are exactly the same for the same motherboard or toolboard
- Please ensure that the host computer's CAN network has been configured
- The command to search for
CAN IDcan only be used when1d50:606fappears after running lsusb - The CAN speed of the toolboard must match that of the host computer, otherwise the
IDcannot be found or the firmware cannot be flashed
- Run the following command to query the CANBus UUID:
- Fly-Armbian and general host computer search method
- Fly-FAST search method
~/klippy-env/bin/python ~/klipper/scripts/canbus_query.py can0
python ~/klipper/scripts/canbus_query.py can0
-
Several situations may occur after entering the command, depending on your machine. Below are references:
- First case: a motherboard with bridging firmware flashed, showing one ID and indicating
Application: Klipper
- Second case: a motherboard with bridging firmware flashed and a toolboard requiring firmware flashing, showing two IDs

- Third case: using
UTOCwith a toolboard requiring flashing - Note:
UTOCwill not display an ID
- Fourth case: no ID shown, usually because it is occupied by Klipper, incorrect CAN0 speed on the host computer, or wiring issues

- First case: a motherboard with bridging firmware flashed, showing one ID and indicating
-
Under normal circumstances, if the toolboard requiring flashing is in CANBOOT mode, it will show
Application: CanBootand the corresponding firmware light will be flashing. In this case, you need to flash the Klipper firmware, or else it cannot connect!!! -
Note: If it is a Klipper firmware and you have already entered the ID into the configuration, the ID will not be displayed and will be occupied by Klipper. You need to disable the corresponding ID and power off the motherboard completely before restarting it.
- If no UUID is queried, please refer to the document below
- CAN Problem Collection
Firmware Flashing
-
Replace
241696050c56in the command below with the UUID found earlier. Please note there is a space after-upython3 ~/klipper/lib/canboot/flash_can.py -u 241696050c56 -
As shown in the figure below, if
CAN Flash Successappears, the flashing is successful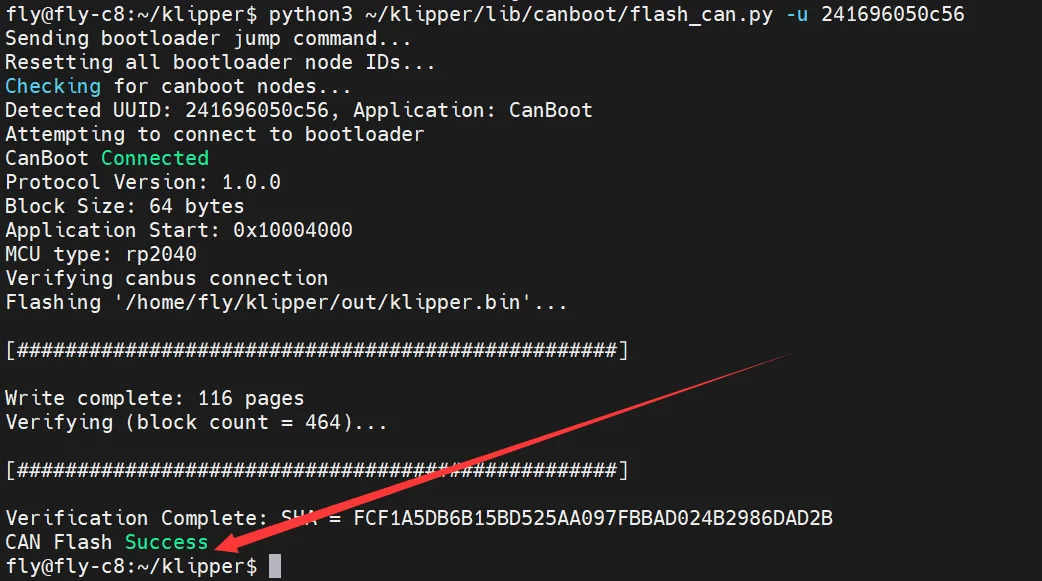
Firmware Update
- To update the firmware, simply recompile the firmware and execute the flashing command again to update it
- However, please ensure that the corresponding ID can be found or that Klipper has already connected
python3 ~/klipper/lib/canboot/flash_can.py -u <MCU ID>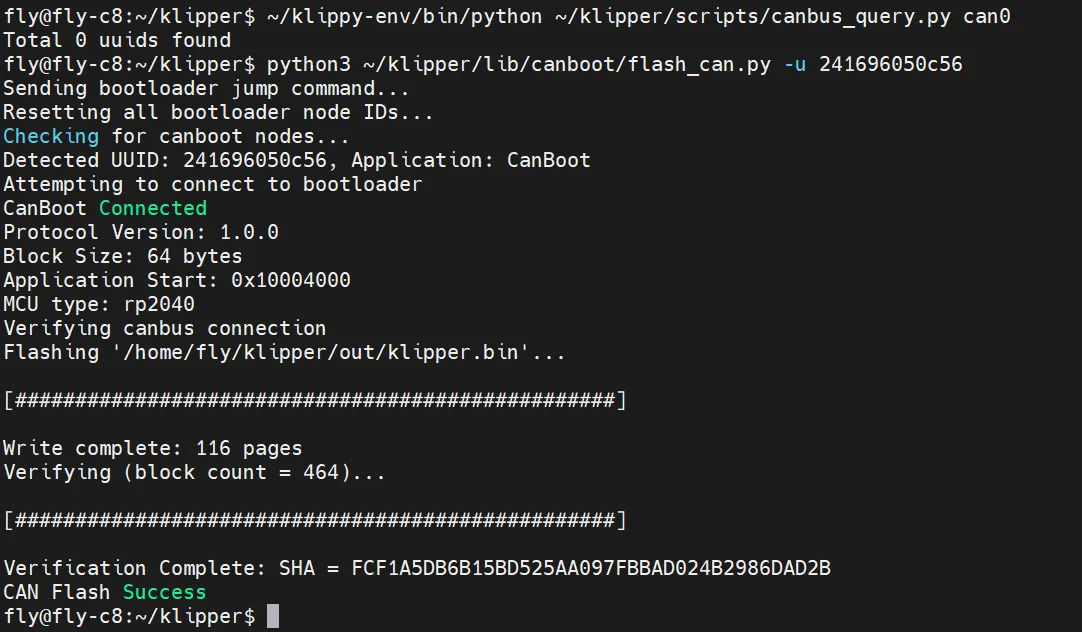
Confirm Firmware Startup
- If the firmware starts normally, the LED will light up.