Connecting Klipper
- This tutorial is only applicable for flashing Klipper firmware onto the Fly-Buffer-Plus buffer board.
- The original firmware will be overwritten after flashing and its original functionality will no longer work.
- To restore original functionality, you will need to write macros yourself or re-flash the original factory firmware.
Flashing BL
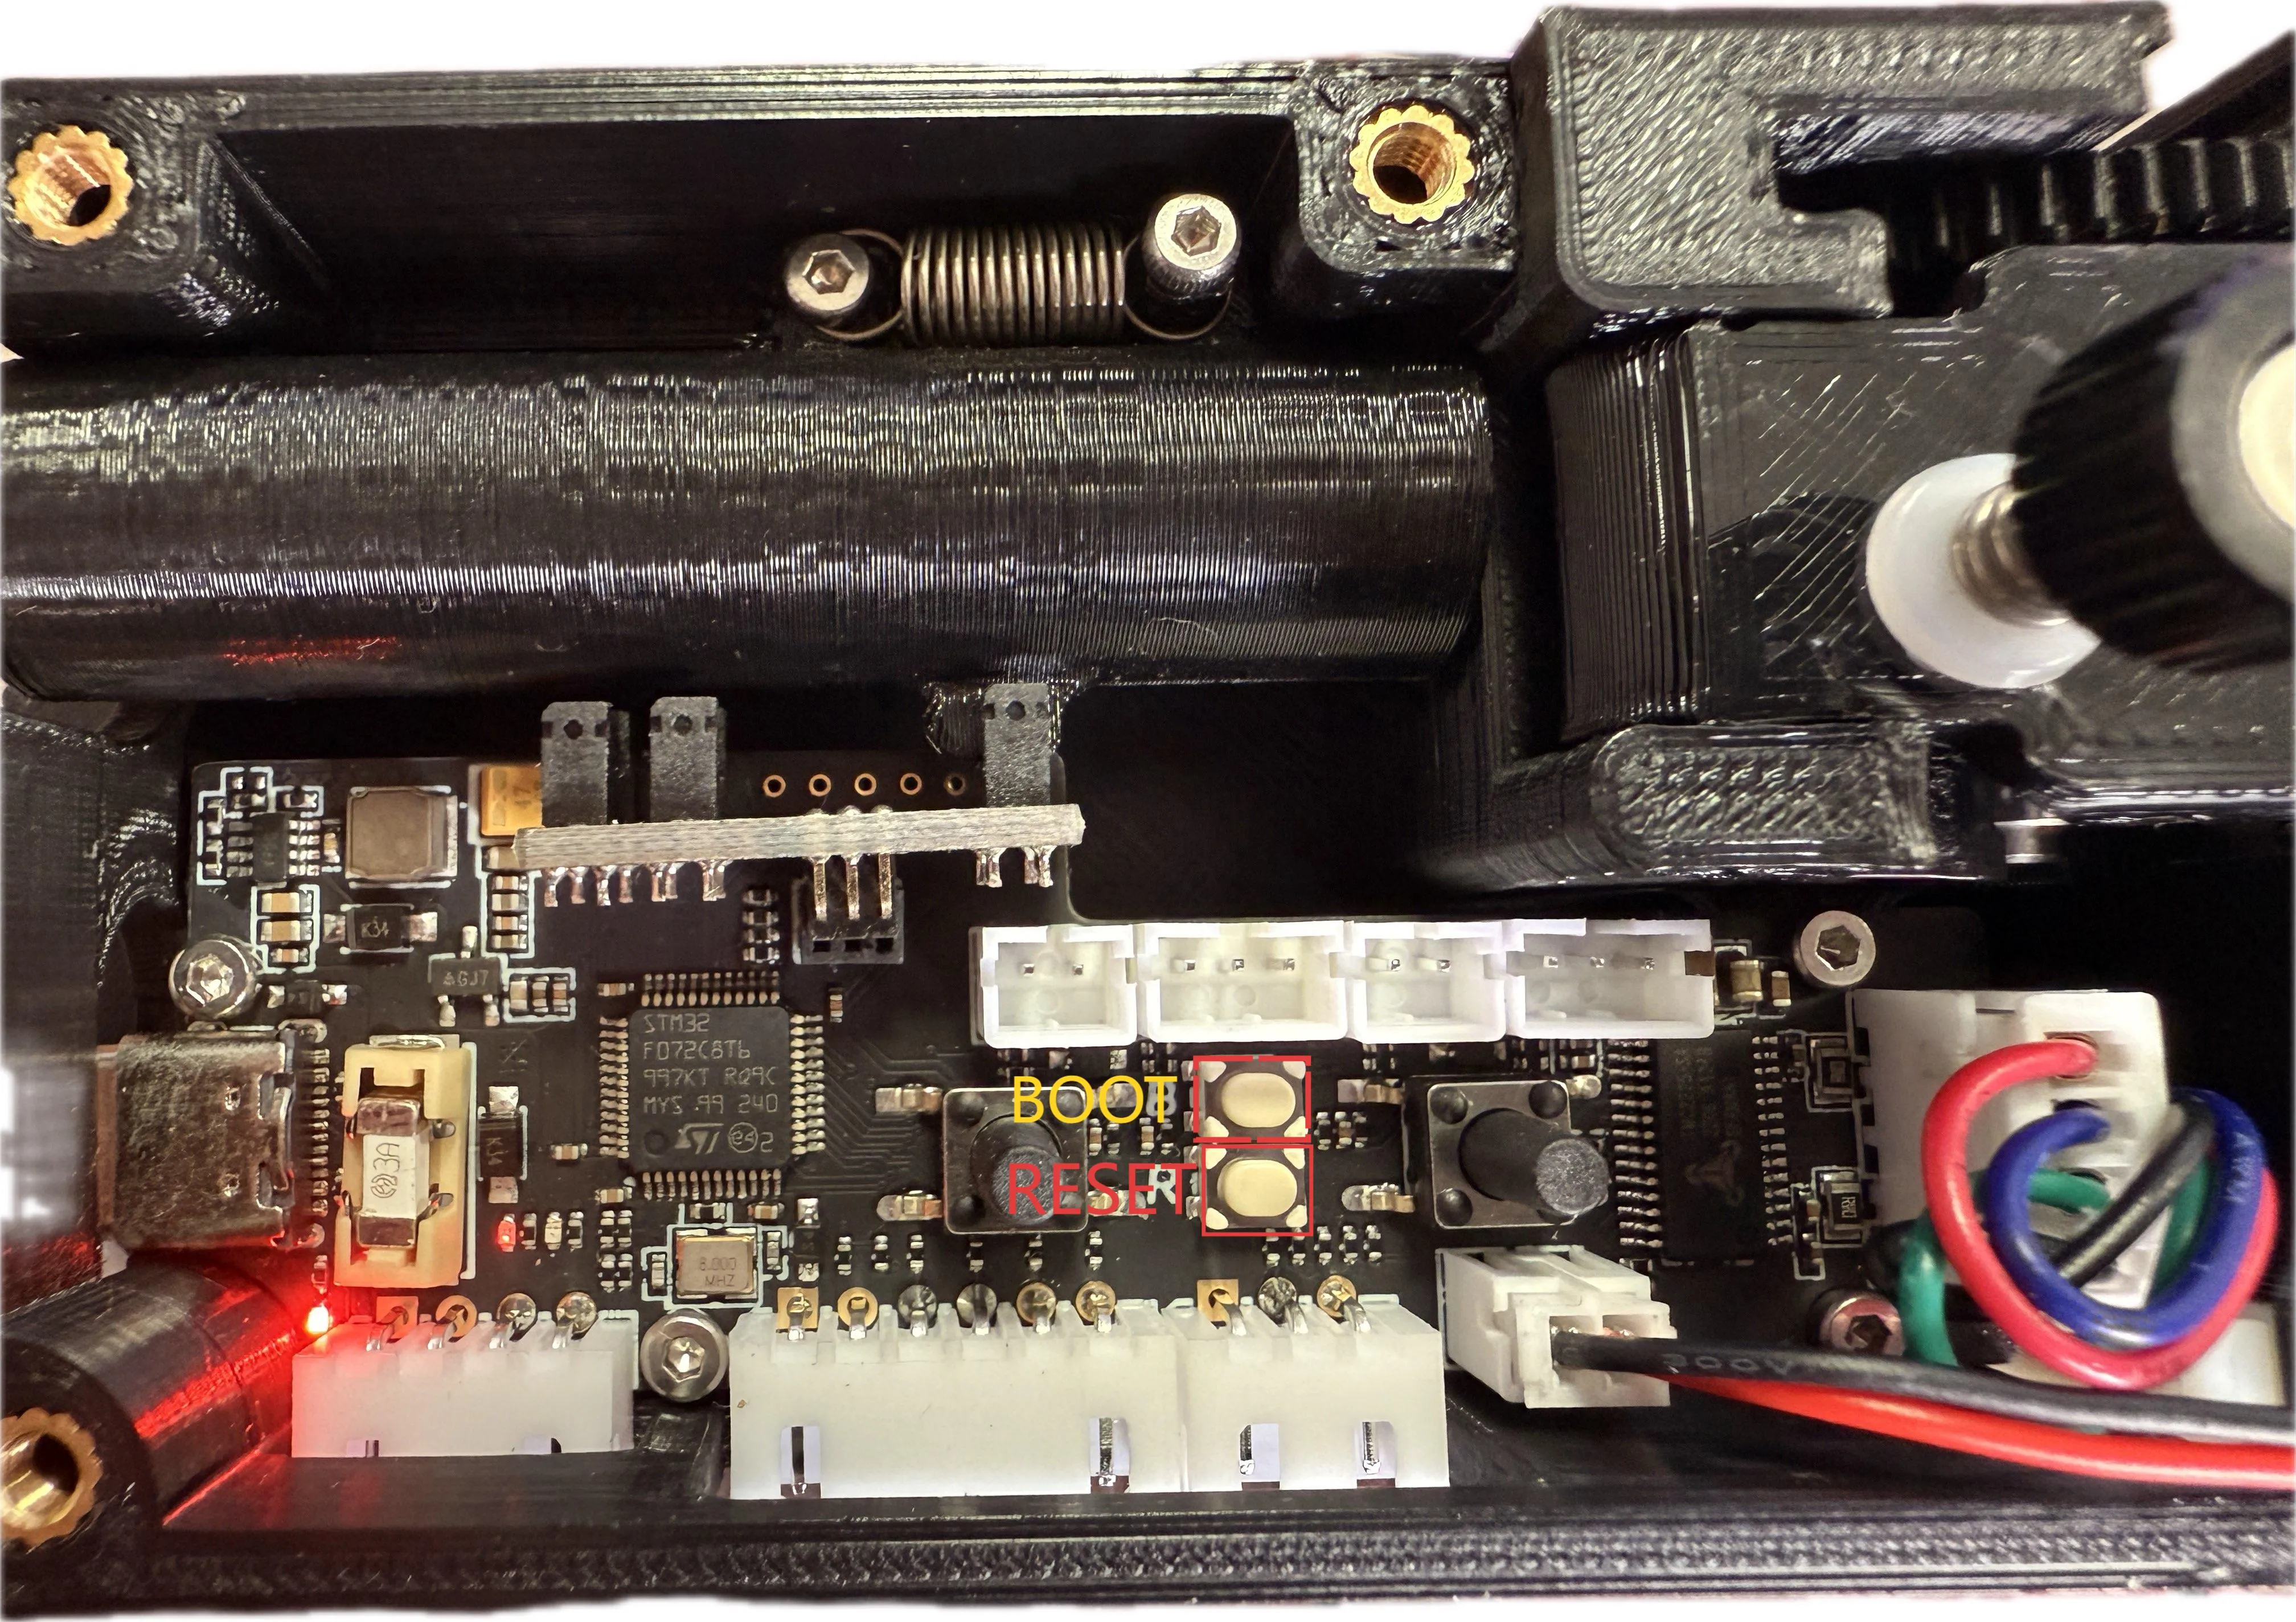
Entering flashing mode
- There are two ways to enter flashing mode:
- First method: With the tool board completely powered off, press and hold the BOOT button, then connect one end of a data-capable TYPE-C cable to the mainboard and the other end to your device.
- Second method: Connect one end of a data-capable TYPE-C cable to the mainboard and the other end to your device, then press the BOOT button followed by the RST button. Release the RST button first, then release the BOOT button.
Flashing firmware
- Windows flashing tutorial
- Host flashing tutorial
- Buffer board BL firmware
- Click on the download link below
-
Loading...
USB3.0may fail to flash, please try to use the computer'sUSB2.0for flashing- If flashing still fails, please try using the host computer to flash
- If the following error appears, please use a USB hub

- Flashing tool Download Link
- Please download
SetupSTM32CubeProgrammerandSTM32 DFU driver - Download the firmware to any directory on your computer
- Connect the main board to the computer using a Type-C cable, and ensure it has entered
dfuflashing mode - In STM32CubeProgrammer, select USB mode, then refresh and connect
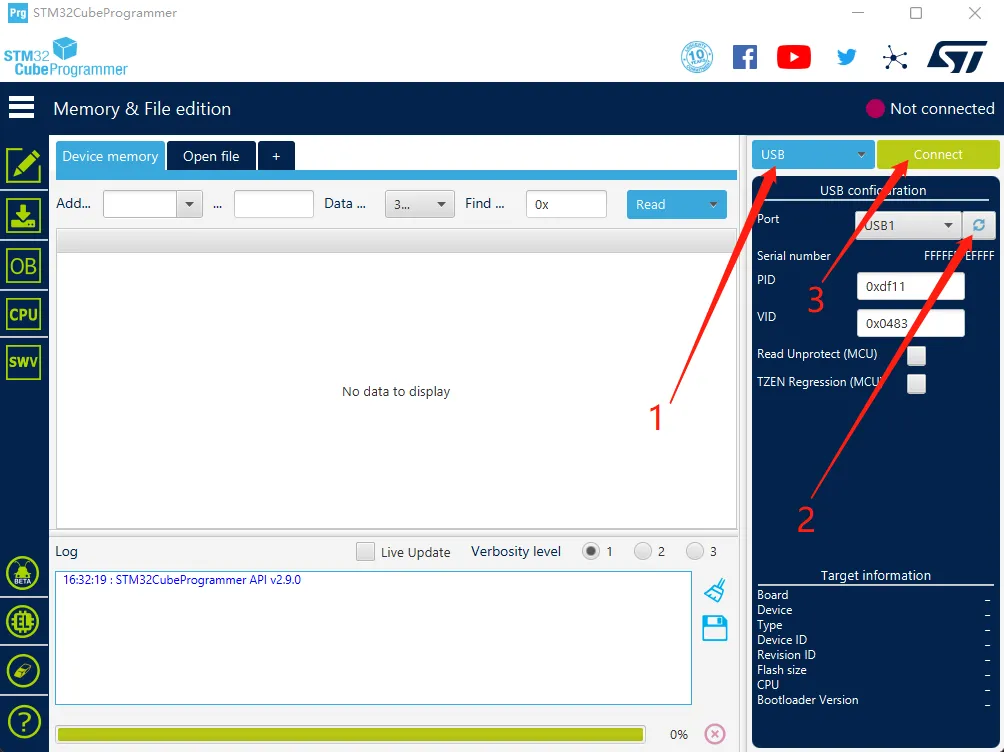
- If no error pop-up appears, the connection is successful.
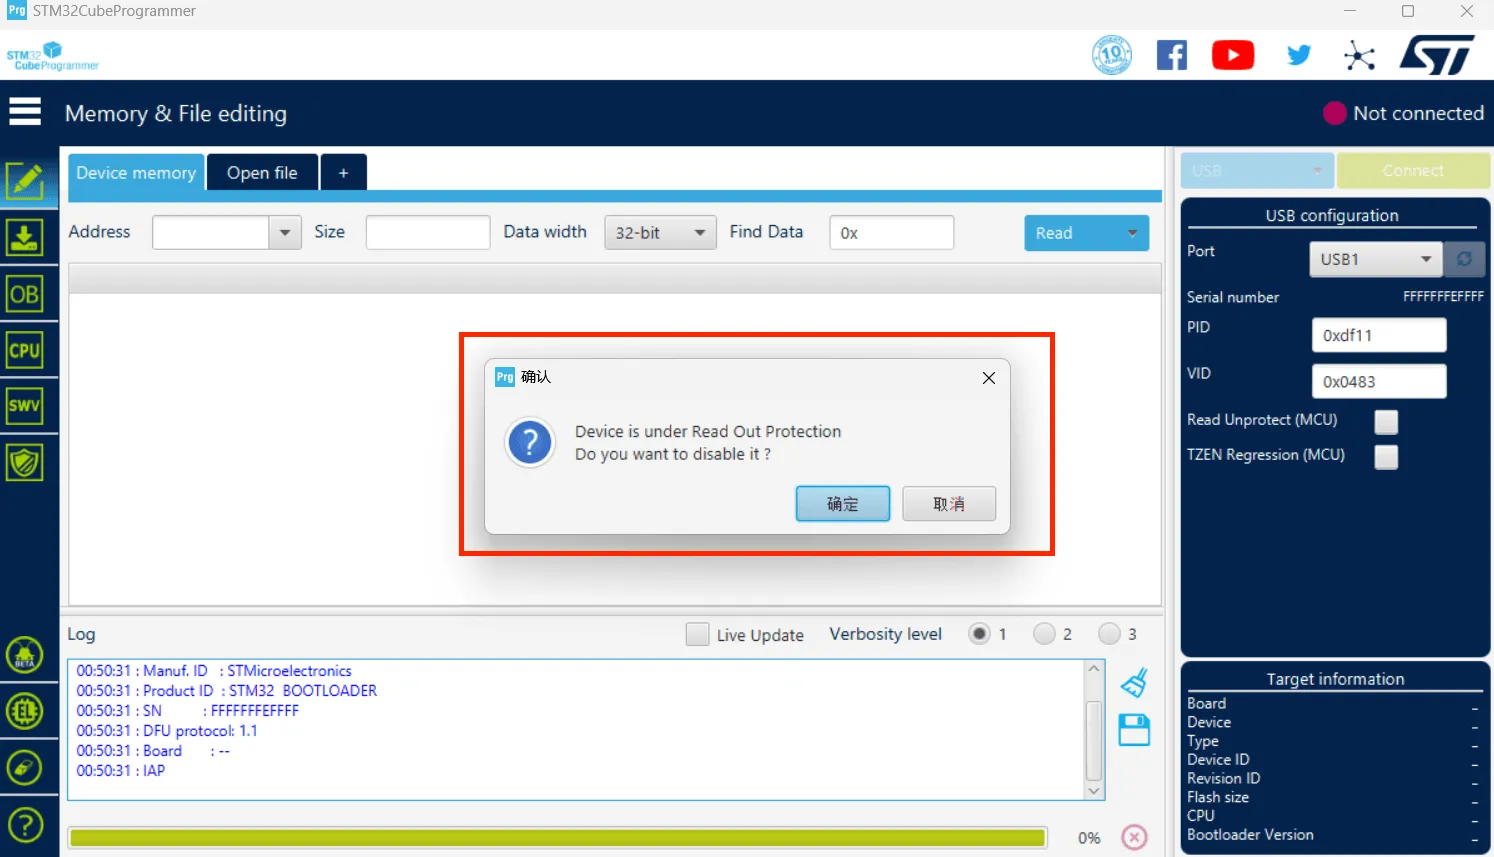
Warning
If the following screen appears, it indicates a computer or software issue. Please flash using the host computer: Host Computer Flashing Tutorial
- Click the download icon on the left and select the options below
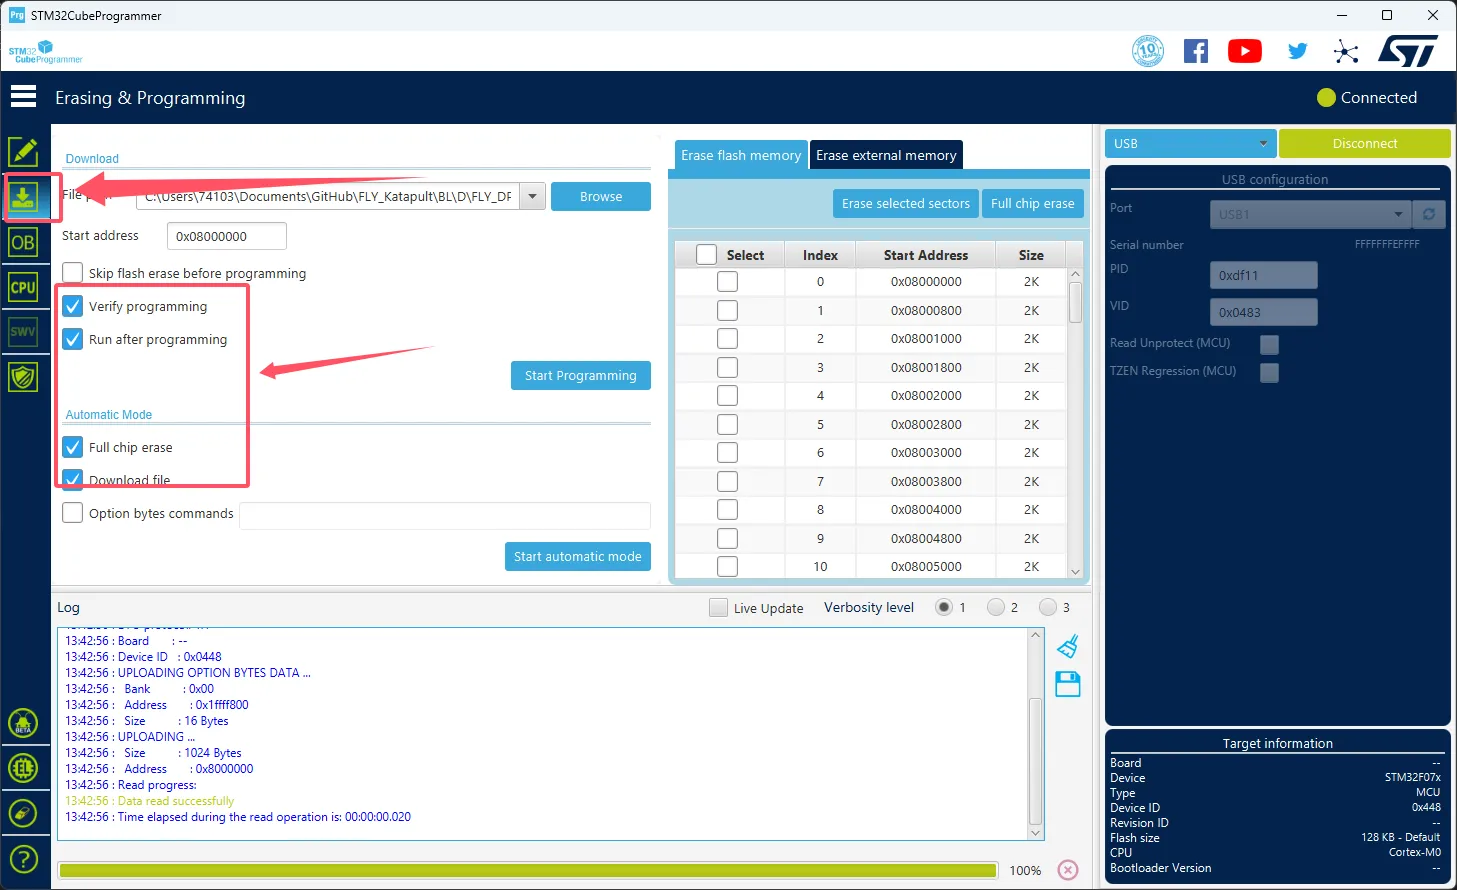
- Click the
Browsebutton as indicated by the arrow, then select the firmware you need to flash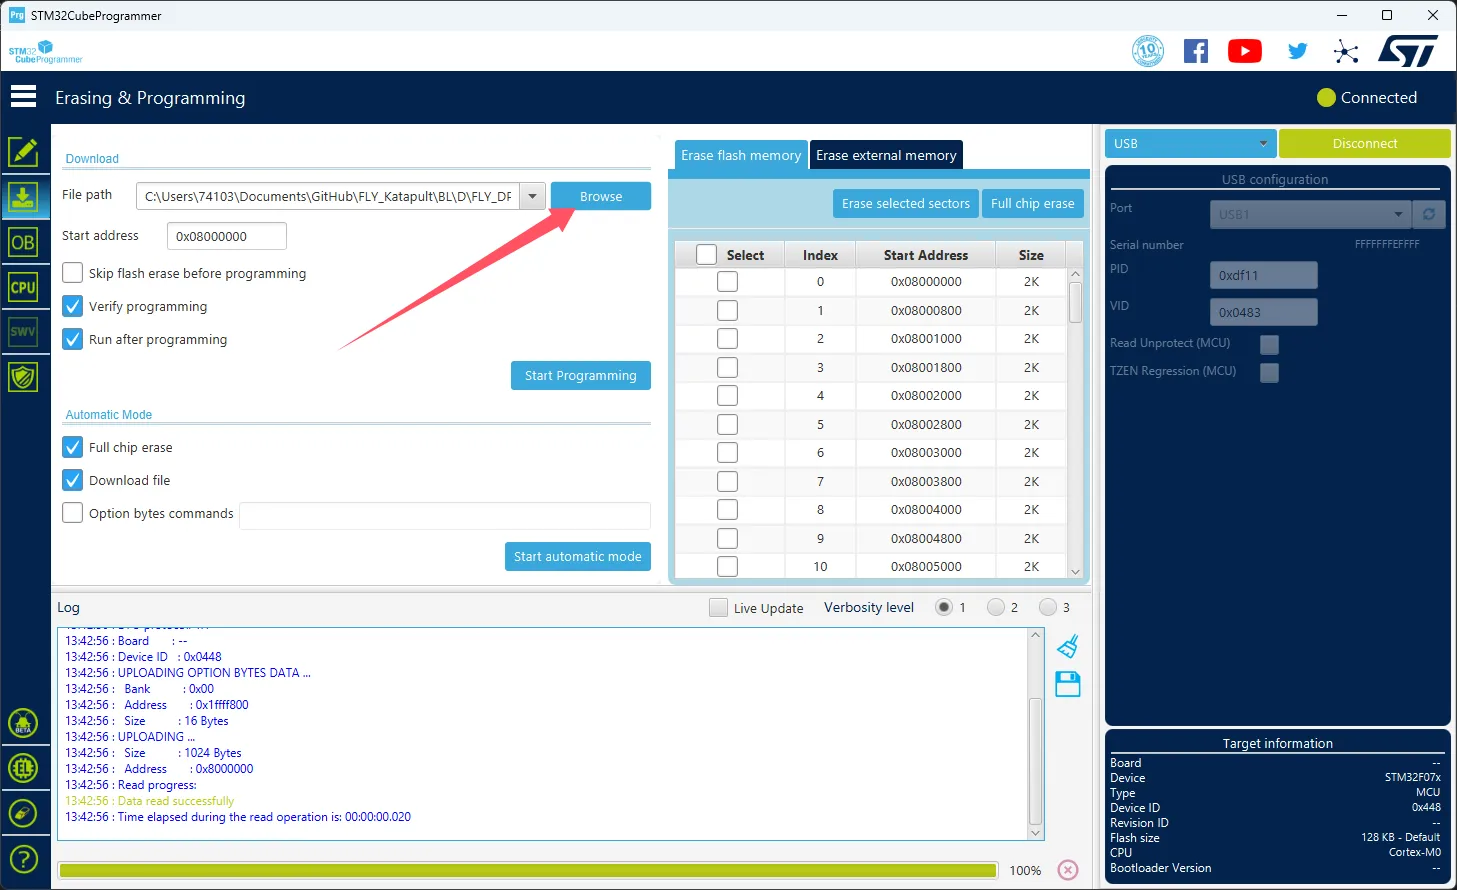
- Select
Start addressand enter0x08000000- Please note, if the firmware is in
HEXformat, please skip this step!!
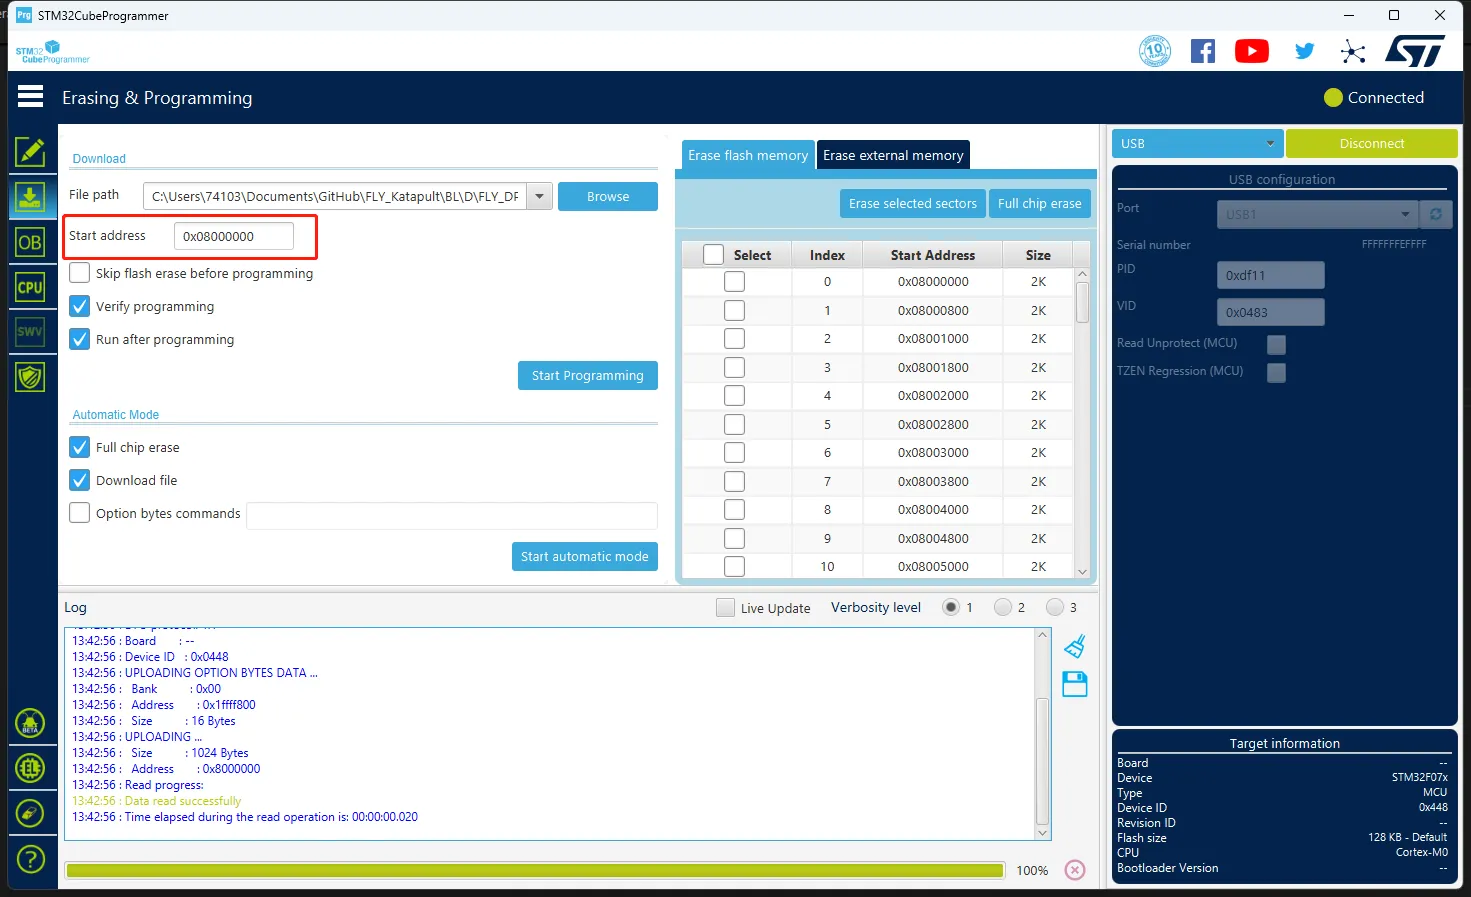
- Please note, if the firmware is in
- Click
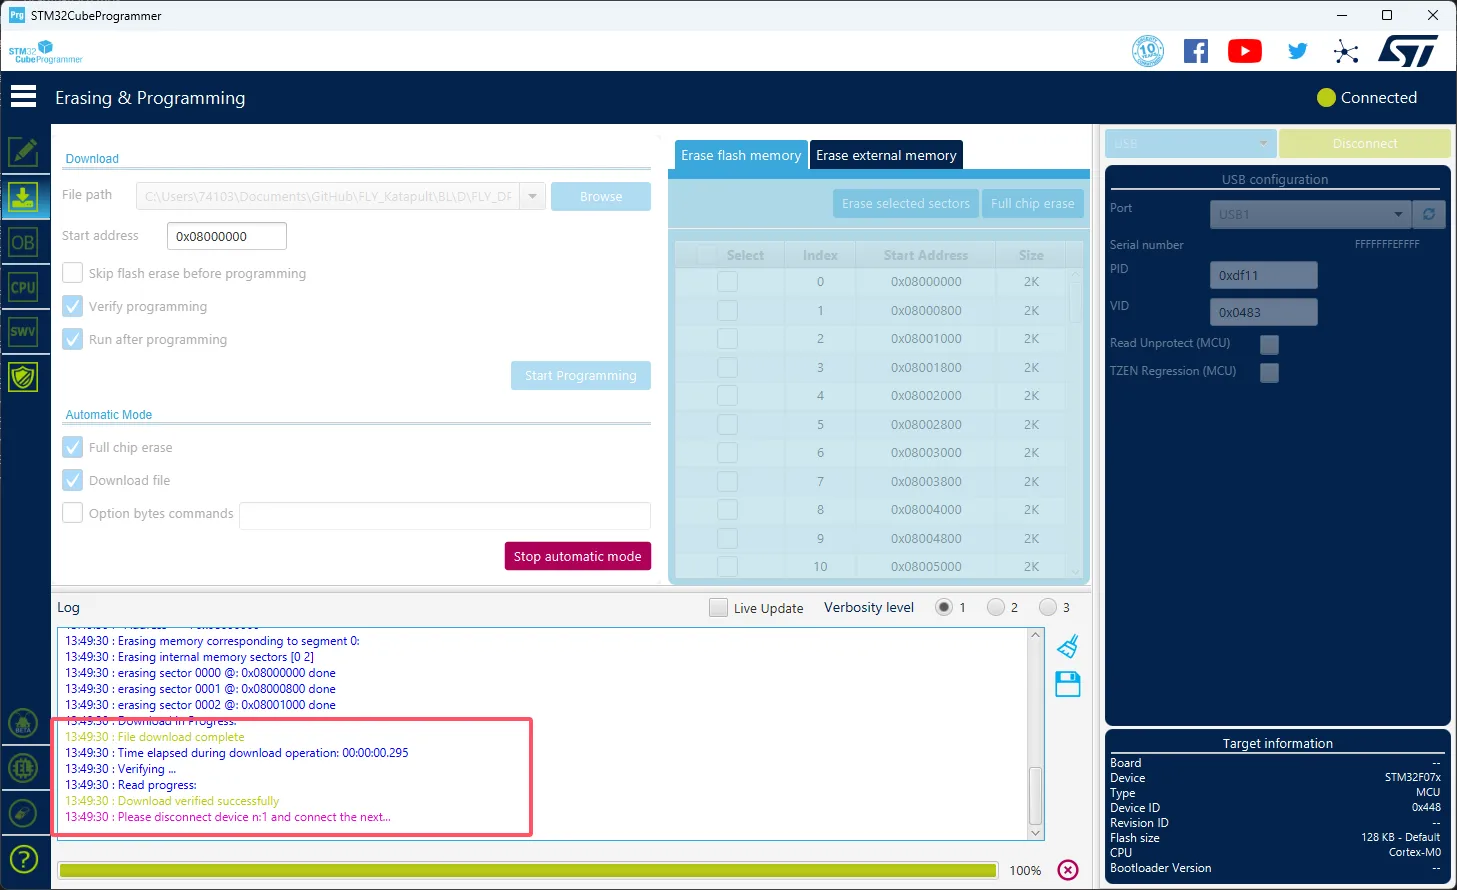
Start automatic modeat the bottom to begin flashing the firmware
- The following prompt indicates that the firmware flashing is complete
- Install the burning tool
- No need to install the burning tool for the FLY upper computer
- If you need to install, please note: The upper computer needs to be connected to the internet to install normally
- If already installed, no need to install
sudo apt update
sudo apt install dfu-util -y
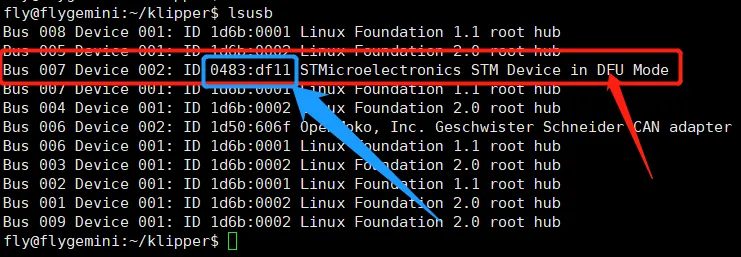
- Execute the following command to check if the connection is successful.
lsusb
- If there is no DFU device, please try to re-enter burning mode
- Due to system version issues, other names may be displayed. If
0483:df11is shown, it indicates that the burning mode has been entered
- Pull the pre-compiled firmware
- These are all pre-compiled firmwares
- Please note: The upper computer needs to be connected to the internet to install
- The upper computer needs to execute the command below to download the firmware package (if unable to get the file due to network issues on the upper computer, please contact the administrator in the after-sales group)
cd && git clone https://github.com/FengHua741/FLY_Katapult.git
- If the firmware package has already been downloaded, it is recommended to update the firmware package before proceeding with the remaining operations
cd ~/FLY_Katapult && git pull
- Flashing firmware
Only one of the firmware files needs to be flashed
- Below is the firmware flashing command
sudo dfu-util -a 0 -d 0483:df11 --dfuse-address 0x08000000 -D ~/FLY_Katapult/BL/buffer/FLY_BUFFER.bin
-
If the flashing is successful, you will see the message
File downloaded successfullyas shown in the arrow in the image below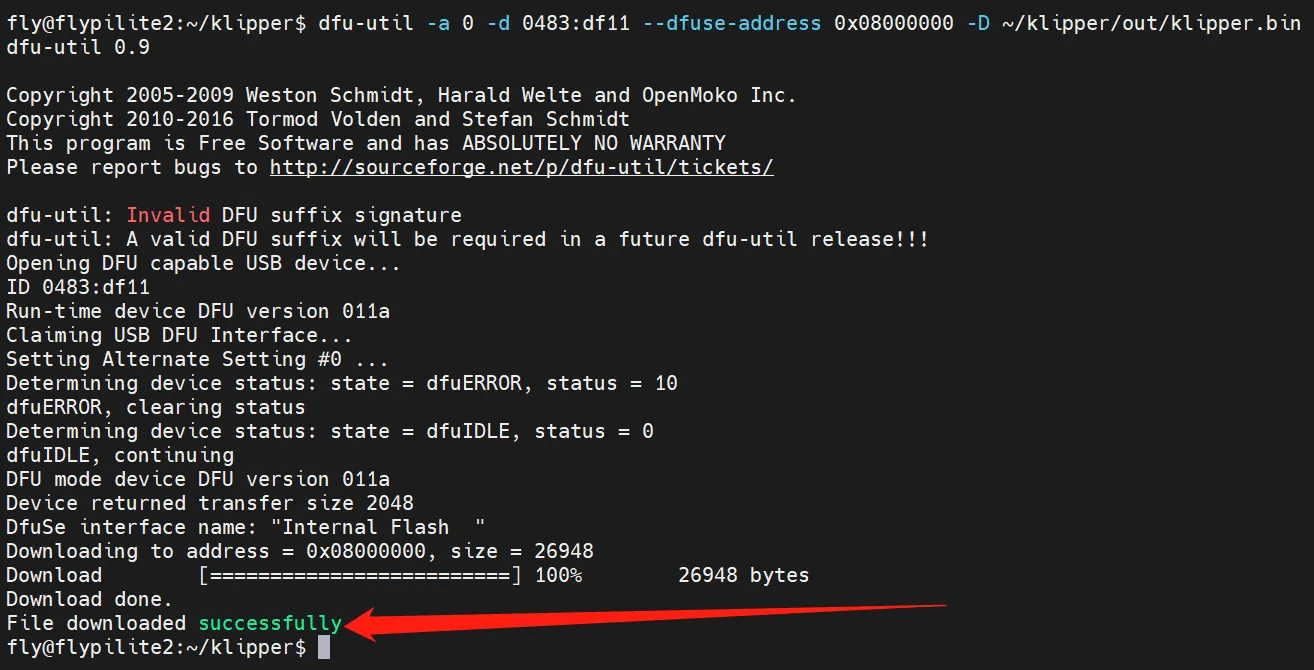
After flashing, you need to completely power off the mainboard once.
USB firmware compilation
Starting compilation
- A host computer with the
klipperservice installed is required Connect via SSH over the network - And the device is connected to the host computer
- Note: Please use a regular host computer, such as Raspberry Pi FLY. If it is a modified host computer (such as a WiFi stick, Redmi, etc.), due to too many issues, we cannot provide technical support
- FlyOS-Armbian system and general system notes
- FlyOS-FAST system notes
- Notes on
FlyOS-Armbiansystem and general system- Ordinary host computer systems such as Raspberry Pi, FLY are viewed in this category
- Do not use the
ROOTuser for any operations on these host computers - Please use a normal user for operations
- To switch users, for
FlyOS-Armbiansystem use thesu flycommand to switch to a normal user - For other systems, use the
su <your host computer username>command to switch to a normal user
su <your host computer username>
- Notes on
FlyOS-FASTsystem- The default username for
FAST systemisroot, password ismellow - Compiling firmware can only be done using the
rootuser - And
FAST systemonly hasROOTuser, you don't need to switch users!!!
- The default username for
::: tip
- Please ensure that the host machine can connect to the network normally.
- Before compiling the firmware, use SSH to log in to the host machine via the network.
- Do not use a serial port tool to log in to the host machine.
:::
Klipper Firmware Compilation and Configuration Page Operation Instructions
::: tip
Please make sure that the keyboard input method is in half-width mode, i.e., English mode.
:::
- The key
↑(up arrow) and↓(down arrow) on the keyboard are used to move the cursor up and down to select menu items. - The confirm key
Enteror spacebarSpaceis used to check the menu or enter a sub-menu. - The exit key
ESCis used to return to the previous menu. - The
Qkey is used to exit the Klipper firmware configuration page. - When exiting the Klipper firmware configuration page and there is a prompt, press the
Ykey to save the configuration file.
::: warning
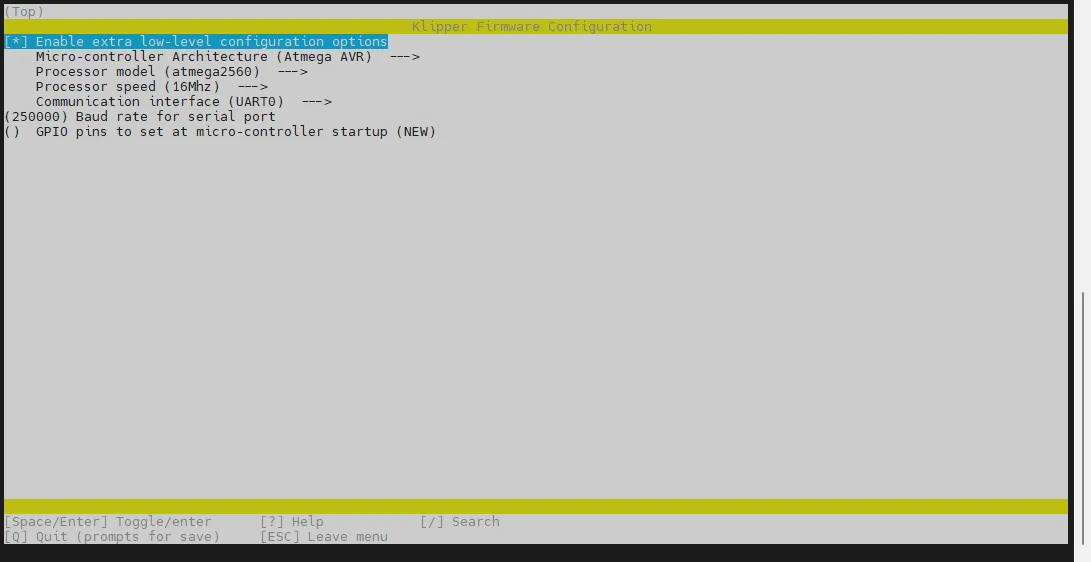
If there are fewer options in the configuration page, please first check [ ] Enable extra low-level configuration options to display some hidden options.
:::
Below is the introduction on how to compile the firmware:
-
After connecting to SSH, enter the following command and press Enter:
cd ~/klipper && rm -rf ~/klipper/.config && rm -rf ~/klipper/out && make menuconfig -
Where
rm -rf ~/klipper/.config && rm -rf ~/klipper/outis to delete previous compilation data and firmware.make menuconfigis to compile the firmware. After execution, the following interface should appear: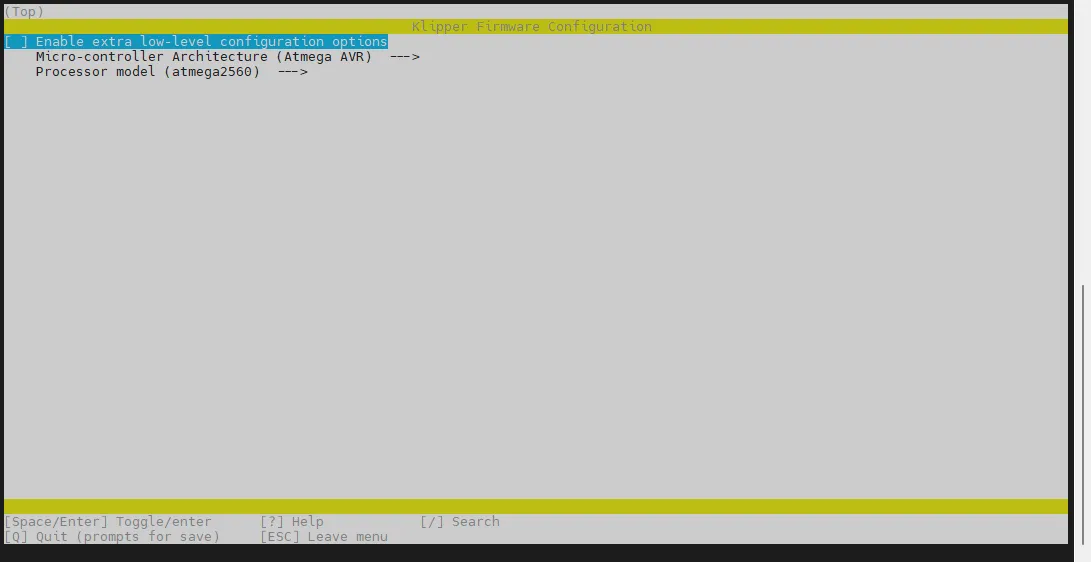
-
Select Enable extra low-level configuration options and press Enter
-
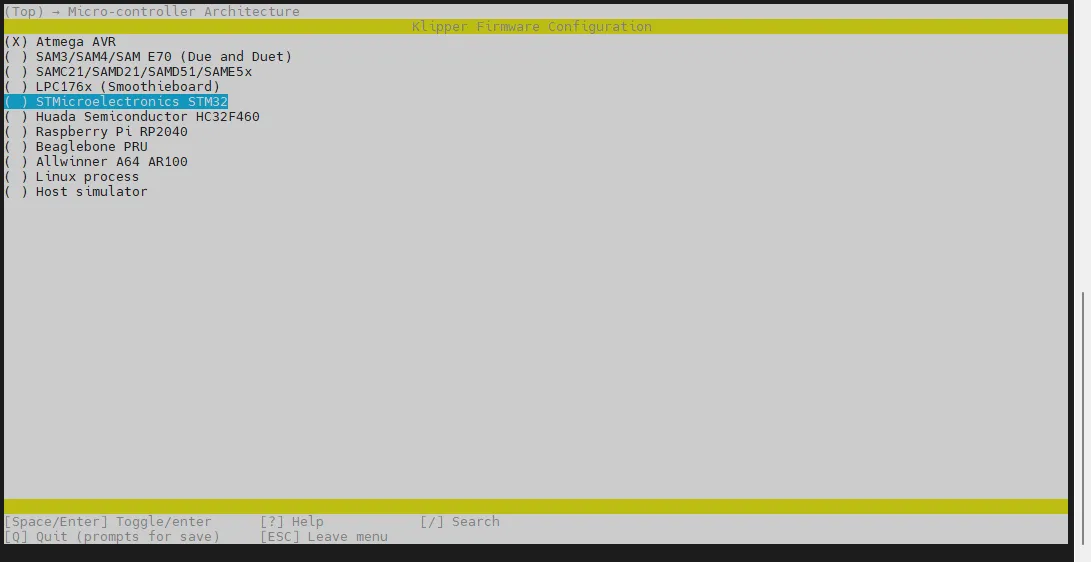
Enter the menu Micro-controller Architecture then select STMicroelectronics STM32 and press Enter
-
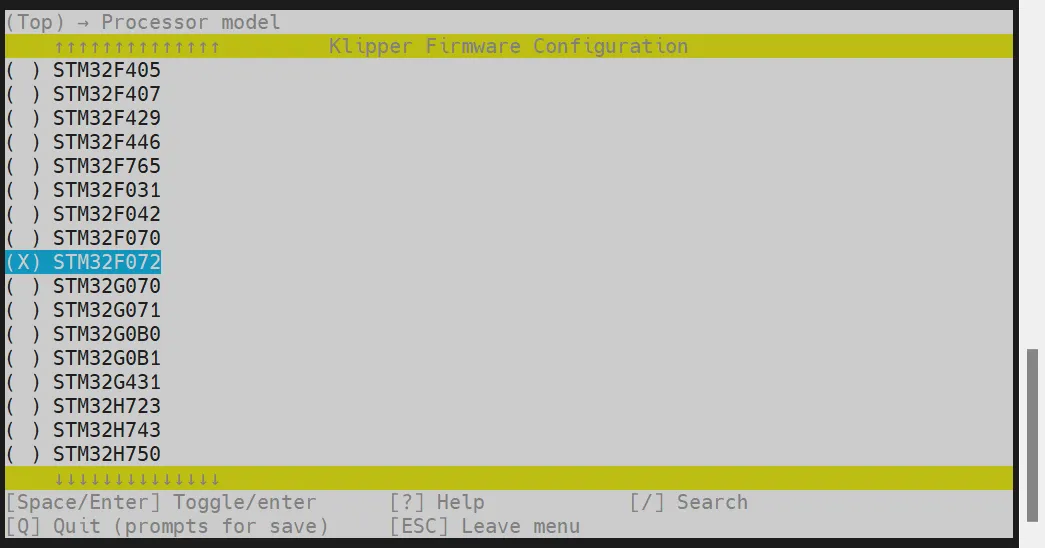
Enter the menu Processor model, select STM32F072 and press Enter
-
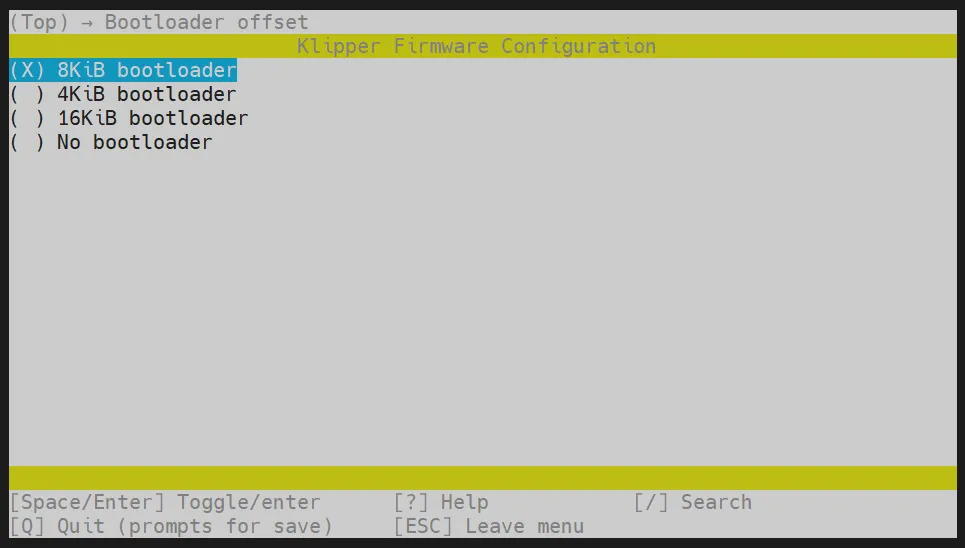
Select Bootloader offset, choose: 8KiB bootloader
-
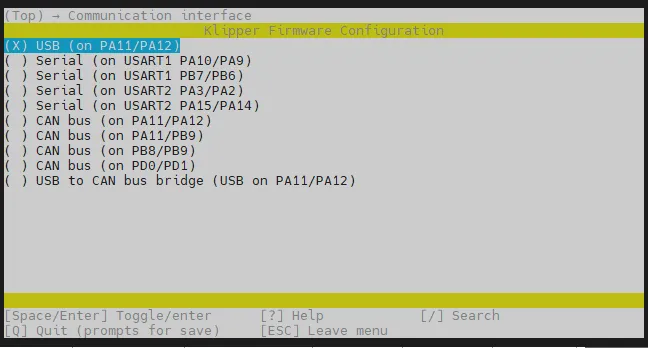
Communication interface, select: USB (on PA11/PA12) and press Enter
-
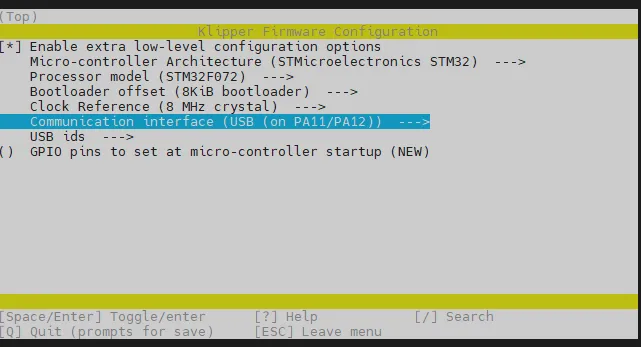
Please verify against the following image to ensure it matches before proceeding
- Press the
Qkey, you will see Save configuration, then press theYkey
- Now you should have saved the configuration and exited back to the command line interface
- Enter the command below to start compiling (this may take some time)
make -j4
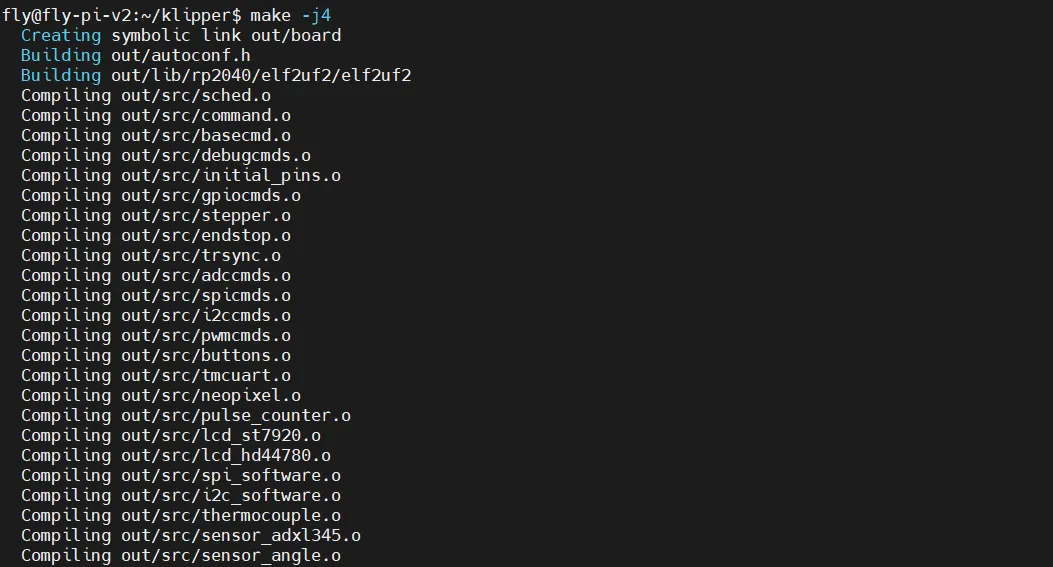
-
If the compilation is successful, you will see the following output
Linking out/klipper.elf
Creating hex file out/klipper.bin
- Below is a recording of the firmware compilation process
Entering flashing mode
- Double-press the
RSTbutton to enter flashing mode
Confirming flashing mode
- Please ensure that the host machine can connect to the network normally and ensure that the data cable connecting the lower-level machine to the host machine has data transmission function.
- After SSH connecting to the host machine, input
lsusband press Enter. If the information circled in the following picture appears, you can proceed to the next step.- If there is no feedback at all, this is a system problem of the host machine, and we are unable to help. You need to replace with a confirmed normal system or replace the host machine.
- If the prompt says there is no
lsusbcommand, you can execute the following command to install it:sudo apt-get install usbutils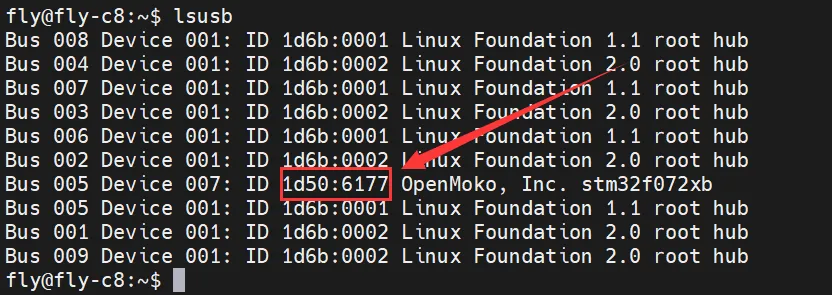
1d50:6177belongs to the device you will use this time.- Some host machines may not fully display or fail to display due to system problems.
- If the
lsusbcommand can display the device but does not show1d50:6177, please try replacing the data cable and connecting the mainboard to another USB port on the host machine.
- If you have executed the above steps before and successfully burned the Klipper firmware, and the mainboard is running normally, but you just want to update the Klipper firmware, please directly check the
Firmware Updatesection in the right menu bar of this page.
You must query the 1d50:6177 device before proceeding to the next step.
Flashing firmware
- Internet connection is required when installing the flashing plugin. Please ensure your host machine is properly connected to the internet.
- If already installed, there is no need to install again.
Start Flashing
-
For non-fly host machines, please execute the code below to install the required dependency packages for firmware flashing! Otherwise, the firmware cannot be flashed!
- Default Repository
- Domestic Repository
cd && git clone https://github.com/Arksine/katapult.gitcd && git clone https://gitee.com/MrCakeFuck/katapult.git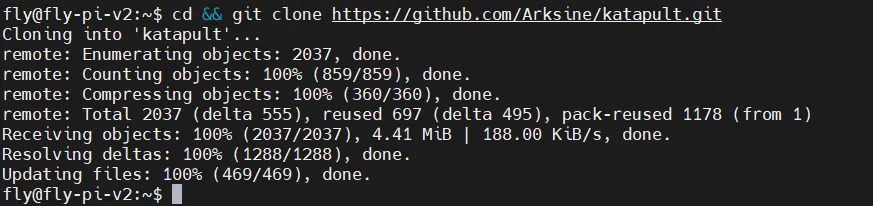
-
Use the command below to search for your device ID. The ID shown in the figure below should appear (Note: The ID shown in the figure is for reference only; each motherboard has a unique ID).
ls /dev/serial/by-id/*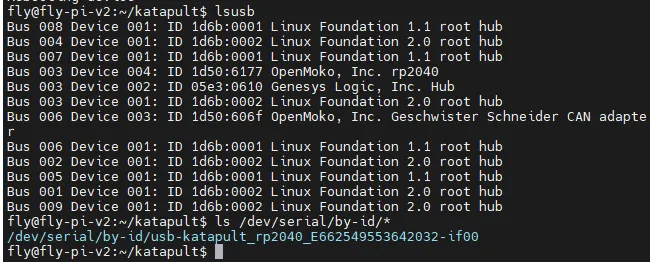
-
Use the code below to flash the firmware. Please ensure the firmware has already been compiled, and replace
<你的主板ID>with the ID obtained in the previous step.
- Fly-Armbian and Standard Host Flashing Method
- Fly-FAST Flashing Method
~/klippy-env/bin/python ~/katapult/scripts/flashtool.py -d /dev/serial/by-id/<你的主板ID>
python ~/katapult/scripts/flashtool.py -d /dev/serial/by-id/<你的主板ID>
-
Reference image is shown below:

-
Reference after flashing is completed:
Firmware Update
- USB Firmware Update
- Bridged CAN Firmware Update
-
Use the following command to search for your motherboard ID. The ID shown in the figure below should appear (Note: The ID shown in the figure is for reference only; each motherboard has a unique ID).
ls /dev/serial/by-id/*
The ID /dev/serial/by-id/usb-katapult_rp2040_E662549553642032-if00 in the figure below is the motherboard ID.
-
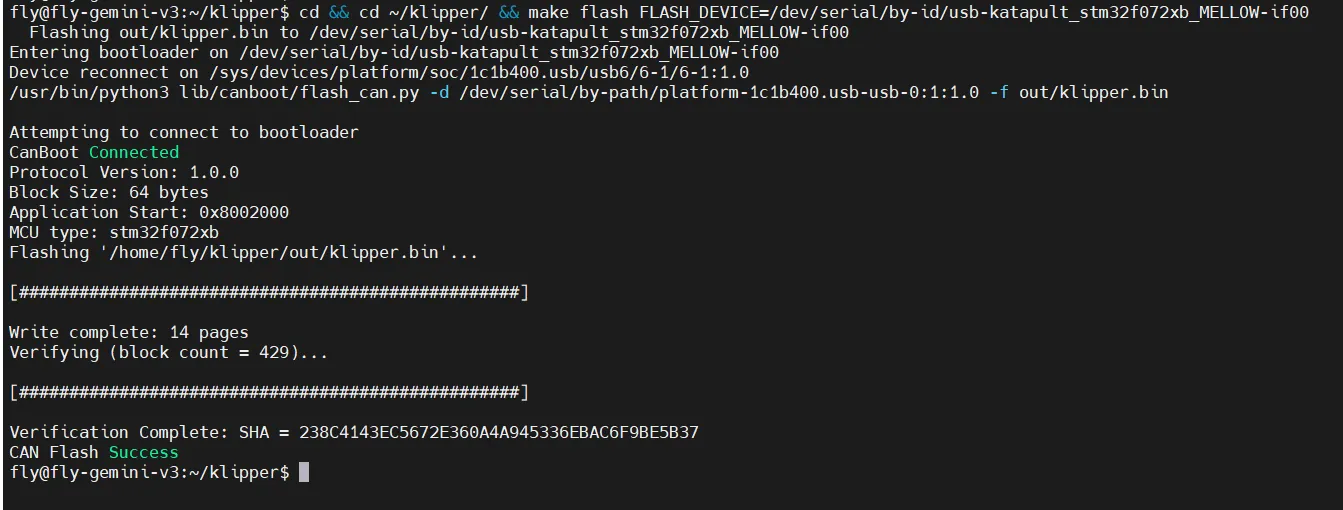
After compiling the latest firmware, use the command below to update the USB firmware. Please replace
<你的主板ID>with the ID obtained in the previous step.cd ~/klipper/ && make flash FLASH_DEVICE=<你的主板ID>
- To update the bridged CAN firmware over USB, after compiling the latest firmware, run the command below to reset into Katapult. (As shown in the figure below, the ID is for reference only; please use the ID from your configuration file.)
<CANBUS UUID>is the CANBUS UUID of the motherboard specified in your printer.cfg configuration file.
- Fly-Armbian and Standard Host Reset to Flash Method
- Fly-FAST Reset to Flash Method
- Replace
<你的主板ID>with the ID obtained in the previous step.~/klippy-env/bin/python3 ~/katapult/scripts/flashtool.py -i can0 -r -u <CANBUS UUID>
- Replace
<你的主板ID>with the ID obtained in the previous step.python3 ~/katapult/scripts/flashtool.py -i can0 -r -u <CANBUS UUID>
- The
f95cee90e1f9in the figure below is the CANBUS UUID of the motherboard.

-
After resetting into Katapult, use the command below to search for your motherboard ID. The ID shown in the figure below should appear (Note: The ID shown in the figure is for reference only; each motherboard has a unique ID).
ls /dev/serial/by-id/*
The ID /dev/serial/by-id/usb-Klipper_stm32f072xb_43002C000951324757373520-if00 in the figure below is the motherboard ID.

-
Ensure the new firmware has been compiled before executing the flashing. Replace
<你的主板ID>with the ID obtained in the previous step.cd ~/klipper/ && make flash FLASH_DEVICE=<你的主板ID>
Recovery Method for Incorrect Firmware
- Power off the motherboard, then power it on again and double-press the reset button quickly to re-enter flashing mode.
- Alternatively, use Windows/host machine to re-flash the Katapult firmware Flash Katapult Firmware
Search USB ID
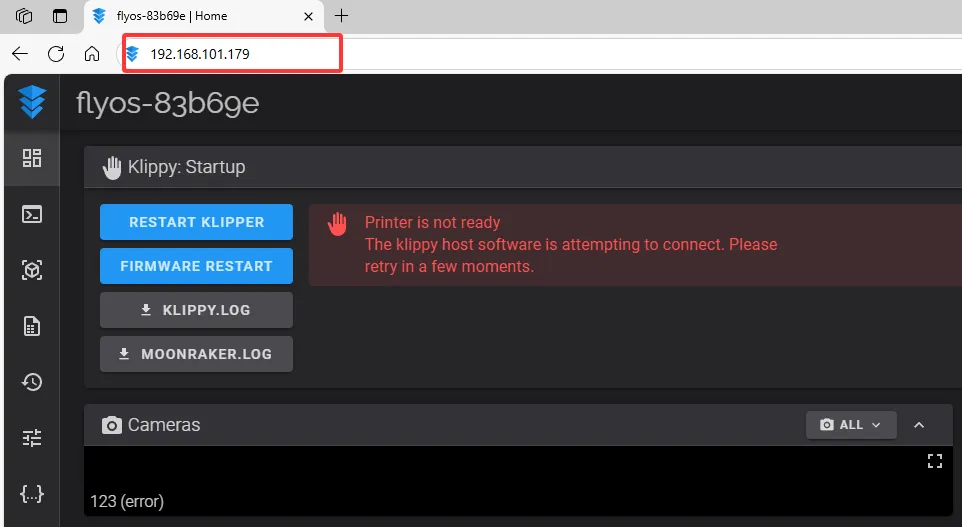
- Open the browser and enter the IP address of the host computer in the address bar. For example, if my host computer's IP is
192.168.101.179, simply type it in and press Enter.
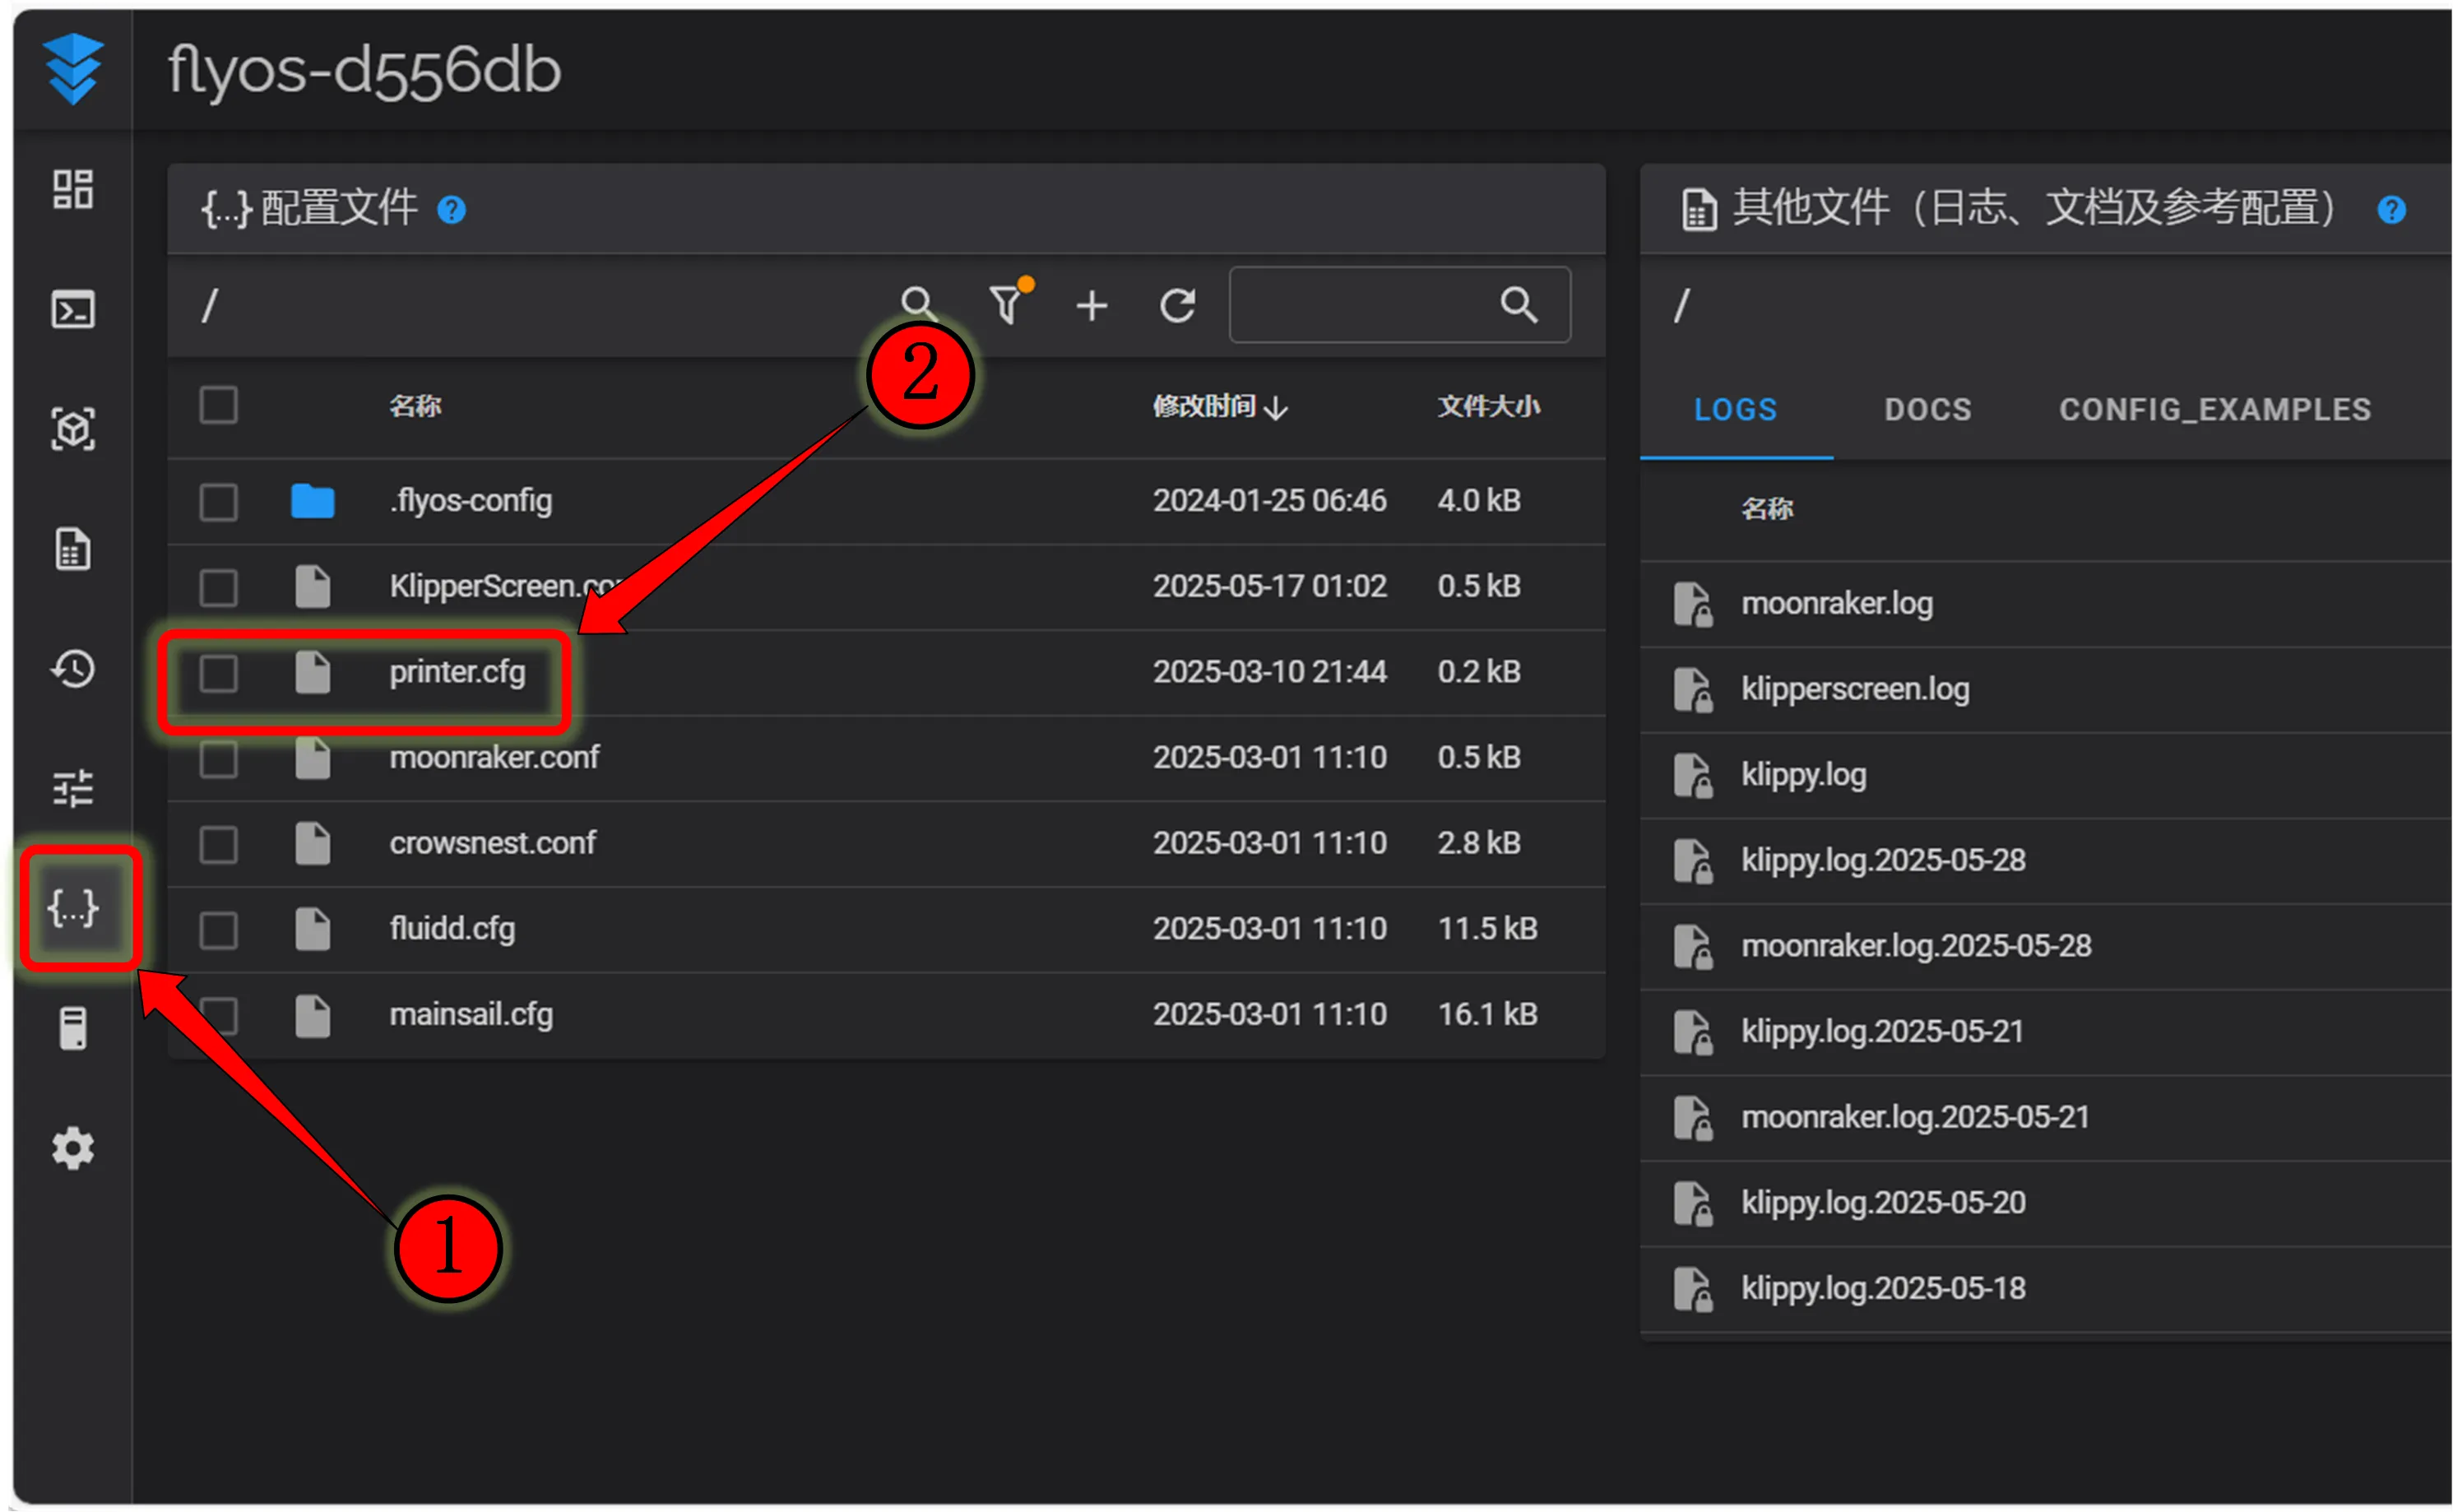
- Open the WEB interface of the host computer, and in the configuration section of the left sidebar, find:
 |
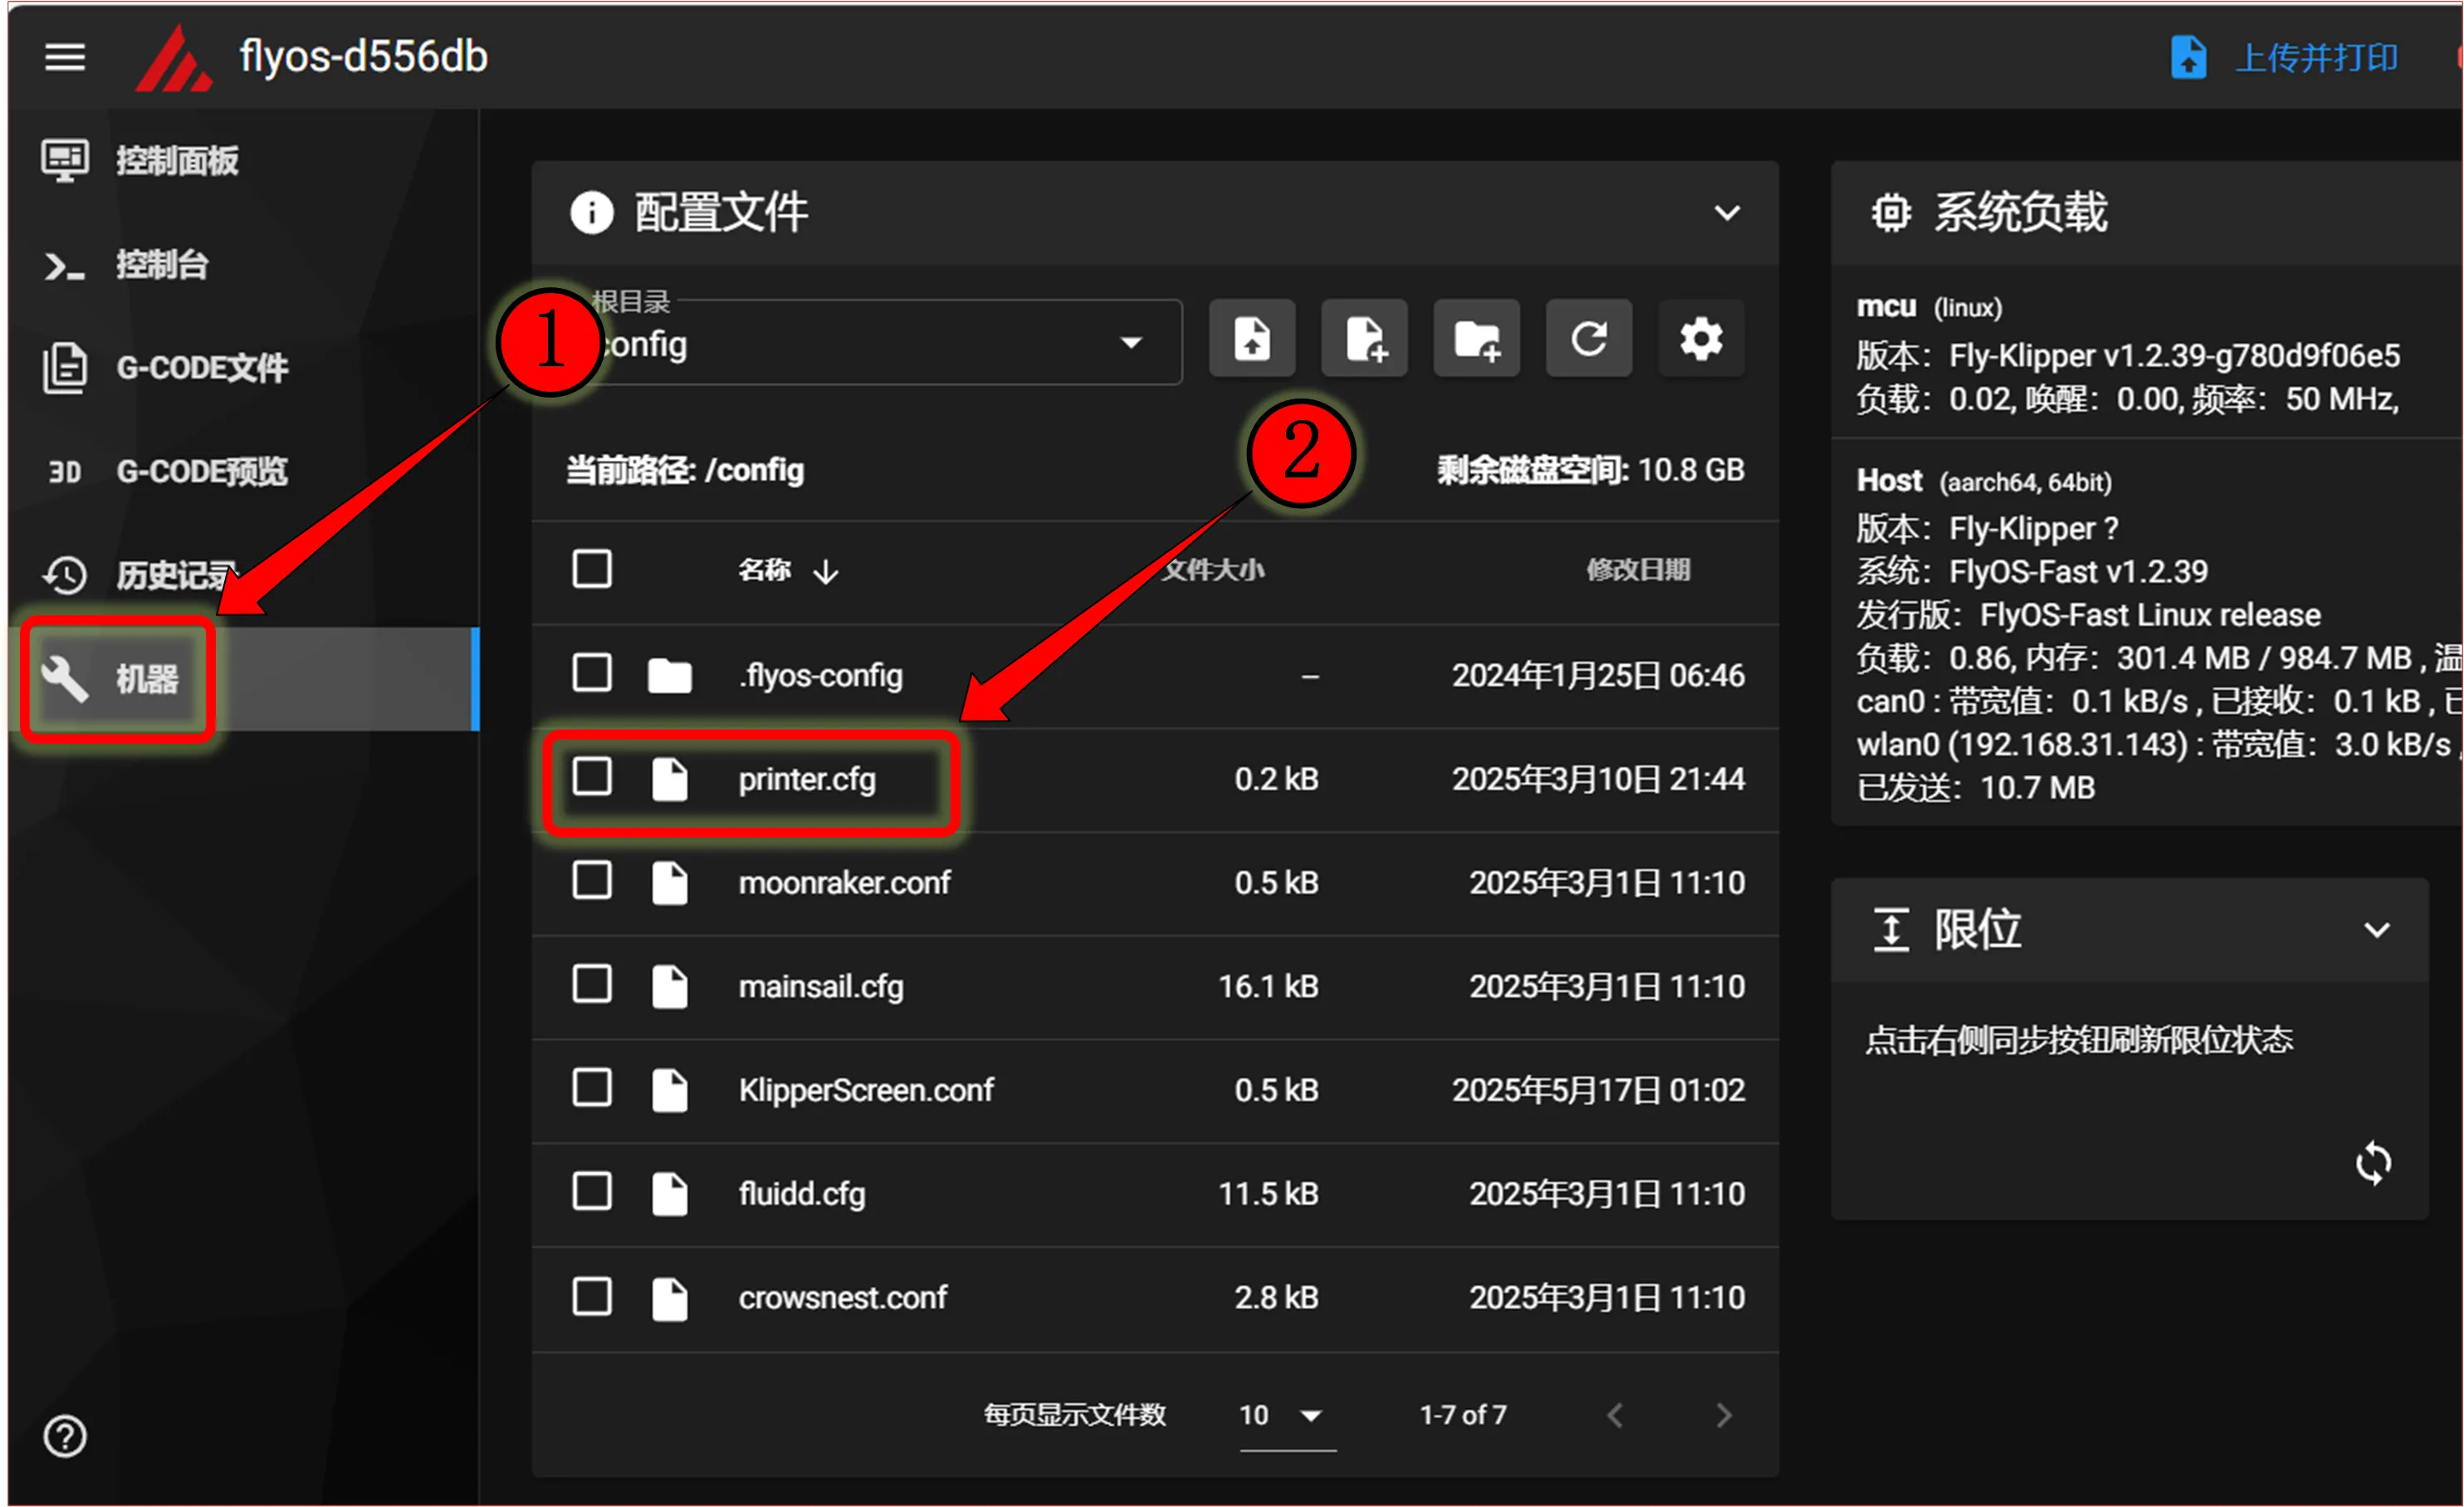 |
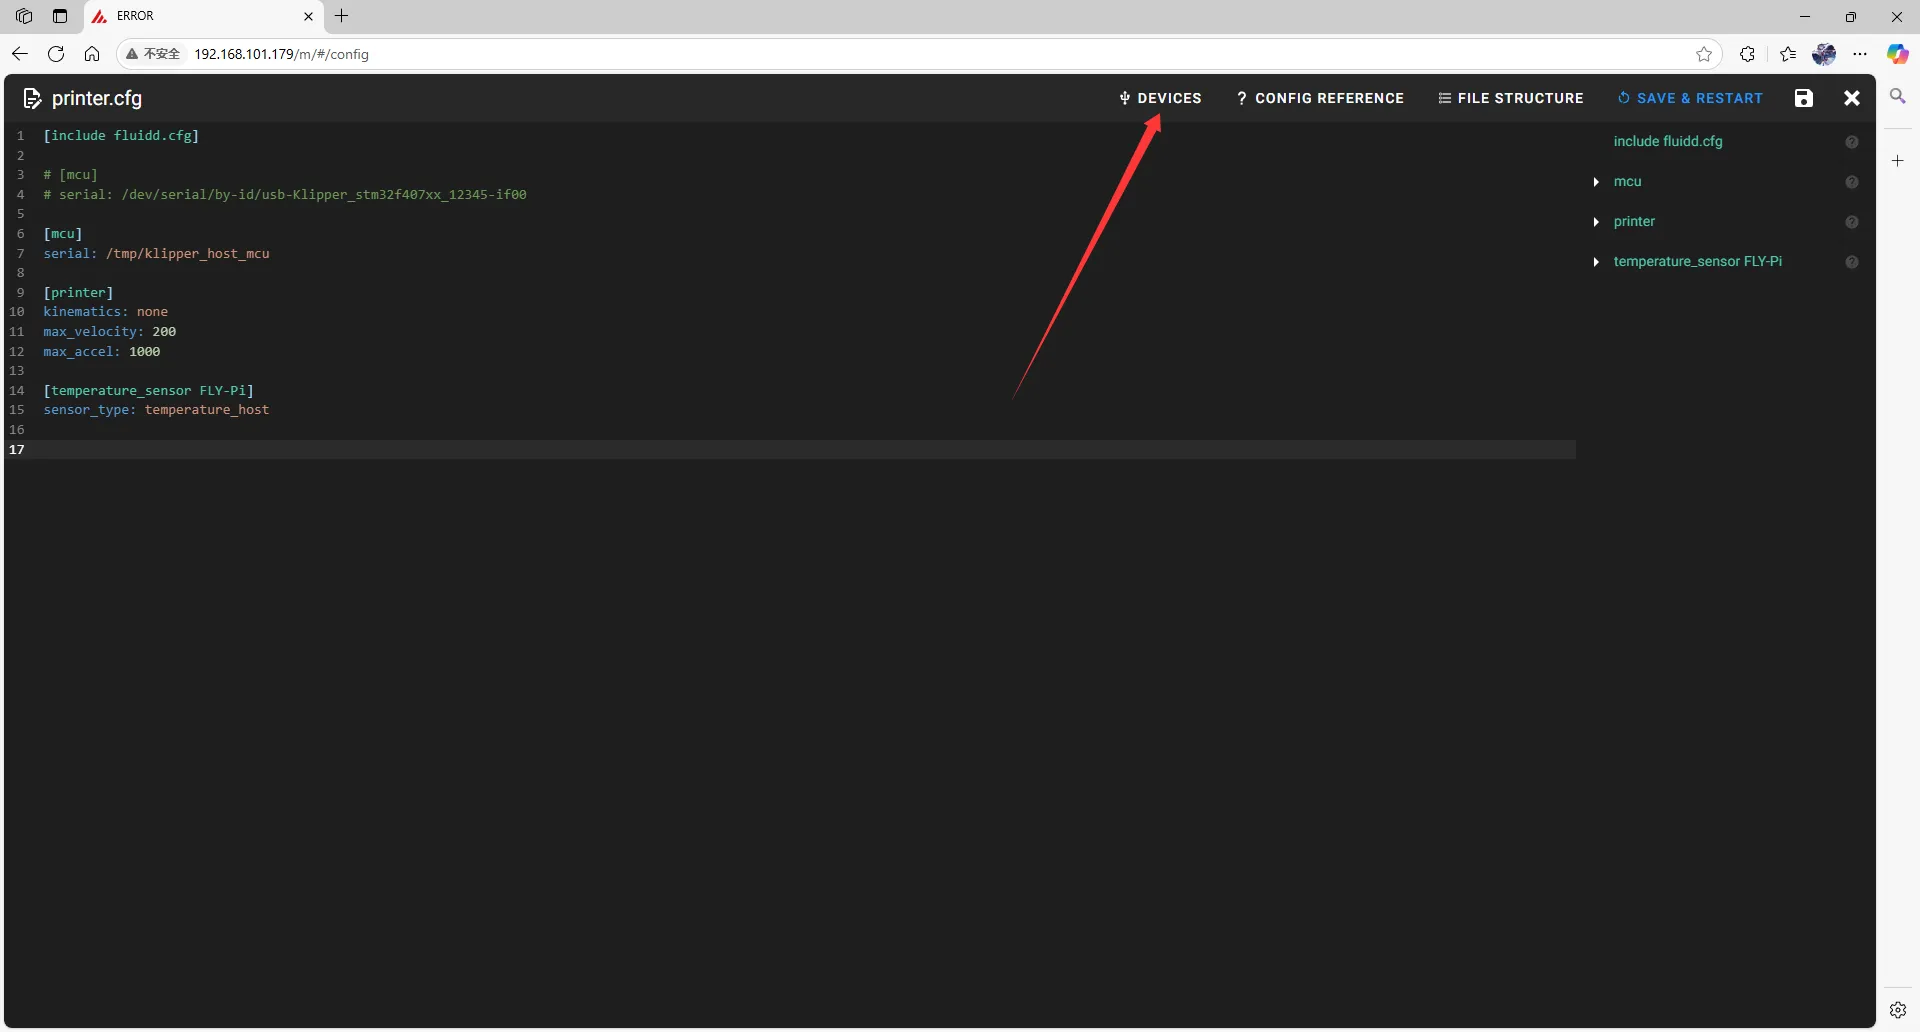
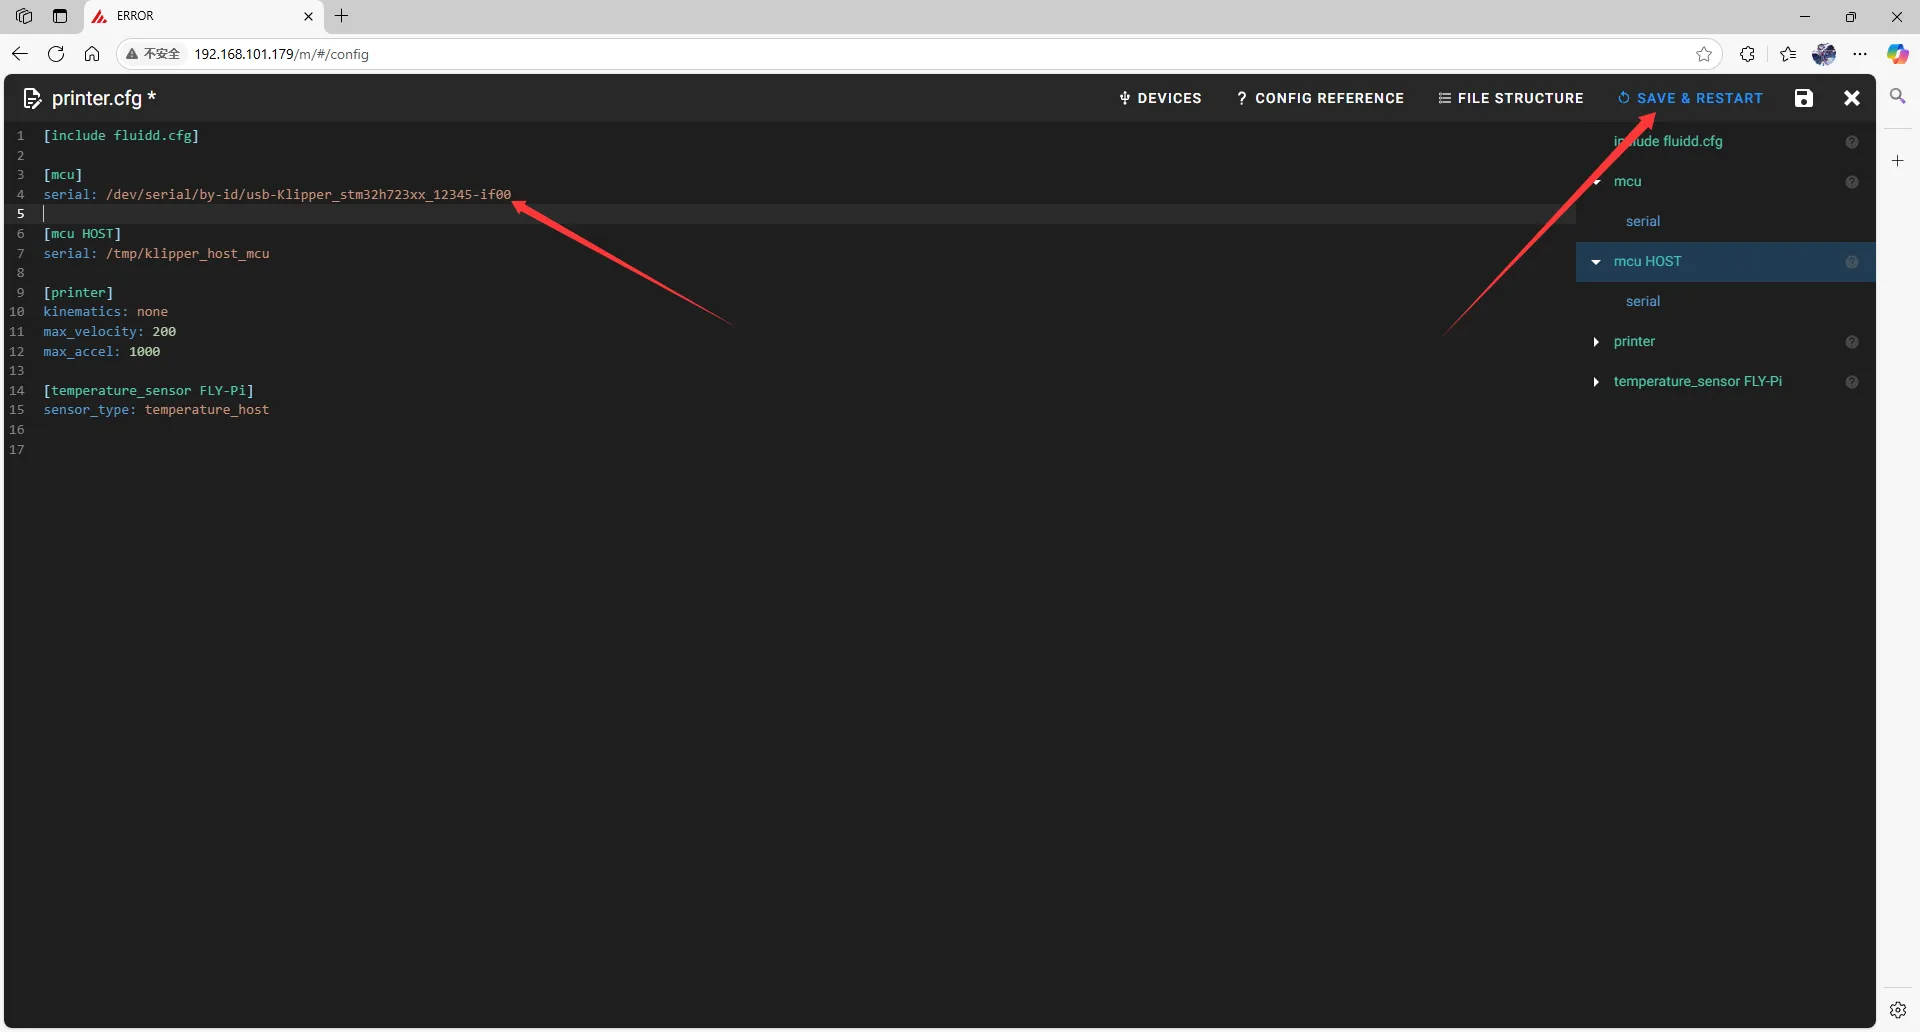
-
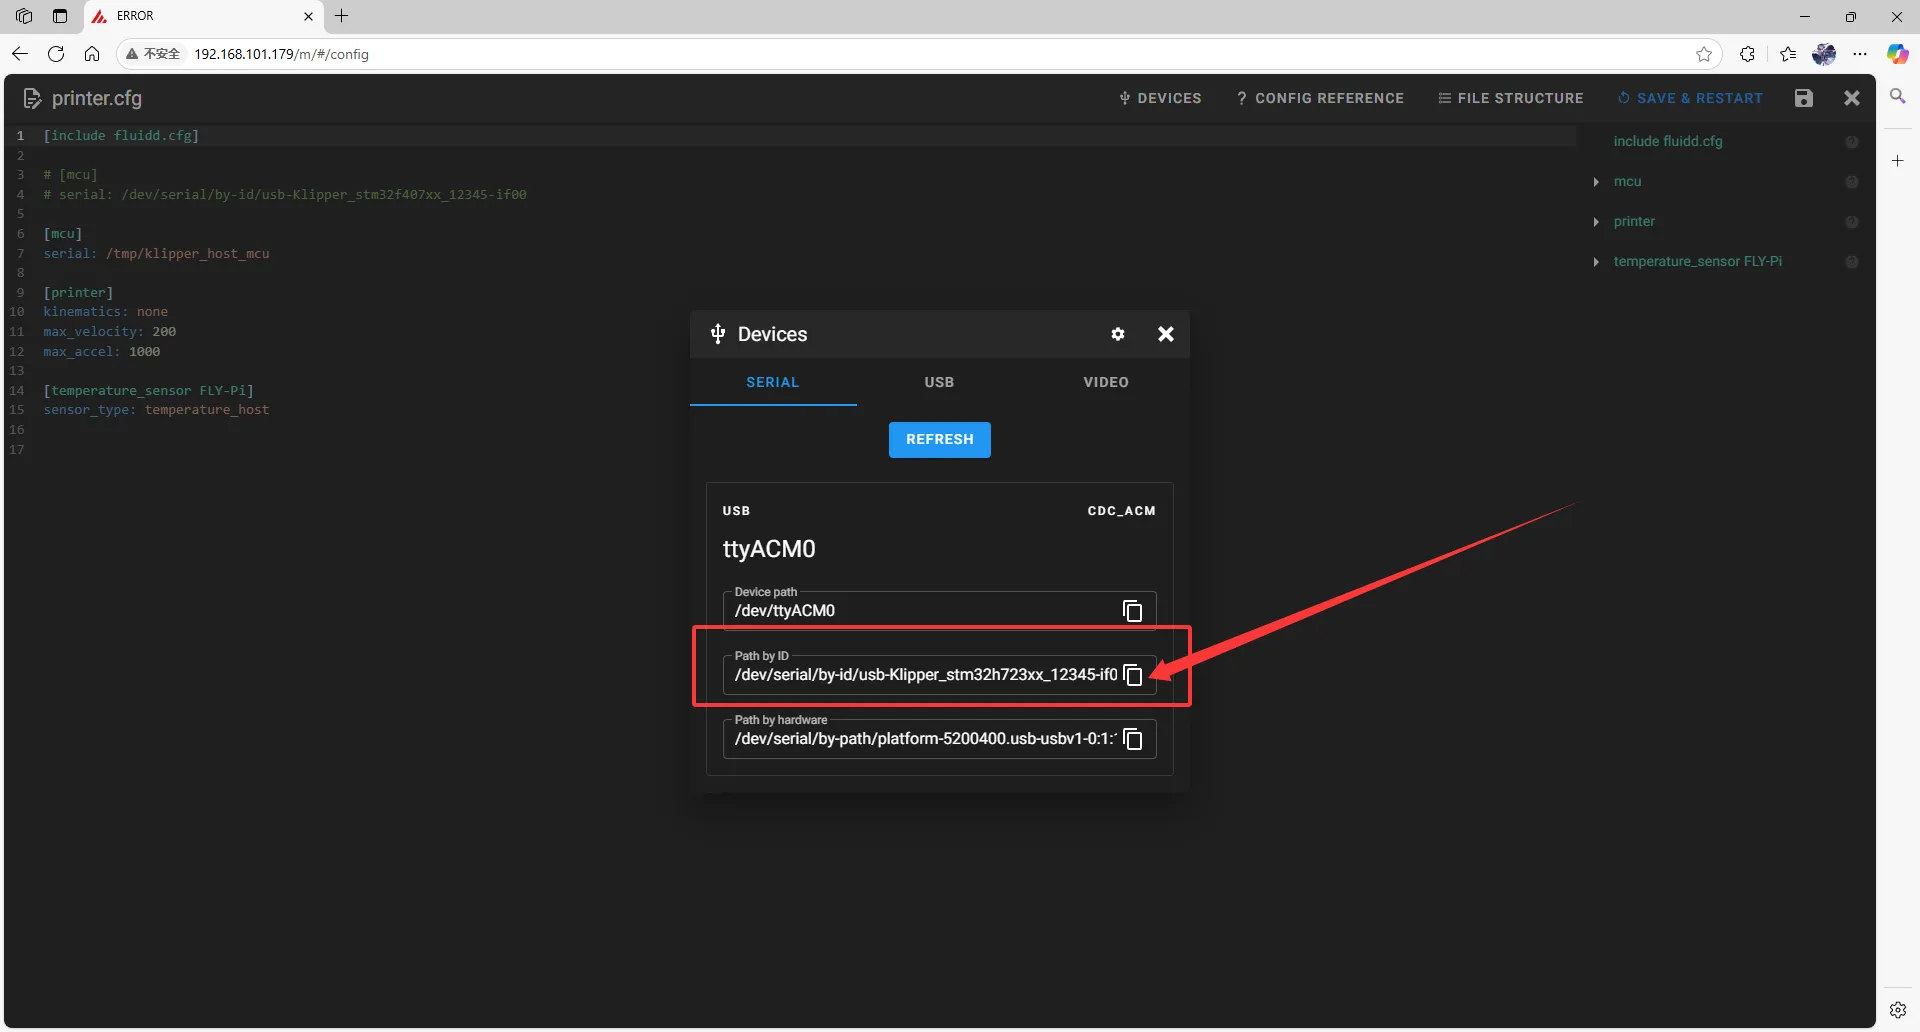
After entering
printer.cfg, click onDEVICESat the top right corner.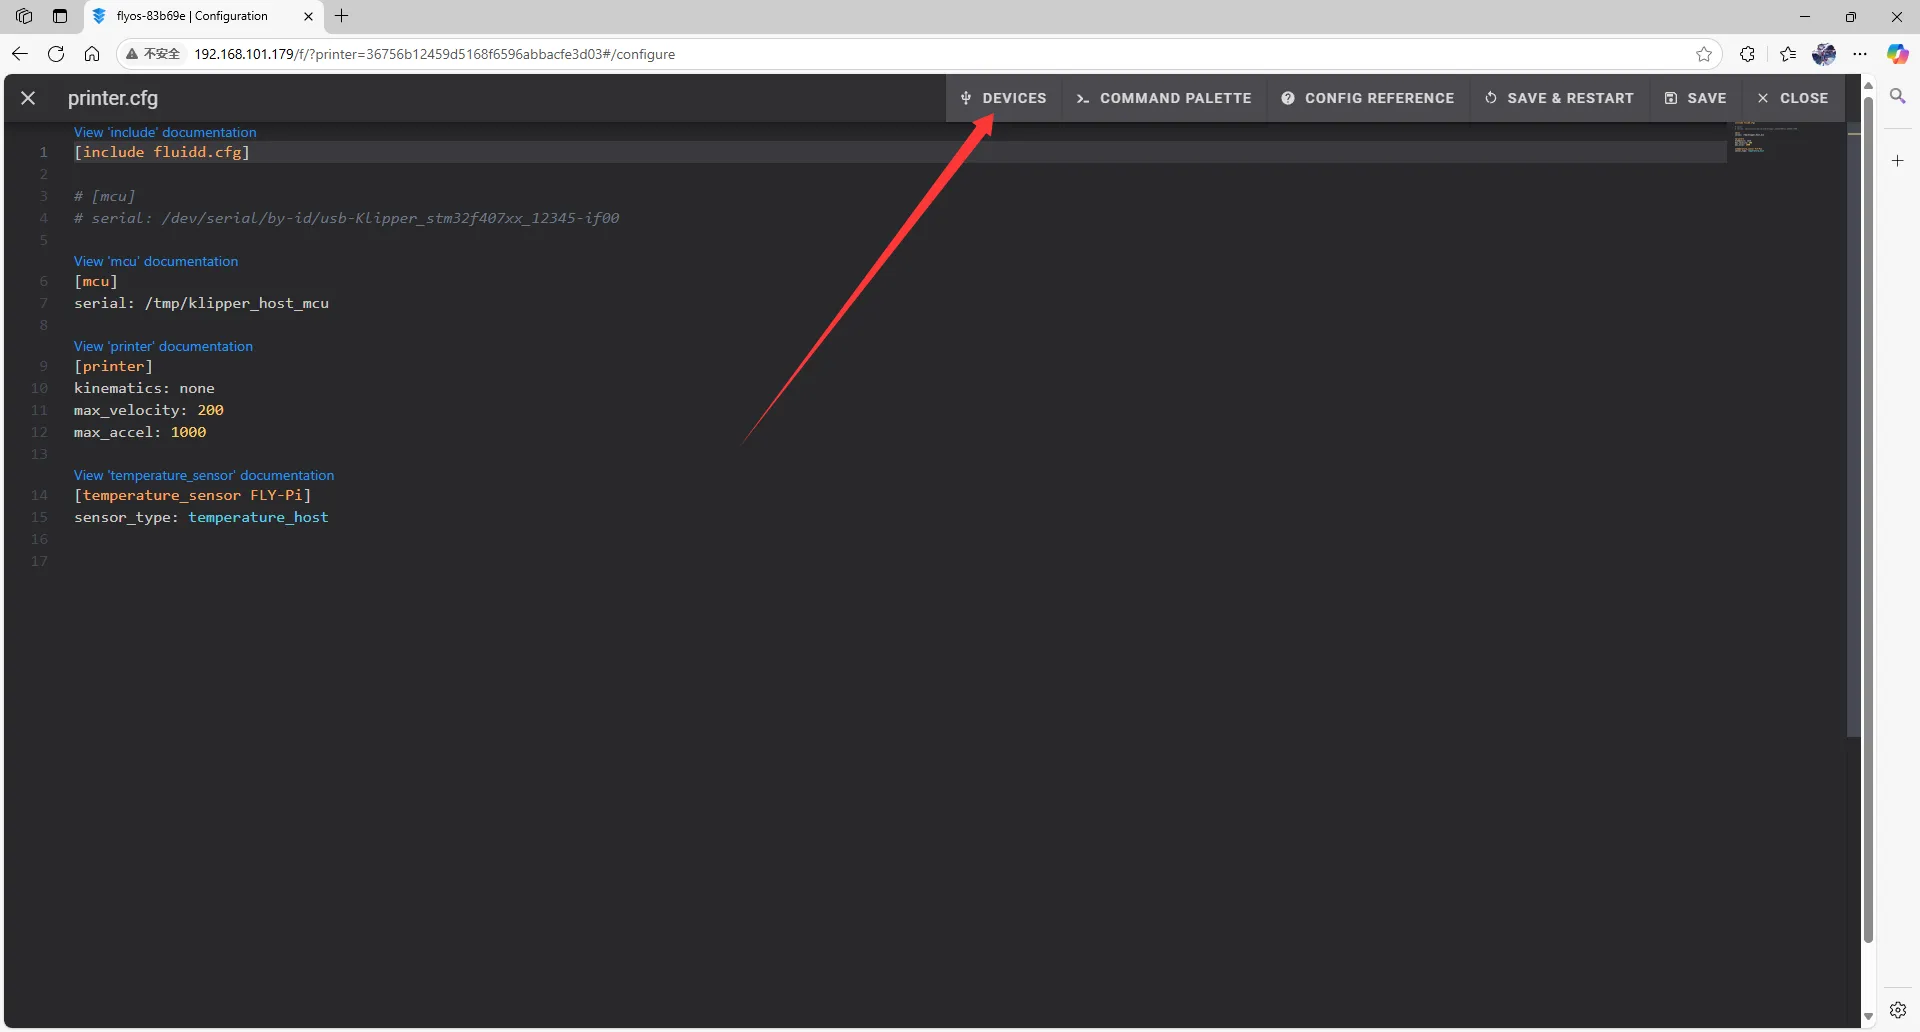
-
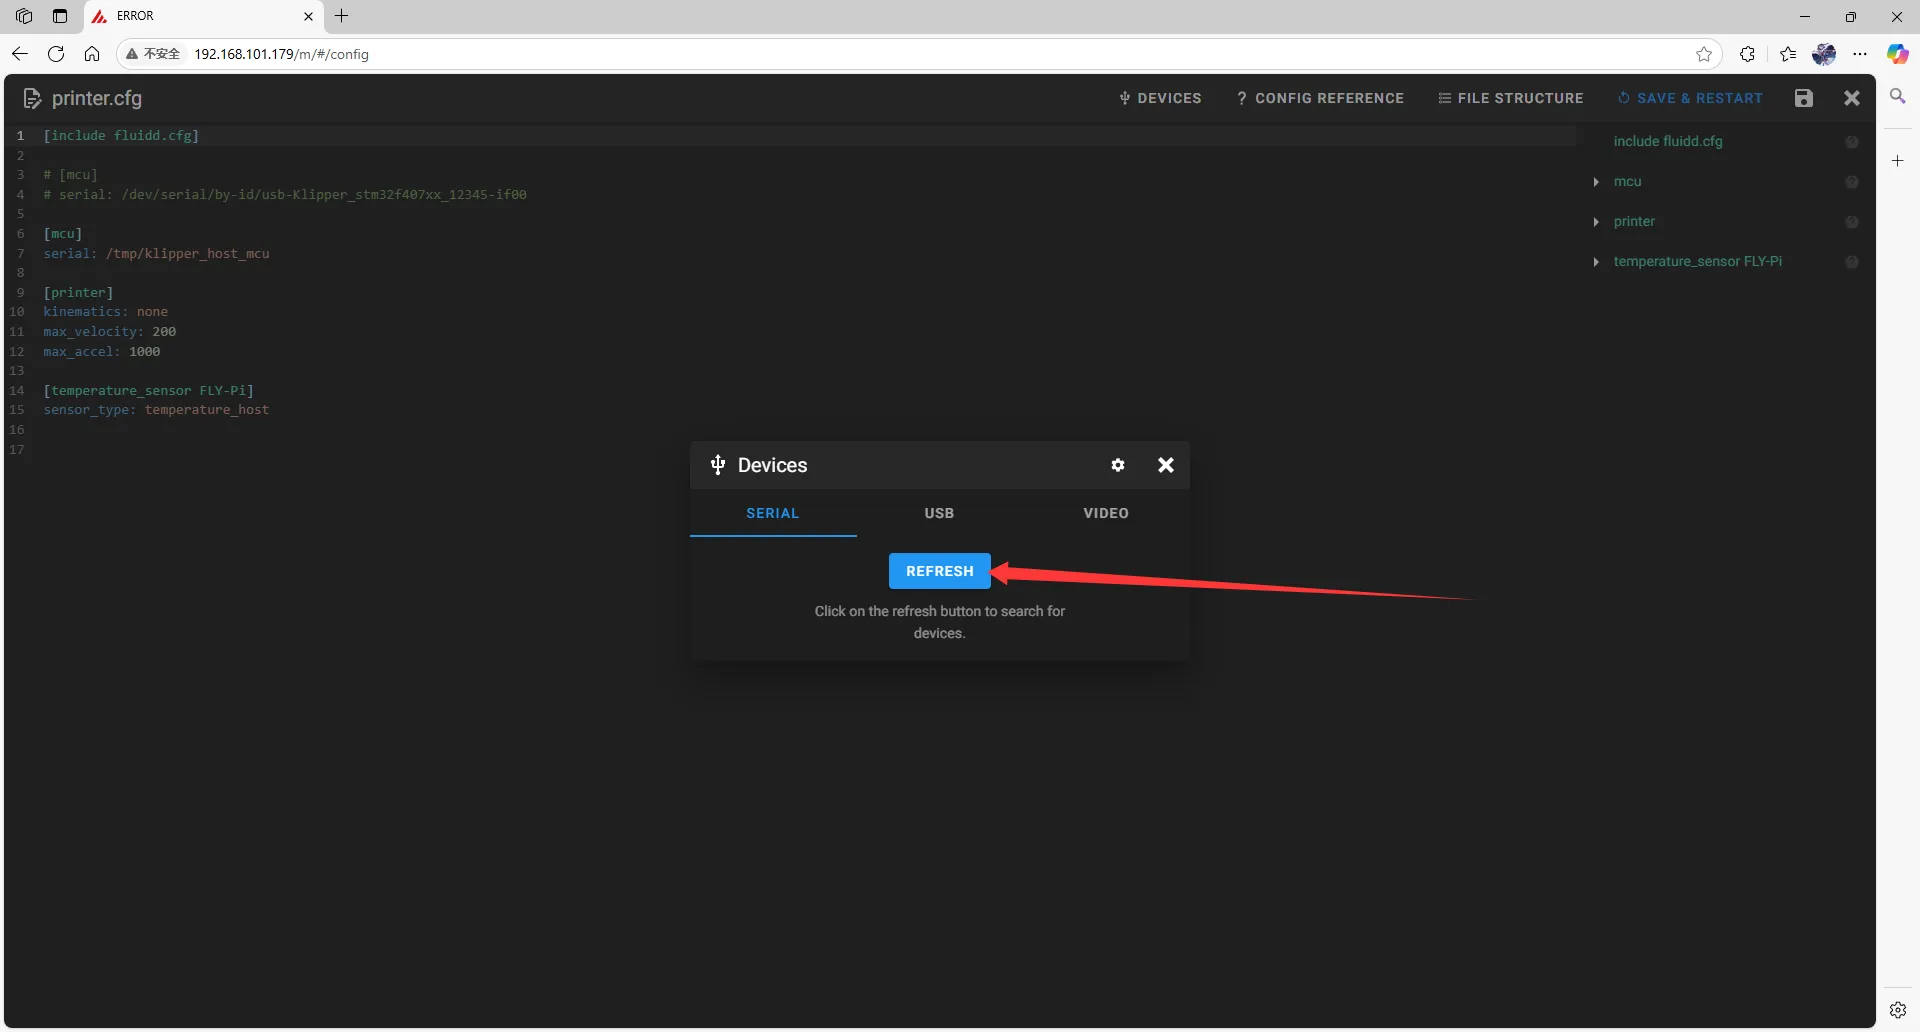
Click on
SERIAL, then refresh.- Refresh for fluidd
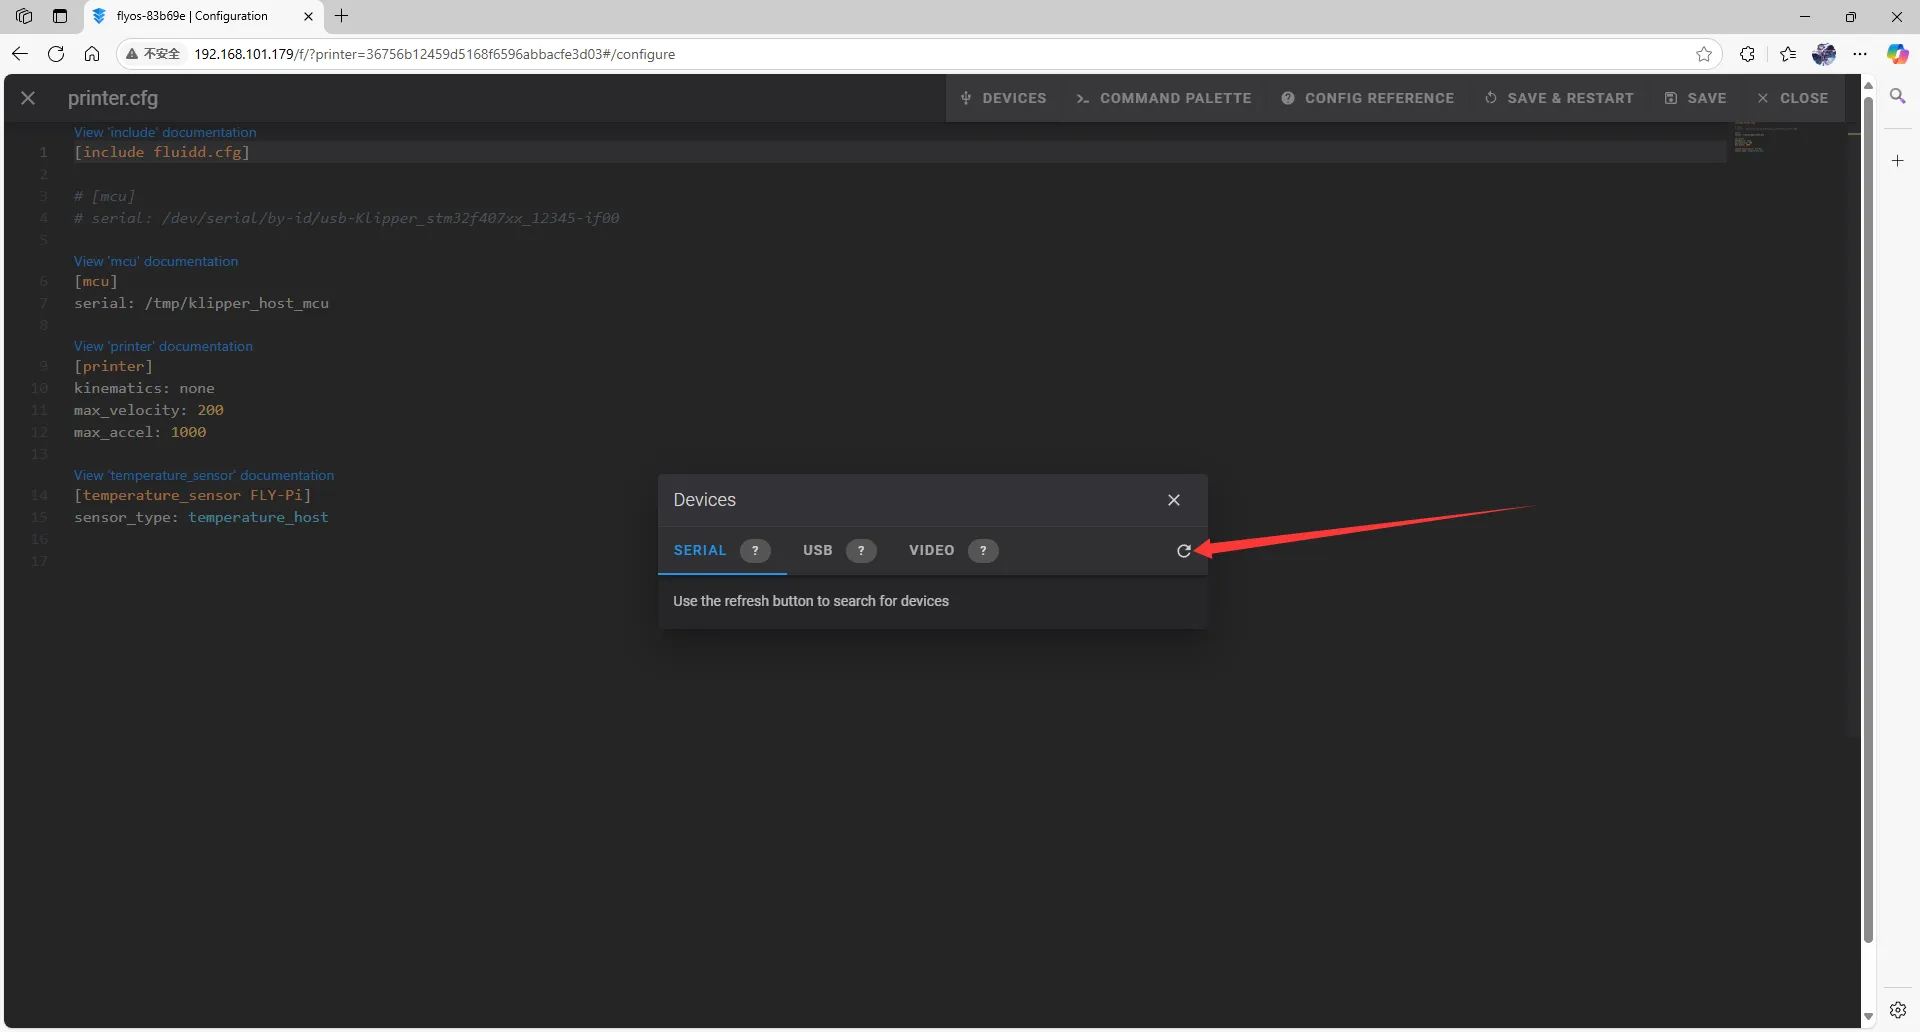
- Refresh for mainsail
-
Copy the ID; click the arrow to copy.
- For fluidd, check if
ttyAMCexists, and ensure that Path by ID exists; this is the USBID

- For mainsail, check if
ttyAMCexists, and ensure that Path by ID exists; this is the USBID
- For fluidd, check if
Fill in USB ID
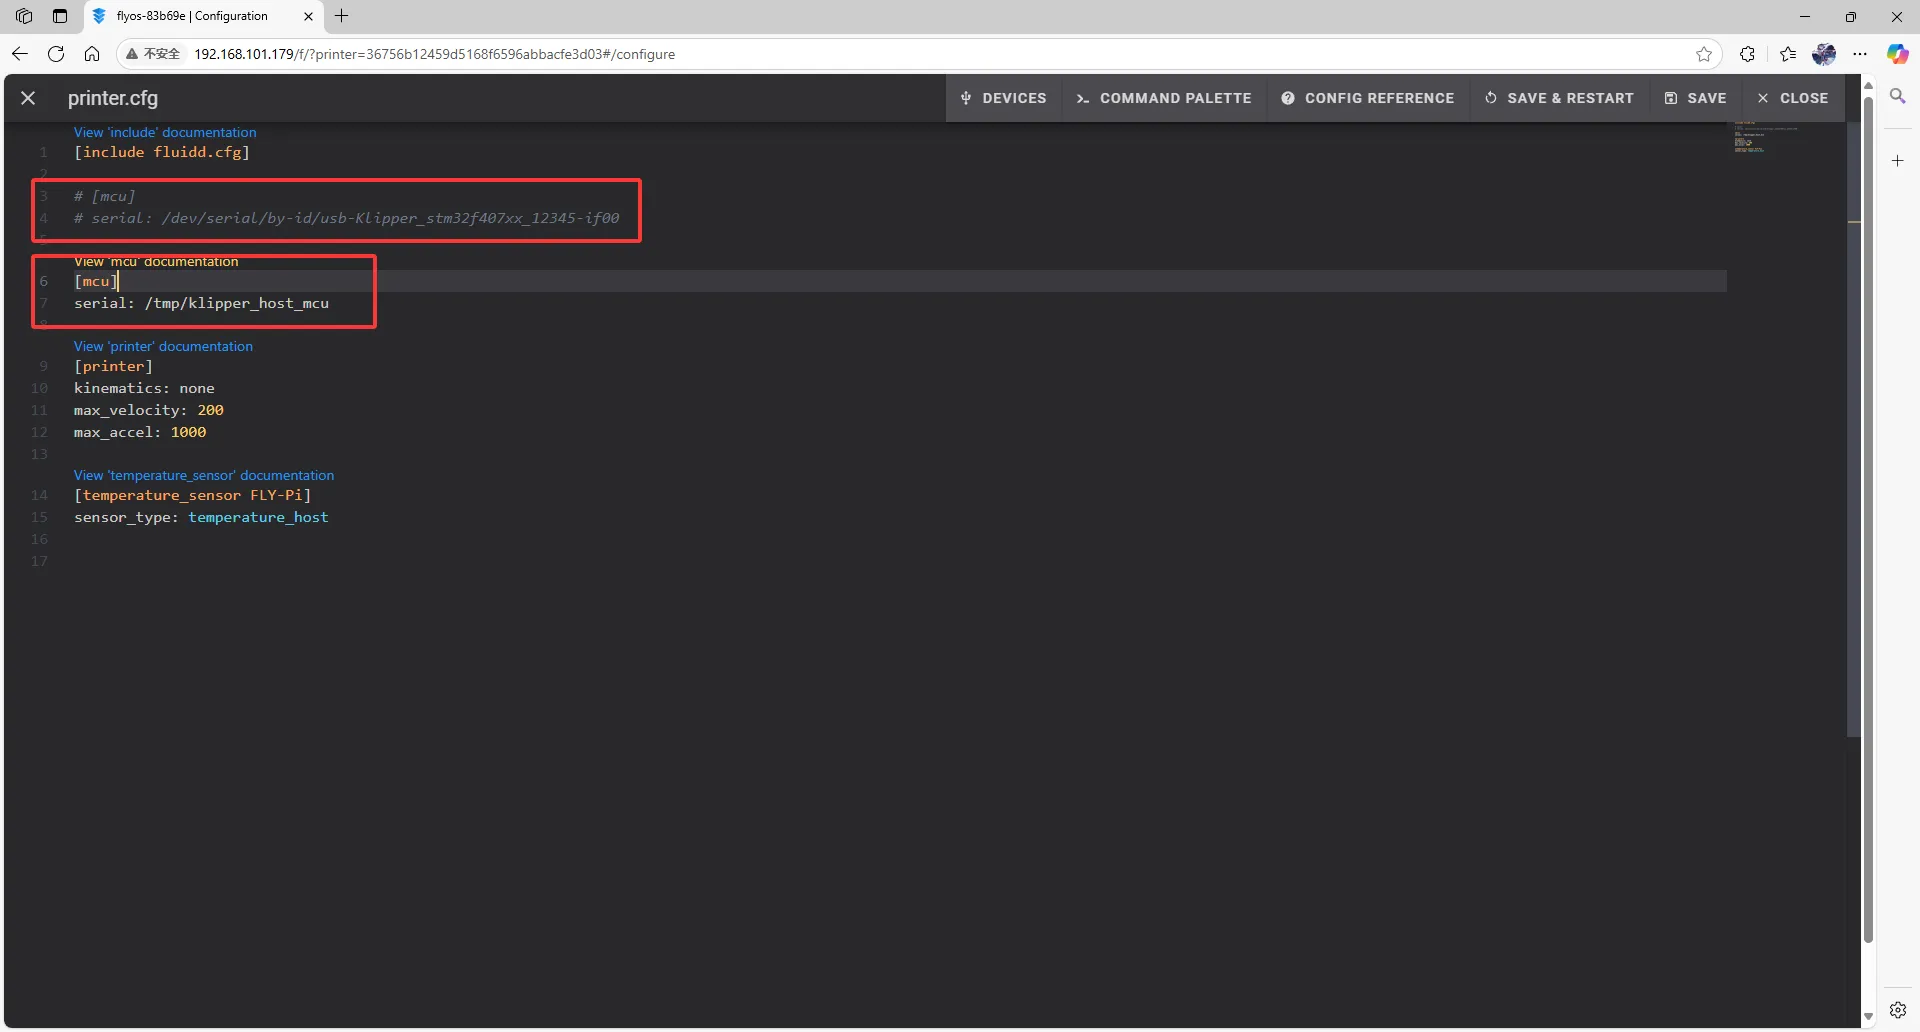
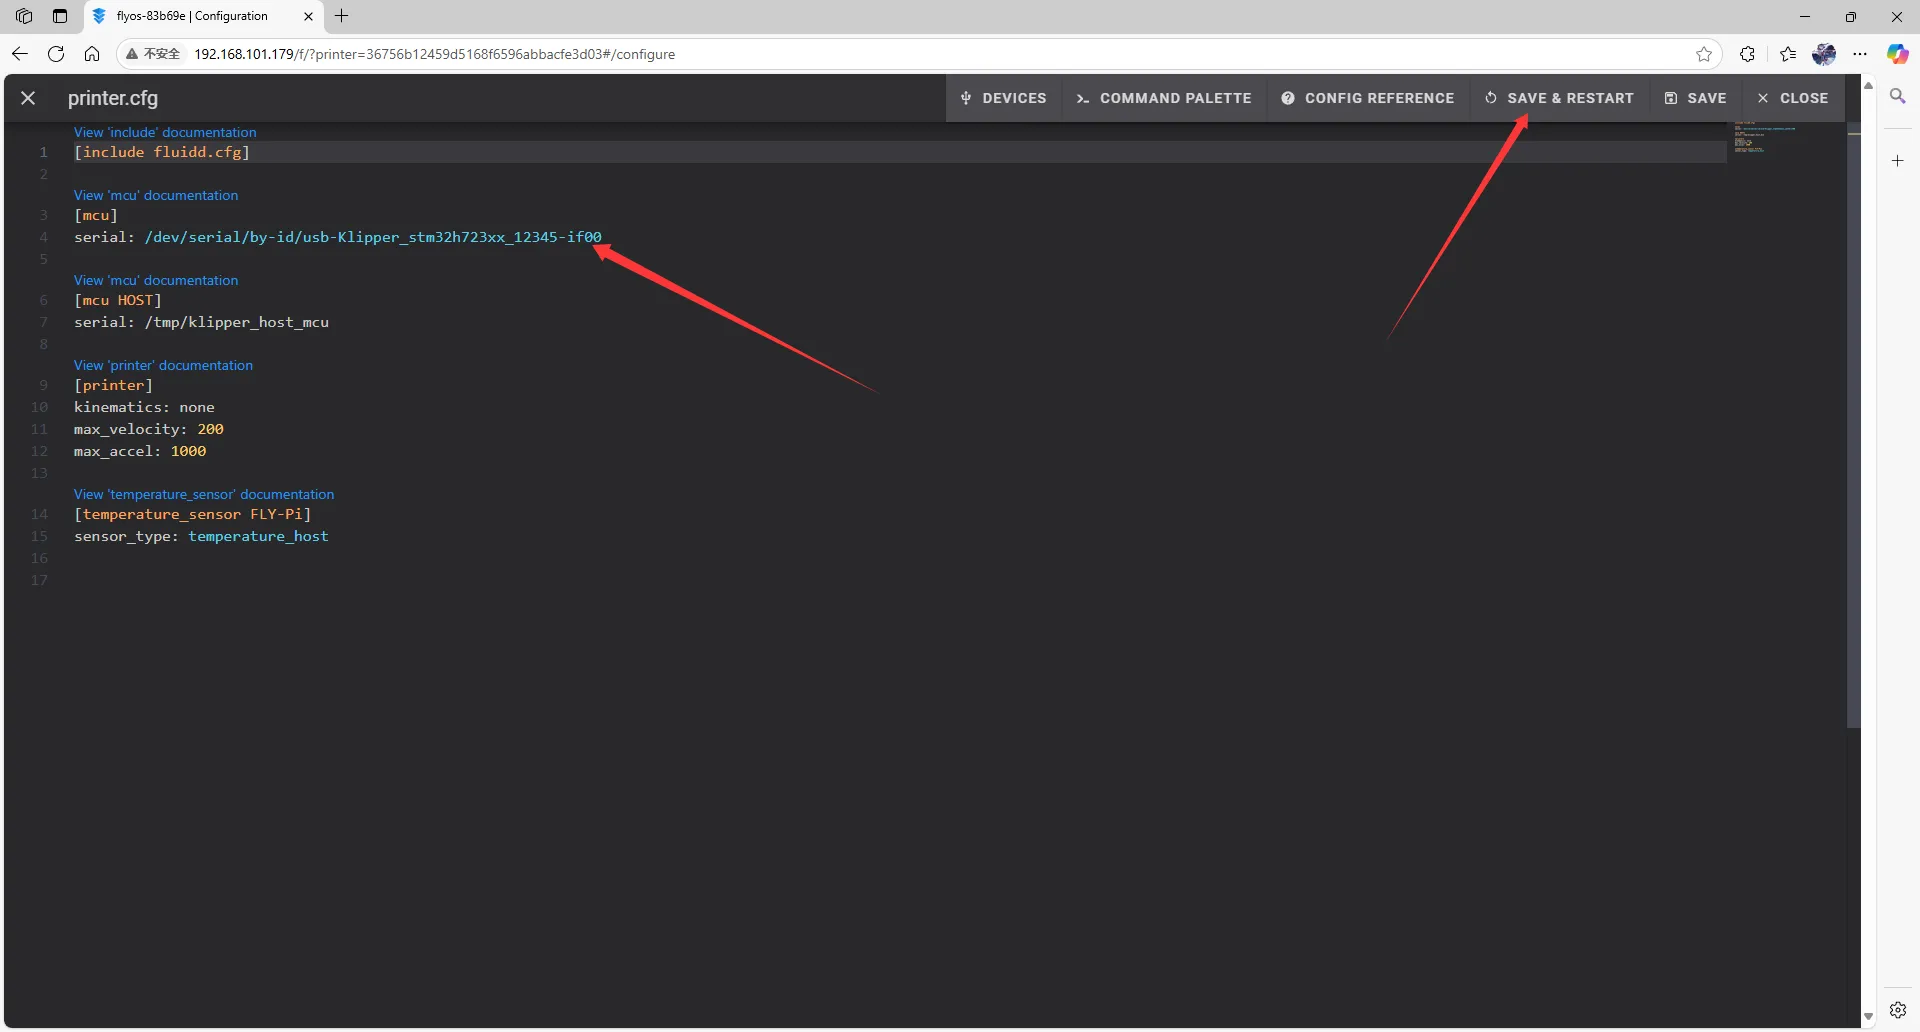
- Close
DEVICESand fill in the ID
- Please change the following in the configuration file:
[mcu]
serial: /tmp/klipper_host_mcu
to
[mcu host]
serial: /tmp/klipper_host_mcu
- Add:
[mcu]
serial: <Replace this with the ID you just found>
 |
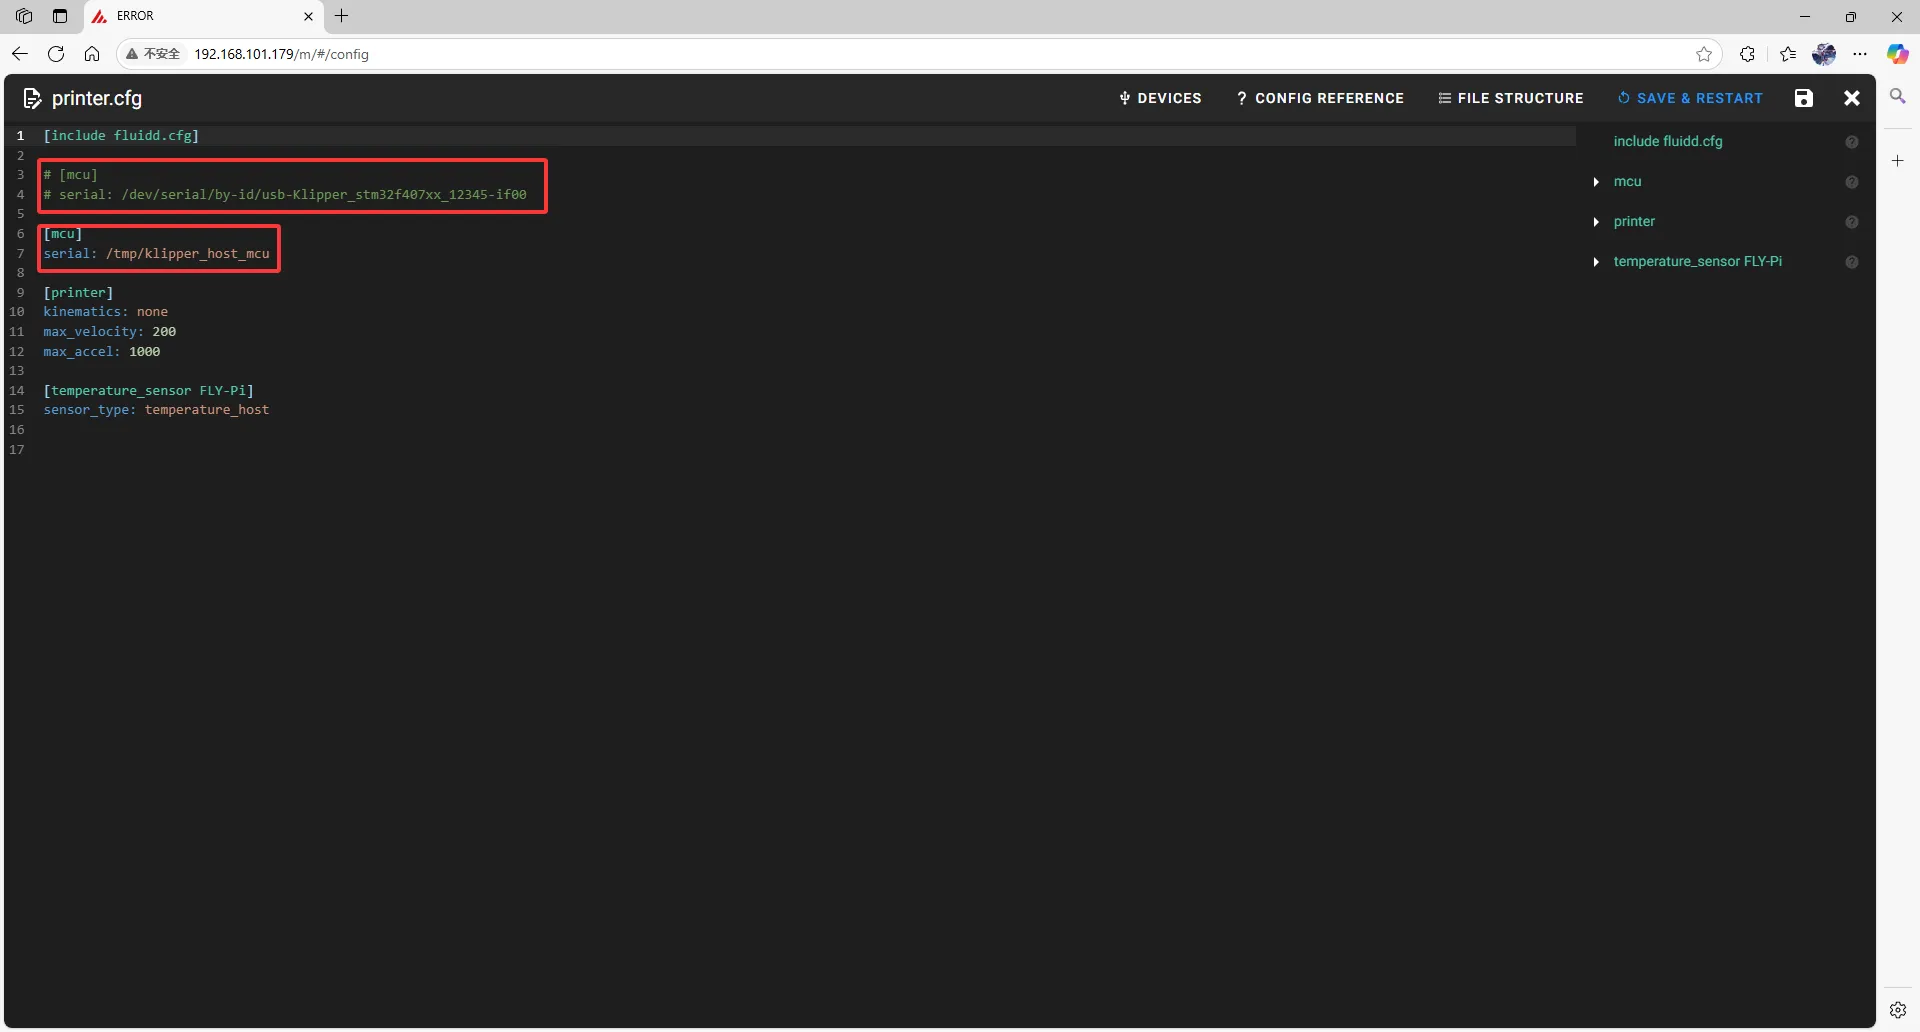 |
- Fill in the ID into the configuration.
- After filling in the ID, click
SAVE & RESTARTat the top right corner.
 |  |
- If Klipper shows a warning
ADC out of range, this is normal. Connect the heated bed and thermistor to the mainboard, and configure the thermistor pins for the nozzle and heated bed, then save and restart.
Note: All IDs shown in this document are examples. Each mainboard's ID is different; please fill in the actual ID you obtained.