Eddy Usage
- Ensure your printer is not leaking electricity before use
- If there was any previous configuration for
eddy,Probe, orBL-Touch, please delete it - When installing Eddy, the coil should be positioned above the nozzle, approximately
2mm-3mmaway from it - Do not turn on the heated bed when testing
- Machines with multiple Z axes need to be manually leveled once
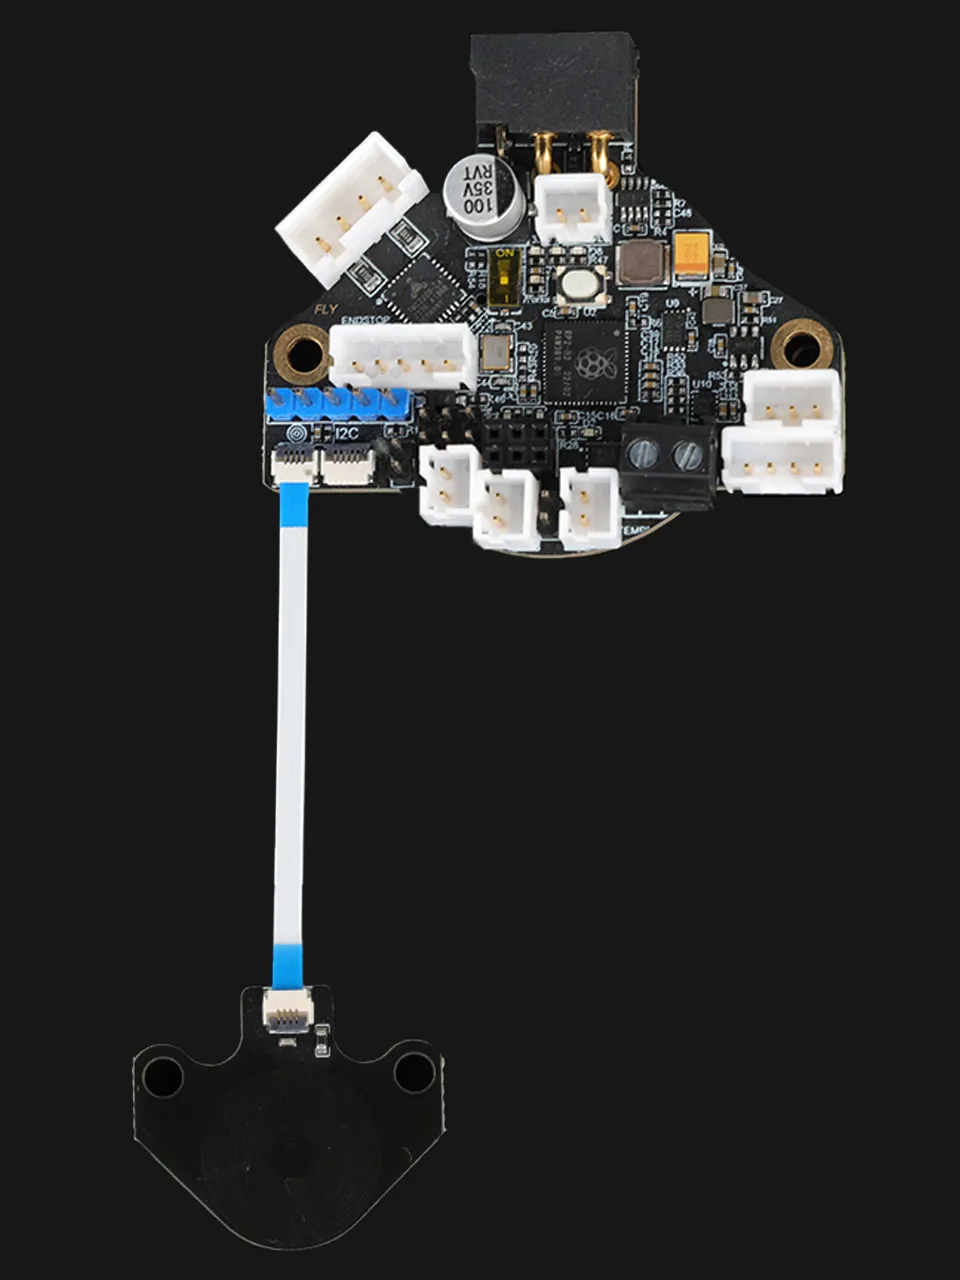
Wiring Diagram
- Install with the logo facing the direction of the heated bed
Reference Configuration
- The
XYoffset values need to be calculated based on the scanning module and the nozzle itself, then modified in the offset values below. - The
Zoffset value must ensure the physical height difference between the probe coil and the nozzle tip is within the recommended range of2~3mm.
[stepper_z]
endstop_pin: probe:z_virtual_endstop
# position_endstop: -0.5

[probe_eddy_current fly_eddy_probe]
sensor_type: ldc1612
i2c_address: 43
i2c_mcu: SHT36
i2c_bus: i2c1e
x_offset: 0     # remember to set the x offset
y_offset: 21.42 # remember to set the y offset
z_offset: 2     # remember to set the z offset
i2c_speed: 4000000

[temperature_probe fly_eddy_probe]
sensor_type: Generic 3950
sensor_pin:SHT36:gpio28
horizontal_move_z: 2
Coil Model Download Link
- Click the download link below
-
Loading...
Calculating XY Offset
- After downloading the model, calculate the XY offset based on your printer's actual setup
- Modify the
x_offsetandy_offsetvalues in the configuration after measurement

Eddy Calibration
Precautions
- Ensure there is no configuration for
Probe,BL-Touch, or related components - Machines with multiple Z axes need to be manually leveled once
- Check that the heatbed is free of debris and the nozzle is clean before calibration
Adding Configuration
⚠️ Important Notes:
- The configuration below is temporary and must be deleted or commented out after use
- Click
Save & Restartto save and restart after adding - Must be added to the very top of the
printer.cfgfile, never at the bottom
[force_move]
enable_force_move: true

[gcode_macro _LDC_CALIBRATE_DRIVE_CURRENT]
gcode:
    BED_MESH_CLEAR
    SET_KINEMATIC_POSITION x=100 y=100 z=10
    G28 X Y
    M104 S0
    M140 S0
    M106 S0
    G0 X{printer.toolhead.axis_maximum.x / 2} Y{printer.toolhead.axis_maximum.y / 2} F6000
    G0 Z30 F600
    G4 P1000
    LDC_CALIBRATE_DRIVE_CURRENT CHIP=fly_eddy_probe
    G4 P1000
    SAVE_CONFIG

[gcode_macro PROBE_EDDY_CURRENT_CALIBRATE_AUTO]
gcode:
    BED_MESH_CLEAR
    G28 X Y
    M104 S0
    M140 S0
    M106 S0
    G90 # Abs positioning
    G1 X{ printer.toolhead.axis_maximum.x/2 } Y{ printer.toolhead.axis_maximum.y/2 } F6000
    {% if 'z' not in printer.toolhead.homed_axes %}
        SET_KINEMATIC_POSITION Z={ printer.toolhead.axis_maximum.z-1 } # Allows the user to work it down until it touches.
    {% endif %}
    PROBE_EDDY_CURRENT_CALIBRATE {rawparams}

[gcode_macro TEMP_COMPENSATION]
description: Temperature compensation calibration process
gcode:
    {% set bed_temp = params.BED_TEMP|default(90)|int %}
    {% set nozzle_temp = params.NOZZLE_TEMP|default(250)|int %}
    {% set temperature_range_value = params.TEMPERATURE_RANGE_VALUE|default(3)|int %}
    {% set desired_temperature = params.DESIRED_TEMPERATURE|default(80)|int %}
    {% set Temperature_Timeout_Duration = params.TEMPERATURE_TIMEOUT_DURATION|default(6500000000)|int %}
        # Safety check: Ensure all axes are not locked
        {% if printer.pause_resume.is_paused %}
            { action_raise_error("Error: Printer is paused, please resume first") }
        {% endif %}
        # Step 1: Home all axes
        STATUS_MESSAGE="Homing all axes..."
        G28
        STATUS_MESSAGE="Homing complete"
        # Step 2: Automatic leveling
        #Z_TILT_ADJUST
        #quad_gantry_level
        # Step 3: Safe Z-axis lift
        STATUS_MESSAGE="Lifting Z-axis..."
        G90
        G0 Z5 F2000  # Lift slowly to prevent collisions
        # Step 4: Set timeout and temperature calibration
        SET_IDLE_TIMEOUT TIMEOUT={Temperature_Timeout_Duration}
        STATUS_MESSAGE="Starting temperature probe calibration..."
        TEMPERATURE_PROBE_CALIBRATE PROBE=fly_eddy_probe TARGET={desired_temperature} STEP={temperature_range_value}
        # Step 5: Set printing temperatures (modify as needed)
        STATUS_MESSAGE="Setting working temperatures..."
        SET_HEATER_TEMPERATURE HEATER=heater_bed TARGET={bed_temp}
        SET_HEATER_TEMPERATURE HEATER=extruder TARGET={nozzle_temp}
        # Completion message
        STATUS_MESSAGE="Temperature compensation process completed!"
        # description: G-Code macro
Drive Current Calibration
- Enter the following command in the web console:
_LDC_CALIBRATE_DRIVE_CURRENT - The printer will move to the center position and move the print head away from the heatbed
- It will then start automatic drive current calibration and save the result upon completion
- Finally, Klipper will restart
Calibrating Height
- Machines with multiple Z axes need to be manually leveled once before calibrating height
- After calibrating height on multi-Z axis machines, perform a leveling operation and recalibrate height (recommended)
- Check that the heatbed is free of debris and the nozzle is clean before calibration
-
Enter the following command in the web console:
PROBE_EDDY_CURRENT_CALIBRATE_AUTO CHIP=fly_eddy_probe -
The printer will move to the center position and display a dialog box
-
The
Zheight shown byKlipperafter executing this command is not important; you only need to adjust the nozzle to the correct height -
Follow the prompts in the
Klipper UIto gradually lower the nozzle until it touches a sheet of paper placed on the print bed. Ensure the paper can slide smoothly under slight resistance. -
Be careful not to apply excessive pressure to avoid damaging the print bed.
-
After completing the adjustment, click the
ACCEPTbutton in the dialog box. The system will begin calibrating the EDDY height -
Once calibration is complete, click the
SAVE_CONFIG & Restartbutton in the top-right corner of the web interface to save the configuration and restart Klipper
Temperature Compensation
- When Eddy performs temperature compensation, the heatbed reaches very high temperatures—avoid burns
- Do not preheat the heatbed or nozzle before starting temperature compensation
- Do not touch the heatbed surface during the process
- It is recommended to wear heat-resistant gloves
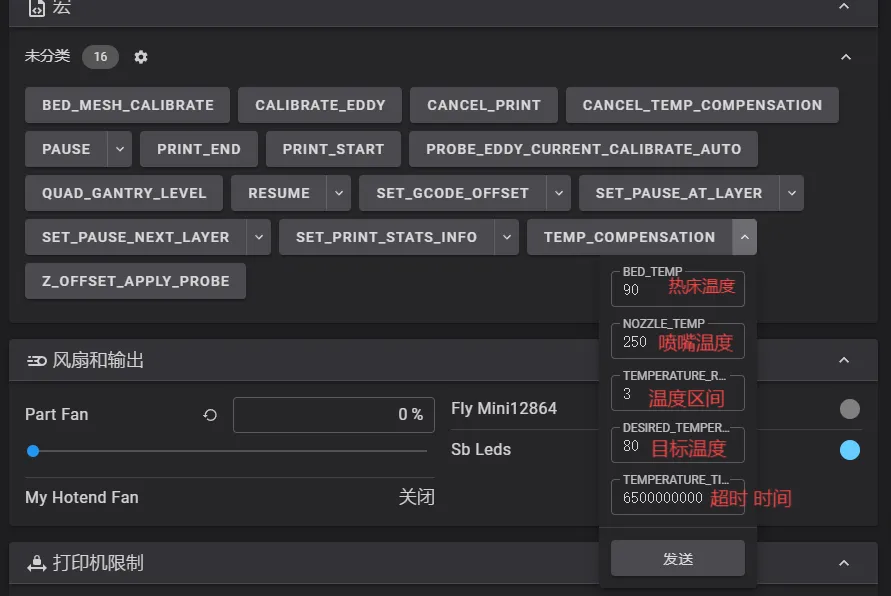
- Click the
TEMP_COMPENSATIONmacro button, which will open a dialog box - In the dialog box, you can set the heatbed temperature, nozzle temperature, temperature range value, and target temperature
- Click the
STARTbutton to begin temperature compensation calibration - During the calibration process, the system will automatically adjust the heatbed and nozzle temperatures and prompt you to manually perform Z offset calibration every 3℃
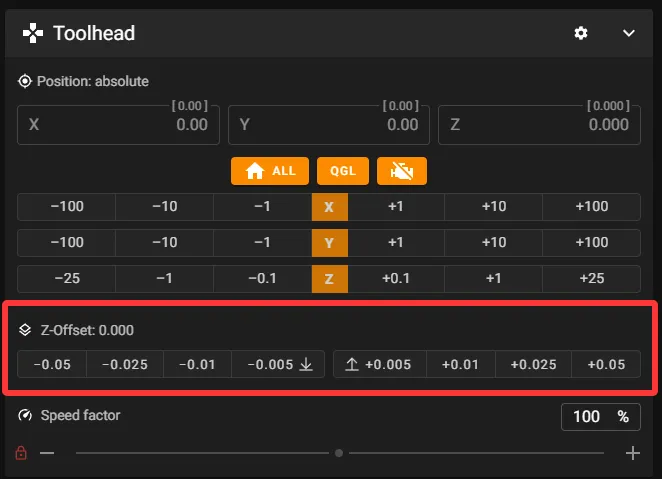
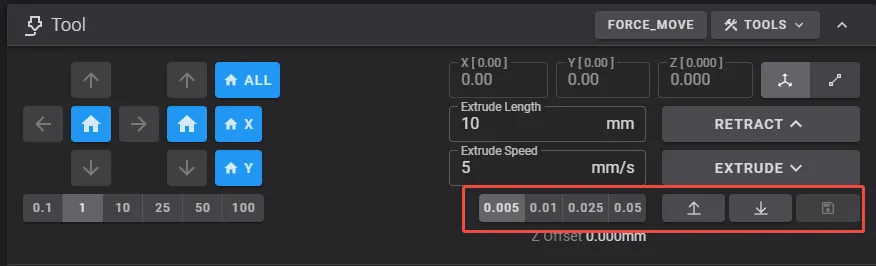
- After this operation, the UI will display a Z-axis adjustment box. Use the manual Z-axis offset calibration (Paper Test) method described above. Insert a piece of paper between the nozzle and the bed, then confirm the value.

- After accepting the value, the system will automatically set the heatbed temperature to 80℃ and the nozzle temperature to 250℃.
- If you're in a room with air conditioning or open windows, it's recommended to turn off the AC or close the window to ensure Eddy's temperature rises properly, as wind can interfere with heating.
- As Eddy's temperature increases, the system will automatically prompt you to perform manual Z offset calibration every 3℃. The heatbed temperature is very high—avoid burns!!!
- Repeat the manual Z offset calibration (Paper Test) until calibration is complete. If you notice that Eddy’s temperature stops rising, you can use the relevant commands below to end the calibration early.
- Additional G-code commands available during drift calibration include: TEMPERATURE_PROBE_NEXT
TEMPERATURE_PROBE_NEXTForces Eddy to sample new data before reaching the target temperature of80℃.TEMPERATURE_PROBE_COMPLETEEnds calibration before Eddy reaches the set temperature of80℃.ABORTTerminates the calibration and discards the results.- After calibration completes, use
SAVE_CONFIGto save the temperature offset settings! - In summary, the calibration process described above is more challenging and time-consuming compared to most other procedures. It may require practice and multiple attempts to achieve excellent first-layer print results across a wide temperature range!
Optimization
Quick Bed Sweeping
- The macro below will first raise the nozzle to
10mmbefore performing bed leveling, then quickly sweep the bed. After the sweeping is completed, the nozzle will be raised to2mmfor fine leveling.
- Z_TILT_ADJUST
- QUAD_GANTRY_LEVEL
[gcode_macro Z_TILT_ADJUST]
rename_existing: _Z_TILT_ADJUST
gcode:
    {% set PROBE_Z_OFFSET = printer.configfile.settings['probe_eddy_current fly_eddy_probe'].z_offset|float %}
    # ========== State Save ==========
    SAVE_GCODE_STATE NAME=STATE_Z_TILT

    # ========== Environment Preparation ==========
    BED_MESH_CLEAR                       # Clear existing bed mesh data

    # ========== Main Leveling Process ==========
    {% if not printer.z_tilt.applied %}
        # Initial coarse adjustment
        _Z_TILT_ADJUST horizontal_move_z=10 retry_tolerance=1
    {% endif %}

    # Fine secondary leveling
    _Z_TILT_ADJUST horizontal_move_z={PROBE_Z_OFFSET} retry_tolerance=0.075 retries=20 METHOD=rapid_scan ADAPTIVE=1
        G0 Z10 F6000                     # Use standard G-code commands instead of HORIZONTAL_MOVE_Z

    # ========== Post-Processing ==========
    G90                                 # Force absolute coordinate mode
    G0 Z10 F6000                        # Raise Z axis to safe height
    M117 Z_tilt Completed               # Display completion status
    #G28                                 # Return to origin
    # ========== State Restore ==========
    RESTORE_GCODE_STATE NAME=STATE_Z_TILT
    M400
[gcode_macro QUAD_GANTRY_LEVEL]
rename_existing: _QUAD_GANTRY_LEVEL
gcode:
    {% set PROBE_Z_OFFSET = printer.configfile.settings['probe_eddy_current fly_eddy_probe'].z_offset|float %}
    # ========== State Save ==========
    SAVE_GCODE_STATE NAME=STATE_QGL

    # ========== Environment Preparation ==========
    BED_MESH_CLEAR                       # Clear existing bed mesh data

    # ========== Main Leveling Process ==========
    {% if not printer.quad_gantry_level.applied %}
        # Initial coarse adjustment
        _QUAD_GANTRY_LEVEL horizontal_move_z=10 retry_tolerance=1
    {% endif %}

    # Fine secondary leveling
    _QUAD_GANTRY_LEVEL horizontal_move_z={PROBE_Z_OFFSET} retry_tolerance=0.075 retries=20 METHOD=rapid_scan ADAPTIVE=1
        G0 Z10 F6000                     # Use standard G-code commands instead of HORIZONTAL_MOVE_Z

    # ========== Post-Processing ==========
    G90                                 # Force absolute coordinate mode
    G0 Z10 F6000                        # Raise Z axis to safe height
    M117 QGL Completed                  # Display completion status
    #G28                                 # Return to origin
    # ========== State Restore ==========
    RESTORE_GCODE_STATE NAME=STATE_QGL
    M400
Heated Bed
- The macro below will enable the bed mesh to operate in fast mode.
- This configuration reduces the influence of heated bed heating on bed leveling.
- This configuration also reduces the impact of high-power heated beds on EDDY.
- The heated bed will be turned off during bed mesh calibration and restored to its original temperature afterward.
[gcode_macro BED_MESH_CALIBRATE]
rename_existing: _BED_MESH_CALIBRATE
gcode:
    {% set PROBE_Z_OFFSET = printer.configfile.settings['probe_eddy_current fly_eddy_probe'].z_offset|float %}
    {% set TARGET_TEMP = printer.heater_bed.target %}
    M140 S0
    _BED_MESH_CALIBRATE horizontal_move_z={PROBE_Z_OFFSET} METHOD=rapid_scan {rawparams}
    M140 S{TARGET_TEMP}
Using the Z-offset Function with EDDY
Download EDDY Optimized Configuration
- Click on the download link below
- Please note there are two files,
eddy.cfgandvariables.cfg, which need to be placed in the same directory asprinter.cfg -
Loading...
Add eddy.cfg Configuration
- If you want Eddy to act as both an auto-leveling sensor and a Z-axis endstop, and you want to use the Z-axis offset function
- Please add the following configuration at the top of your
printer.cfg
[include eddy.cfg]
Modify Path
- Open the
eddy.cfgfile and locate the[save_variables]configuration section - Modify the
filenamepath to match your system's path
- Below are examples
- You need to adjust the path of the
variables.cfgfile according to your system
|
|
Z-Offset Instructions
- To calibrate the Z-offset, print a large model, and only one layer is required
|
|
- After calibration, click Save. Please note that the save confirmation will only be shown in the console!!!!
- No need to restart
klipperafter saving!
- Repeat the Z-offset calibration several times
- To achieve a perfect first layer