System Burning
Host User Guide for Beginners
Host User Guide for BeginnersPreparations Before System Burning
- SD card reader
- One TF card with a capacity of no less than 16GB or no more than 128GB, and the transmission speed of the TF card must be Class10 or above
- Download the corresponding system image
- Download the required burning tool
System Burning
TF card burning and TF card burning to M2WE only require using one of the burning methods.
- If the machine is installed with M2WE and memory card, the system defaults to boot from the memory card
- It is recommended to use TF card to burn the system for M2WE; burning through USB may fail due to driver compatibility issues. It is recommended to directly use Memory Card Burning to M2WE
- Please note whether the downloaded system image corresponds. If it does not correspond, the system cannot start.
- Burning to TF Card
- Burning to M2WE via TF Card
- Burning to M2WE via USB
- Burning to M2WE or TF Card via M2SD Burner
Flashing the System to TF Card
Preparation
- First install the software
SDFormatterandRufusFormatting Tool - Extract the system, after extraction the file suffix is
.img - It is not recommended to use
balenaetcherandRaspberry Pifor system flashing - Insert the TF card into the card reader, and plug the card reader into the computer's USB port
- If the TF card has data, back it up. After flashing the system, the system card is not recommended to be removed unless you need to flash to M2WE
Formatting the Memory Card
- Use the
SDFormatter.exesoftware to format the TF card - Select the disk you want to format
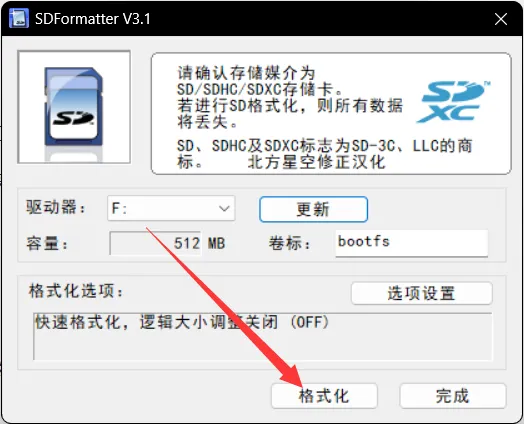
- Or use the built-in disk management in WIN to delete partitions, after deleting the partition, create a new partition.
Flashing to TF Card
Flashing the System
-
Open Rufus, select the device. The displayed capacity should match the capacity of the SD card inserted into the computer.
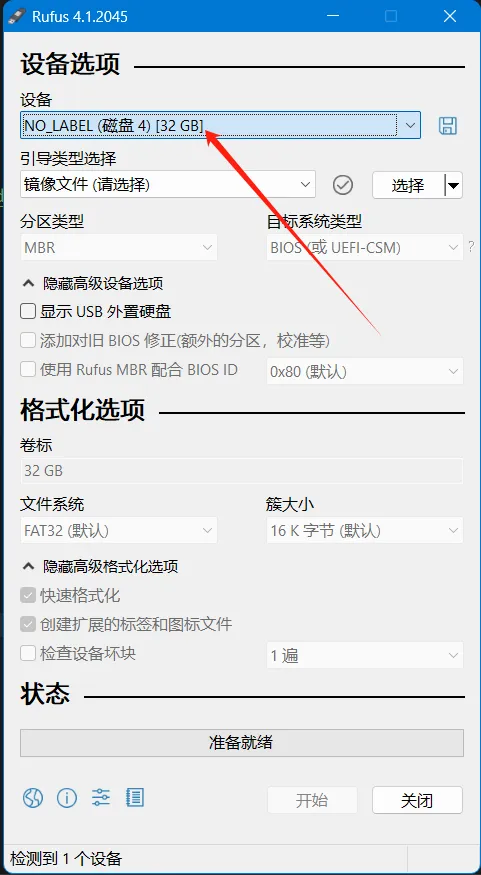
-
For
Boot selection, simply leave it set to the default option,Disk or ISO image. -
To select the image file, click the
Selectbutton to the right ofBoot selection, and choose the extracted.imgfile. -
After selecting the image file, the
Boot selectionfield will change to display the filename of the image.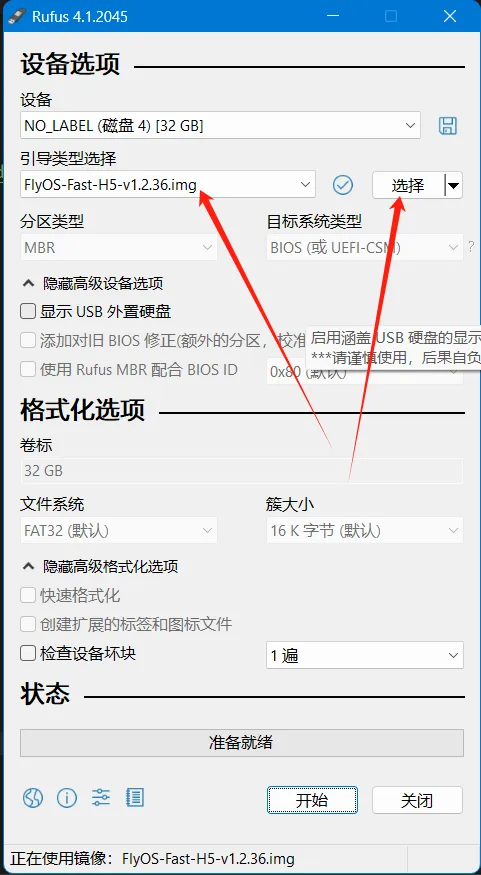
-
Click the
Startbutton. If a window pops up indicating that the disk data needs to be erased, clickOK.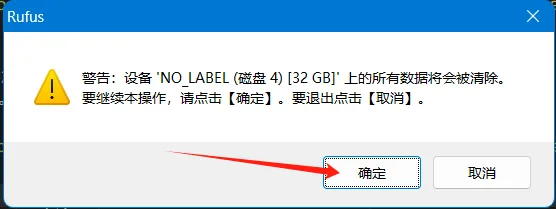
-
Once the flashing process is complete, the computer will emit a prompt sound, and the progress bar will show
Ready.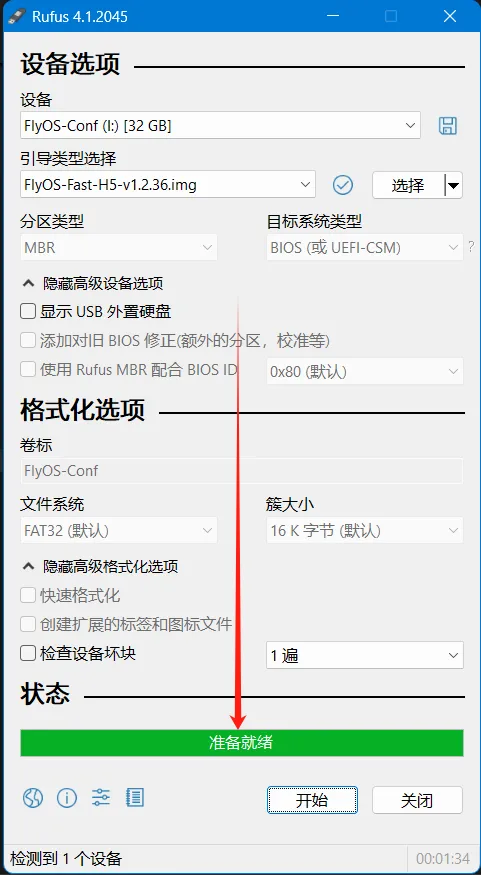
-
After flashing is complete, there is no need to immediately remove the SD card.
-
Open File Explorer and check if there is a USB drive or removable disk named
BOOT.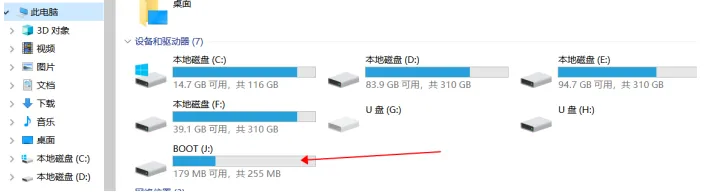
-
The appearance of the
FlyOS-envfile indicates that the flashing was successful. -
Install the SD card into the motherboard.
Flashing to M2WE via TF Card
System migration can completely transfer the image on the TF card to the M2WE, and after the migration is completed, the contents in M2WE remain consistent with those on the original TF card.
- After installing M2WE, power it on and boot
- Please first connect to SSH using a serial port by clicking here
- Execute the following command; you may be prompted to enter a password. Input the password
mellowand press Enter (note that the password is invisible)
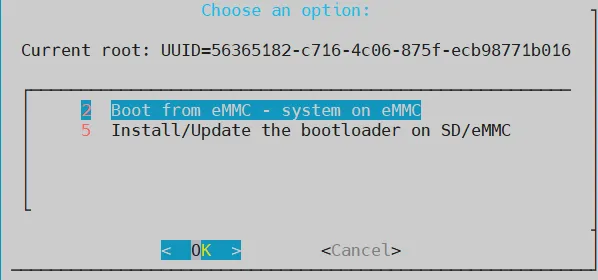
sudo nand-sata-install
- Select the option
Boot from eMMC - system on eMMCand press Enter (generally the default option is selected, so just press Enter directly)
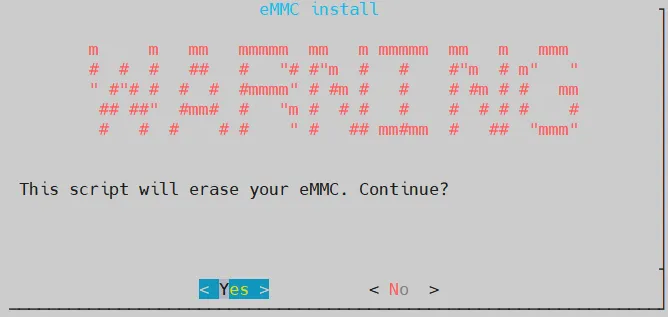
- When prompted with
This script will erase your eMMC. Continue?, selectYesand press Enter (generally the default option is selected, so just press Enter directly)
- Select the file system type as
ext4and press Enter (generally the default option is selected, so just press Enter directly)

- Be patient until the progress bar appears (if no progress bar appears within 2 minutes, please press
CTRL+Cto terminate the operation, then restart the device and try again)

- During the system migration process, do not disconnect power or perform other operations until the migration is complete
- After the migration is complete, press Enter directly, and wait for the device to fully shut down

- After shutdown, remove the TF card, power on again, and the system can now boot from the eMMC
Flashing to M2WE via USB
Preparation
Preparation
- Install the software
SDFormatterandRufusfirst Formatting tool - Download M2WE BOOT driver
- Extract the system, after extraction the file suffix is
.img - It is not recommended to use
balenaetcherandRaspberry Pifor system flashing - Insert the M2WE or SD card into the M2SD, then insert the M2SD into the computer's USB port
- If there is data on the M2WE, please back it up
Installing the Driver
- Open the
Zadigsoftware - Except for the first
Zadig, which does not need to be installed and can be run directly, the other two need to be installed. Just clickNextorNextduring the installation process - Open
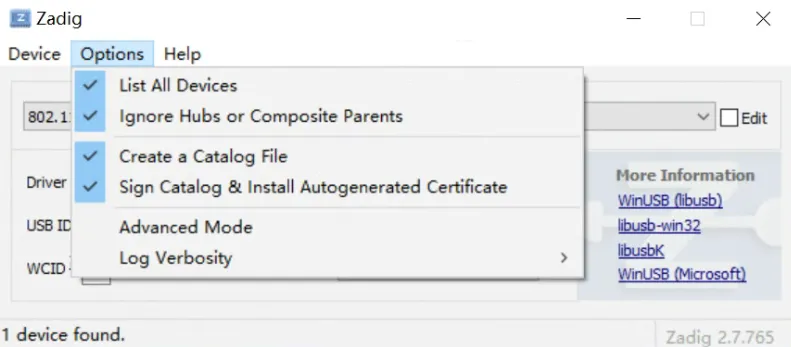
Zadig, checkList All Devicesin the top menu barOptions
Make sure the device is connected to the computer while the button is pressed
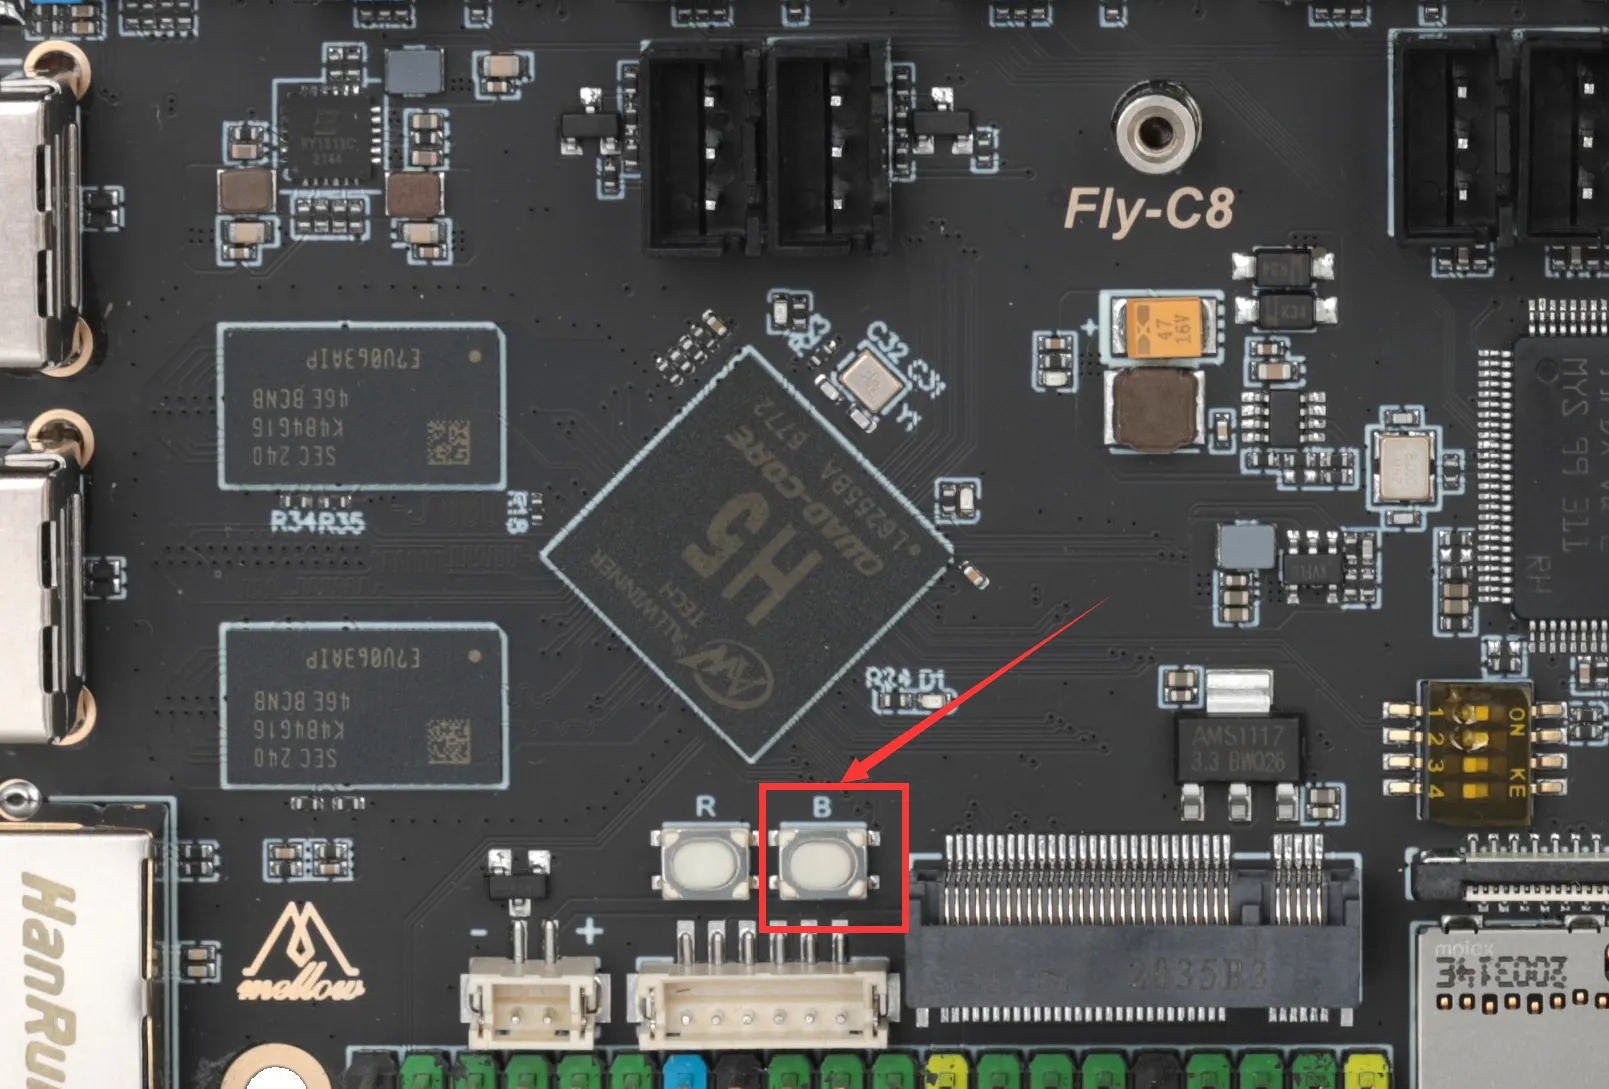
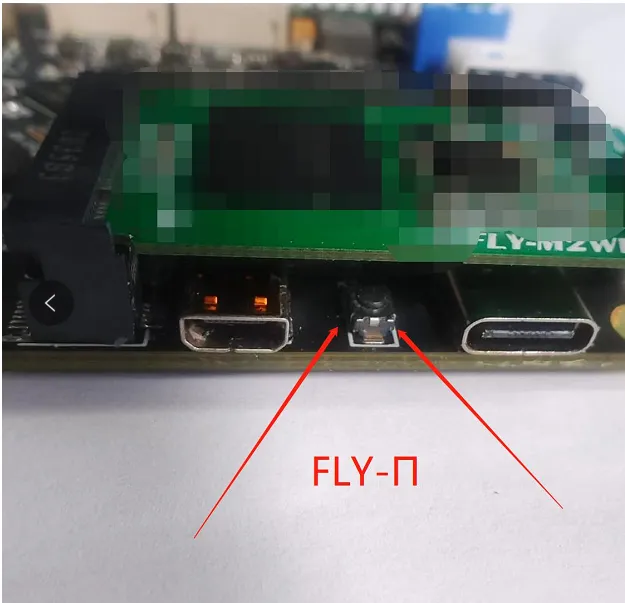
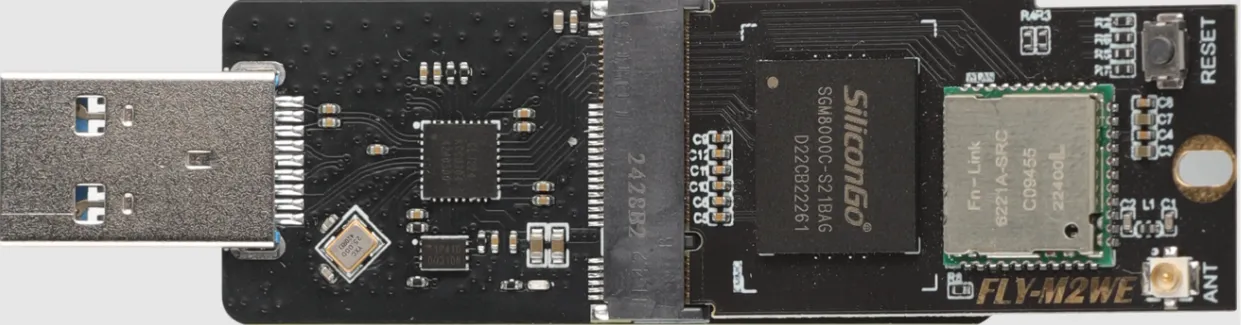
- Install M2WE, press the BOOT button and connect the dual-head USB to the computer
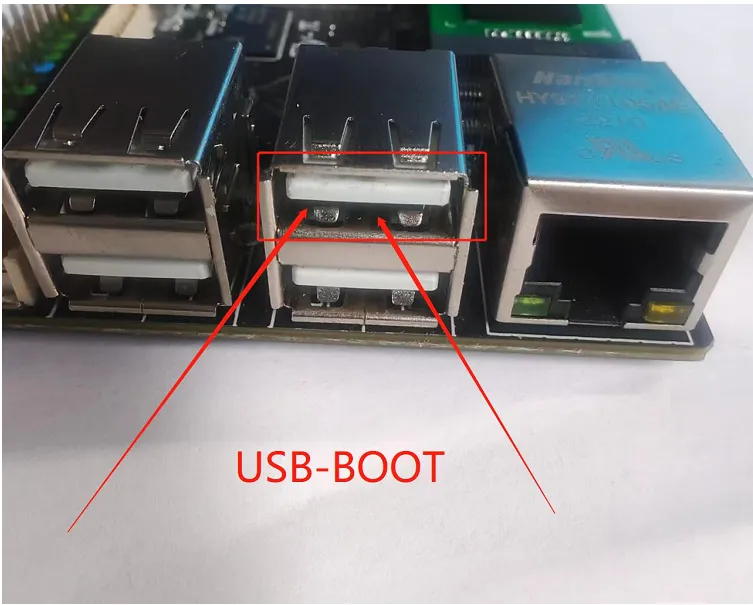
- FLY-C8
- FLY-Pi v2
- FLY-Pi(π)
- FLY-Gemini
- FLY-C8 port
- FLY-Pi v2 port
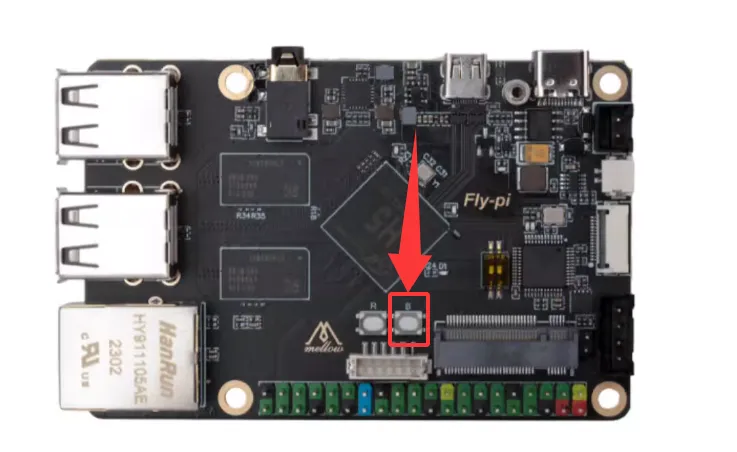
- FLY-Pi port
- FLY-Gemini port
- Open zadig
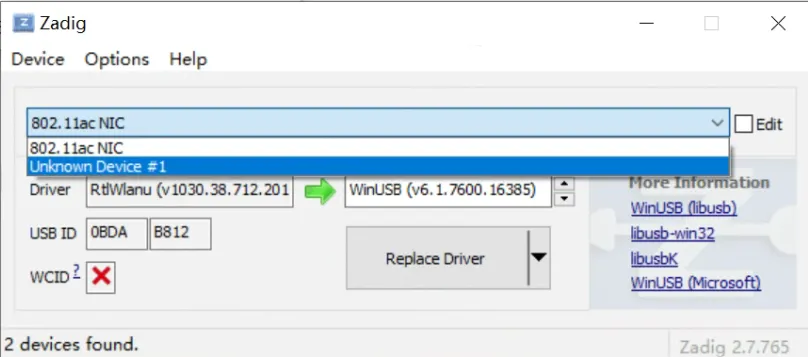
- If everything is normal, there will be an
Unknow Device #xorUSB Device(VID_1f3a_PID_efe8)in zadig, select it
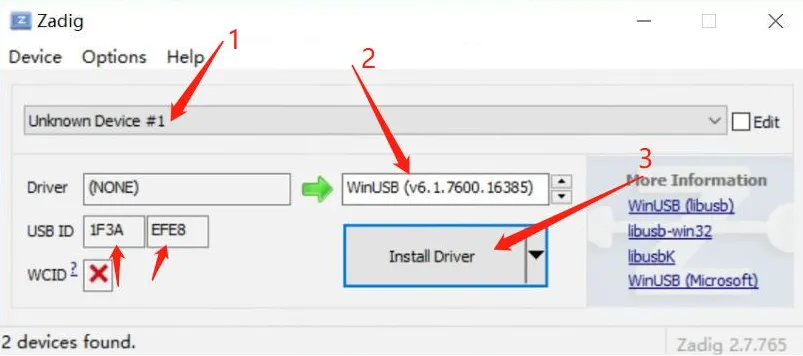
- After selecting the device, check if the USB ID matches the one in the picture. If not, please select another device
- The second part of the picture can only select
WinUSB(vxxxxxxx), the version number doesn't matter - Click
Install Driverto install the driver
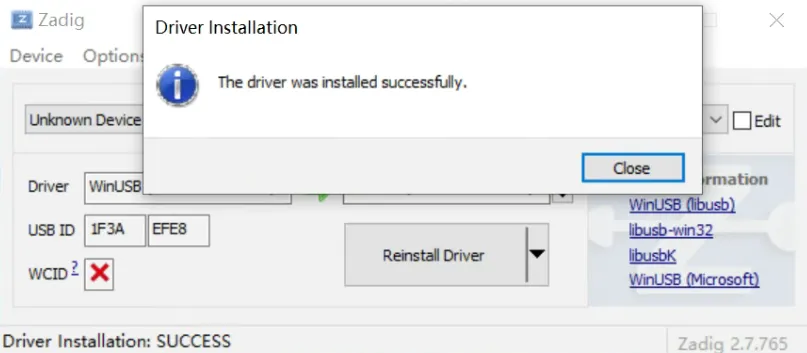
- USB driver installed successfully (the driver only needs to be installed once, no need to install again if you burn it again)
- Open the installed FLY-BOOT, click
Check Device - If the previous steps are operated correctly, it will prompt that a device is available
- Click
BOOTto start, if it works normally, it will prompt thatBOOThas been successfully enabled
Formatting M2WE
- Use the
TFFormatter.exesoftware to format theBOOTdisk
- Or use the built-in disk management in WIN to delete partitions, delete the partition and create a new one again.
- Now you can open File Explorer, and there will be a 14.5G USB drive (16G eMMC shows as 14.5G)
- You can now directly use Win32diskimager to flash the system image, and select the drive letter as this 14.5G USB drive
Flashing to M2WE
Flashing the System
-
Open Rufus, select the device. The displayed capacity should match the capacity of the SD card inserted into the computer.
-
For
Boot selection, simply leave it set to the default option,Disk or ISO image. -
To select the image file, click the
Selectbutton to the right ofBoot selection, and choose the extracted.imgfile. -
After selecting the image file, the
Boot selectionfield will change to display the filename of the image. -
Click the
Startbutton. If a window pops up indicating that the disk data needs to be erased, clickOK. -
Once the flashing process is complete, the computer will emit a prompt sound, and the progress bar will show
Ready. -
After flashing is complete, there is no need to immediately remove the SD card.
-
Open File Explorer and check if there is a USB drive or removable disk named
BOOT. -
The appearance of the
FlyOS-envfile indicates that the flashing was successful. -
Install the SD card into the motherboard.
Install M2WE or SD card on M2SD
- This product supports USB3.0
- This product does not support using TF and M2WE at the same time
- After installing M2WE or SD card, connect to the computer's USB port to format
- Do not install NVME or other devices, otherwise it will cause damage to the device !!!
- Install M2WE
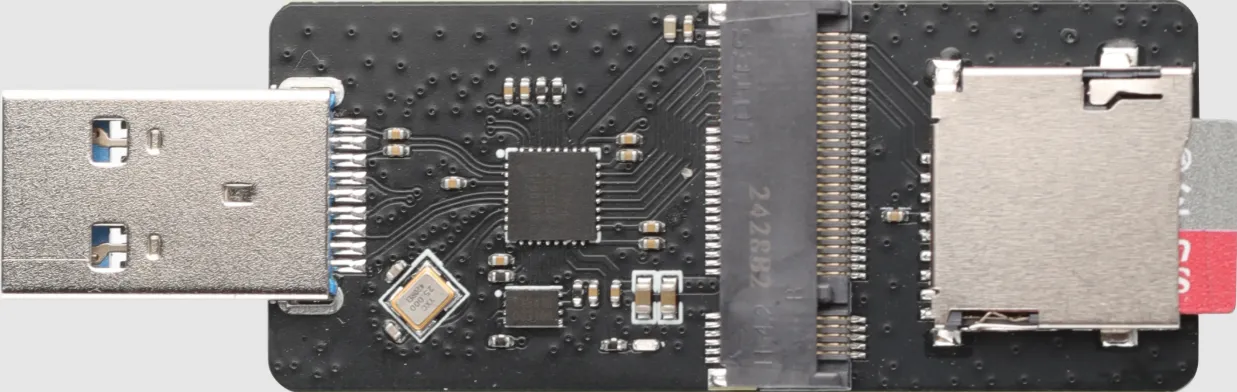
- Install TF
Preparation
- First install the software
SDFormatterandRufusFormatting tool - Extract the system, after extraction the file suffix is
.img - It is not recommended to use
balenaetcherandRaspberry Pifor system burning - Install M2WE or SD card on M2SD, then insert M2SD into the computer's USB interface
- If there is data on M2WE or TF card, please back it up
Format the memory card
- Use the
TFFormatter.exesoftware to format - Select the disk you need to format
- Or use the built-in disk management in WIN to delete the partition, after deleting the partition, create a new partition.
Burn the system
Flashing the System
-
Open Rufus, select the device. The displayed capacity should match the capacity of the SD card inserted into the computer.
-
For
Boot selection, simply leave it set to the default option,Disk or ISO image. -
To select the image file, click the
Selectbutton to the right ofBoot selection, and choose the extracted.imgfile. -
After selecting the image file, the
Boot selectionfield will change to display the filename of the image. -
Click the
Startbutton. If a window pops up indicating that the disk data needs to be erased, clickOK. -
Once the flashing process is complete, the computer will emit a prompt sound, and the progress bar will show
Ready. -
After flashing is complete, there is no need to immediately remove the SD card.
-
Open File Explorer and check if there is a USB drive or removable disk named
BOOT. -
The appearance of the
FlyOS-envfile indicates that the flashing was successful. -
Install the SD card into the motherboard.
Installing the System Card
- Installing the TF Card to PI
- Installing the M2WE Card to PI
- After burning the system to the TF card, the TF card needs to be connected to the PI. Otherwise, the system cannot start.
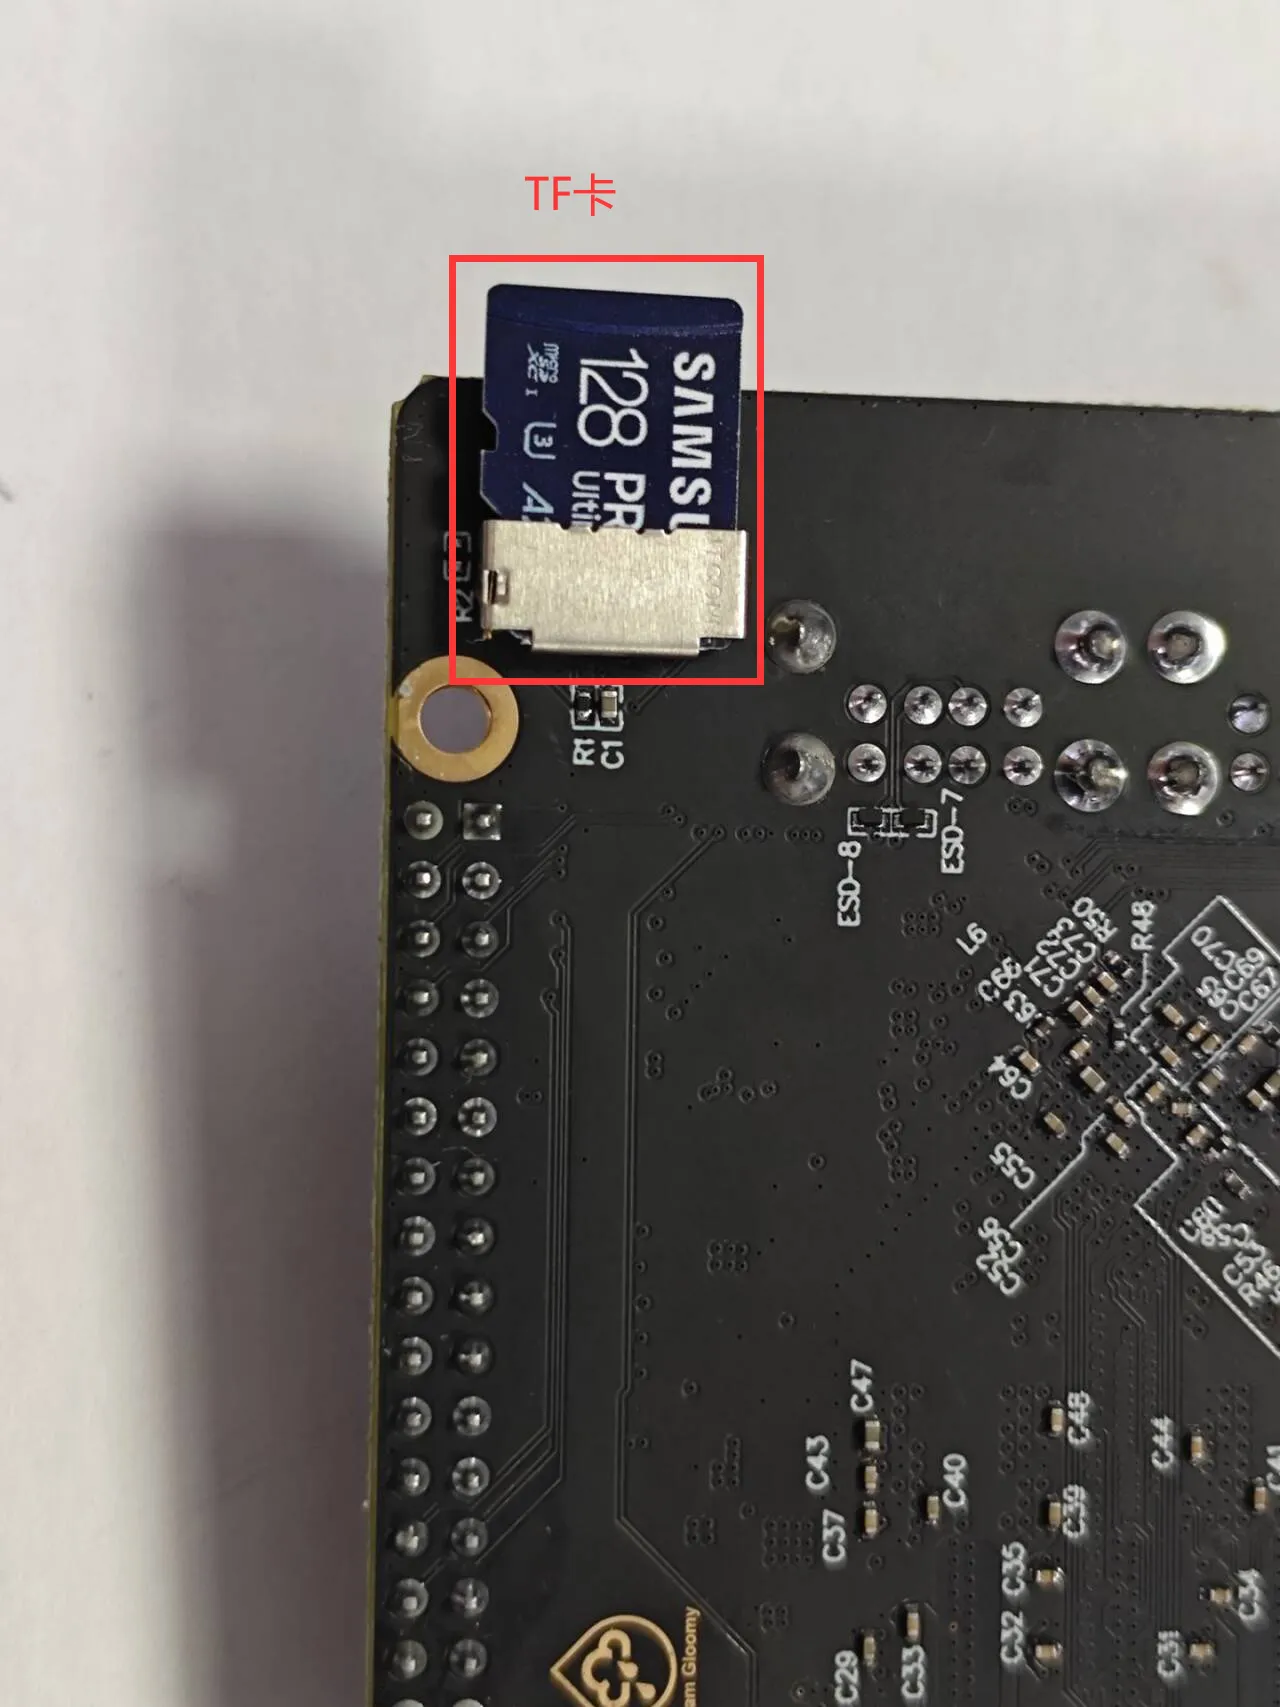
- Please note that if there is a TF card, the system will default to boot from the TF card
- Please note that hexagonal screwdriver with a diameter of 1.27mm should be used to fix the screws
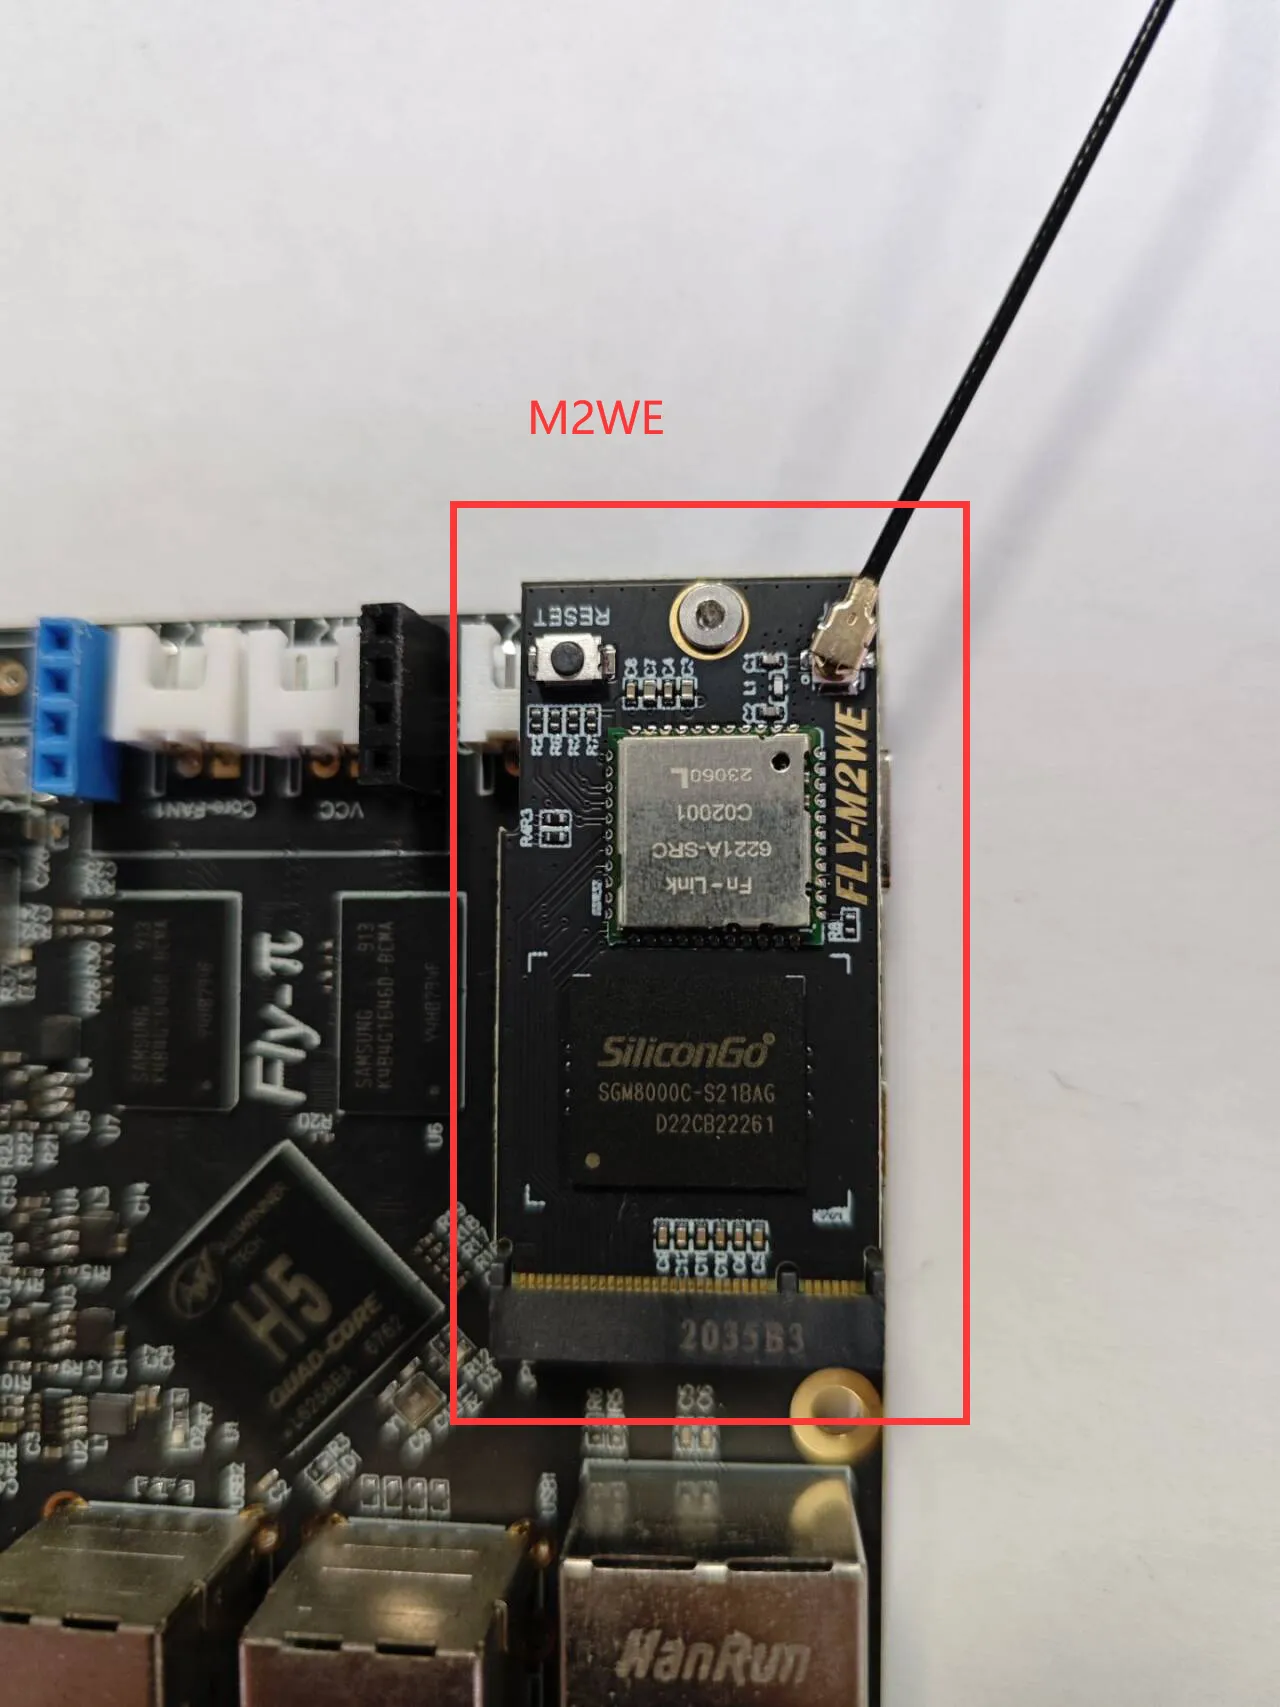
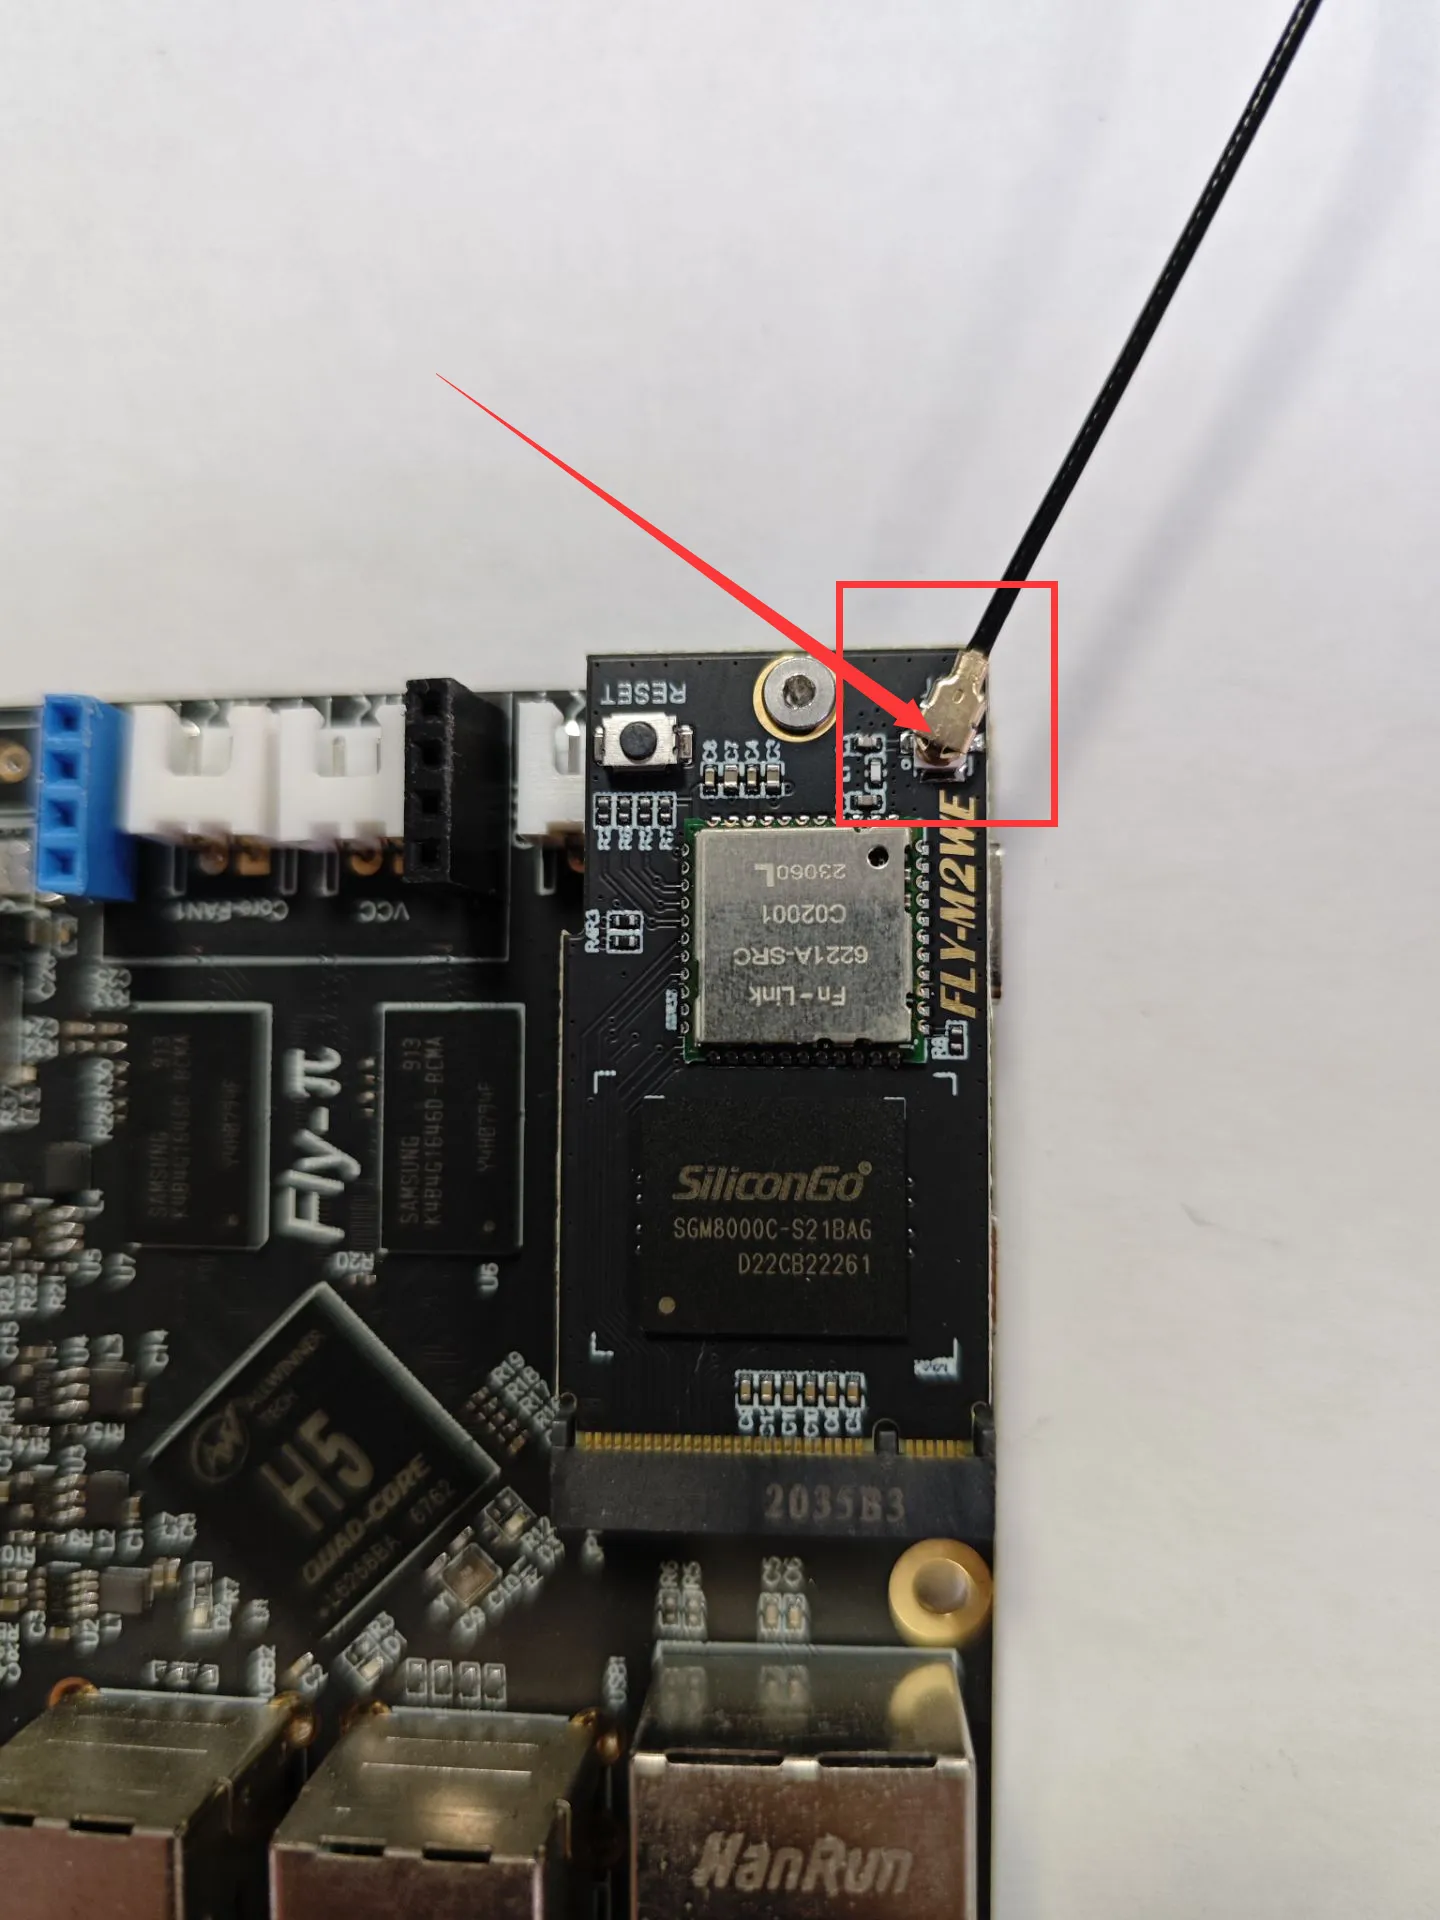
Installing the Antenna
- Install the antenna for
M2WEor2.4G WiFimodule
- FLY host computer requires the use of
M2WEor2.4G WIFImodule; otherwise, WiFi cannot be used - Please note that the host computer does not support WiFi with Chinese names and does not support dual-band (2.4G and 5G) integrated WiFi
- The red arrow points to the WiFi antenna interface
- The WiFi antenna port is
ipex1 - Please install the antenna on the PI V2, otherwise the connection to the router may fail due to poor signal