System Configuration Modification
Important Notes
- Settings in the configuration file will only take effect the first time the system starts after flashing.
- As the configuration process is relatively complicated, it is highly recommended to connect to the device via network and then configure through a browser.
- This tutorial only provides modifiable options.
- It is recommended to use either
mainsailorfluiddweb interfaces for configuration changes. - Please do not enable browser translation, as the system may fail to start after saving.
- It is better not to enter Chinese or special characters in the configuration file.
- Changes to the configuration file will take effect only after restarting the system.
- Do not modify any content below
######### PLEASE DO NOT EDIT THE FOLLOWING #########in the configuration file.
How to Modify the Configuration File
Modifying the Configuration File After Flashing
- Configuration options that only take effect on the
first bootmust be modified by using a professional text editor to open theconfig.txtconfiguration file located in theFlyOS-Confremovable disk immediately after flashing.
Online Configuration Modification After System Startup
-
For general configuration options, you can modify them via the web configuration interface of the system and the changes will take effect after restarting the system.
- Open the device's IP address in your browser, for example:
192.168.1.2/ - In fluidd, uncheck the option as shown in the left image below ->
Hide hidden files and folders. - In mainsail, check the option as shown in the right image below ->
Show hidden files.

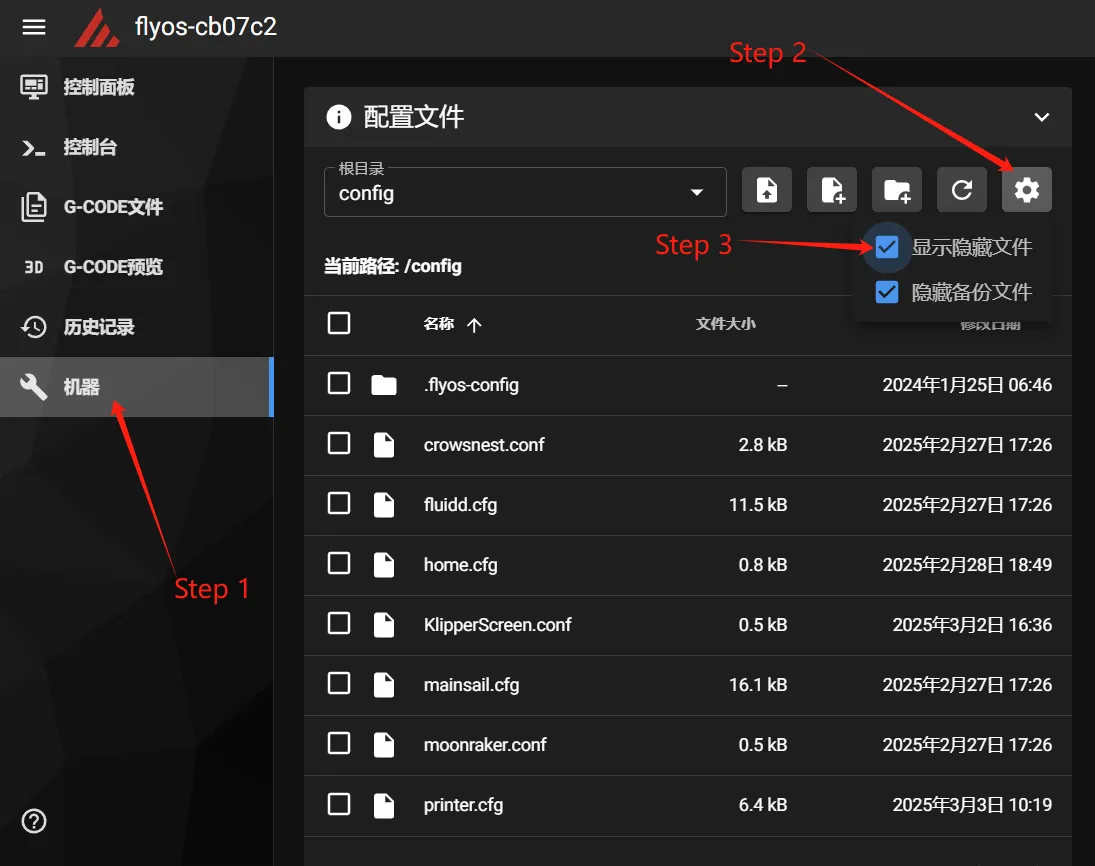
- You will now see the
.flyos-configfolder. Inside this folder there is a file namedsys-config.conf.
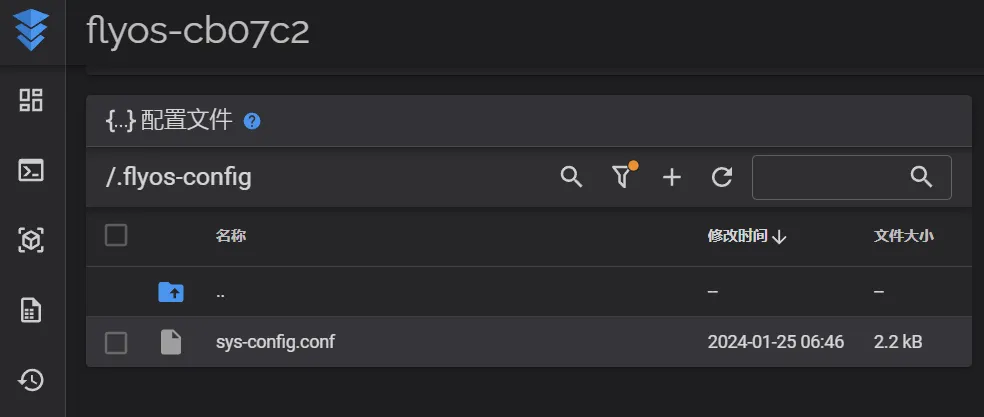
- The
sys-config.conffile is a symbolic link to theconfig.txtconfiguration file located in theFlyOS-Confremovable disk.

-
Open the
sys-config.conffile, modify the required configuration items, thenSave->Closeand restart the system. -
Note: The format of configuration items in the
sys-config.conffile iskey=value. Do not change it tokey: value. -
After saving modifications, restart the system for the changes to take effect.
- Open the device's IP address in your browser, for example:
Configuration Items
🛠️ System Configuration Guide
Welcome to the system configuration guide! This guide will help you easily set up your device.
📶 Wireless Network Settings
These settings take effect automatically every time the device starts
| Configuration Item | Default Value | Optional Values | Description |
|---|---|---|---|
WIFI_SSID | Empty | Your WiFi name | After entering, the device will automatically connect to this WiFi network on startup |
WIFI_PASS | Empty | Your WiFi password | If the WiFi has a password, please enter it here |
💡 Tip: Both fields must be filled to successfully connect to WiFi
🖨️ Printer Basic Settings
✨ Important Notice: These settings only take effect on the first boot, and modifications afterward will have no effect
| Configuration Item | Default Value | Optional Values | Description |
|---|---|---|---|
language | zh-CN(Chinese) | Chinese, English, Japanese, German, and 18 other languageszh-CN, zh-HK, en, de, cz, es, hu, ja, nl, pt, se, uk, da, fr, it, ko, pl, ru, tr | Set the display language for the web control interface |
printer_name | Empty | Any name (e.g., "My 3D Printer") | Give your printer a name for easy identification |
⚙️ System Basic Configuration
These settings take effect automatically every time the device starts
| Configuration Item | Default Value | Optional Values | Description |
|---|---|---|---|
board | Auto Detect | System auto-recognized, do not modify | Your motherboard model, the system will automatically identify it |
localtime | Asia/Shanghai | Global time zones | Set your time zone, the time will be automatically calibrated after connecting to the network |
canbus_bitrate | 1000000 | 1000000(Recommended)500000250000 | Set the communication speed for CAN bus devices, usually keep the default |
🖥️ Screen Display Settings
The following settings are applied automatically every time the device starts
| Configuration Item | Default Value | Optional Values | Description |
|---|---|---|---|
screen | hdmi | none: Turn off all screen displayhdmi: HDMI interface displayfly-tft-v2-r: FLY-TFT V2 Resistive Touchscreenfly-tft-v2-c: FLY-TFT V2 Capacitive Touchscreen | Select the screen type matching your hardware |
rotate | 90 | 0: No rotation90: Rotate clockwise 90 degrees180: Rotate 180 degrees270: Rotate clockwise 270 degrees | Adjust the display orientation for FLY-TFT touchscreen This setting has no effect on HDMI screens |
klipper_screen | 0 | 0: Not enabled1: Enabled | Whether to enable the KlipperScreen touch interface After enabling, you can operate the printer directly via touchscreen |
moon2uart | 0 | 0: Not enabled1: Enabled | Whether to enable the FLY serial screen function This function must be used with the FLY-WiScreen 7-inch screen |
🔧 Klipper-related Settings
These settings take effect automatically every time the device starts
| Configuration Item | Default Value | Optional Values | Description |
|---|---|---|---|
klipper_webui | fluidd | fluiddmainsail | Choose the web control interface for Klipper |
crowsnest | 0 | 0: Not enabled1: Enabled | Whether to enable the camera monitoring function |
🖨️ Printer Type Selection
These settings take effect automatically every time the device starts
| Configuration Item | Default Value | Optional Values | Description |
|---|---|---|---|
printer | klipper | klipper, rrf | Choose the printer control system - klipper: commonly used 3D printer system - rrf: another control system |
🔌 Power Failure Protection and Shutdown Settings
The following settings are applied automatically every time the device starts
- Power Recovery Printing: After an unexpected power outage, printing can continue once power is restored
- Power-off Shutdown: Automatically and safely shut down the system when a power outage is detected
- Conflict Between the Two: If you need to use power recovery printing, you must disable this power-off shutdown feature
| Configuration Item | Default Value | Optional Values | Description | Hardware Pin |
|---|---|---|---|---|
shutdown_pin_state | 0 | 0: High level trigger1: Low level trigger | Set the electrical detection method for the shutdown button | 1 |
shutdown_pin | none | Specific GPIO pinnone(Disable feature) | Set the hardware pin connected to the shutdown button | PI4 |
⚠️ Important Notice
🛑 Do not modify the following content:
In the configuration file, all content below ######### PLEASE DO NOT EDIT THE FOLLOWING ######### should not be modified, otherwise it may cause the system to fail to work properly.