ADXL345
Wiring
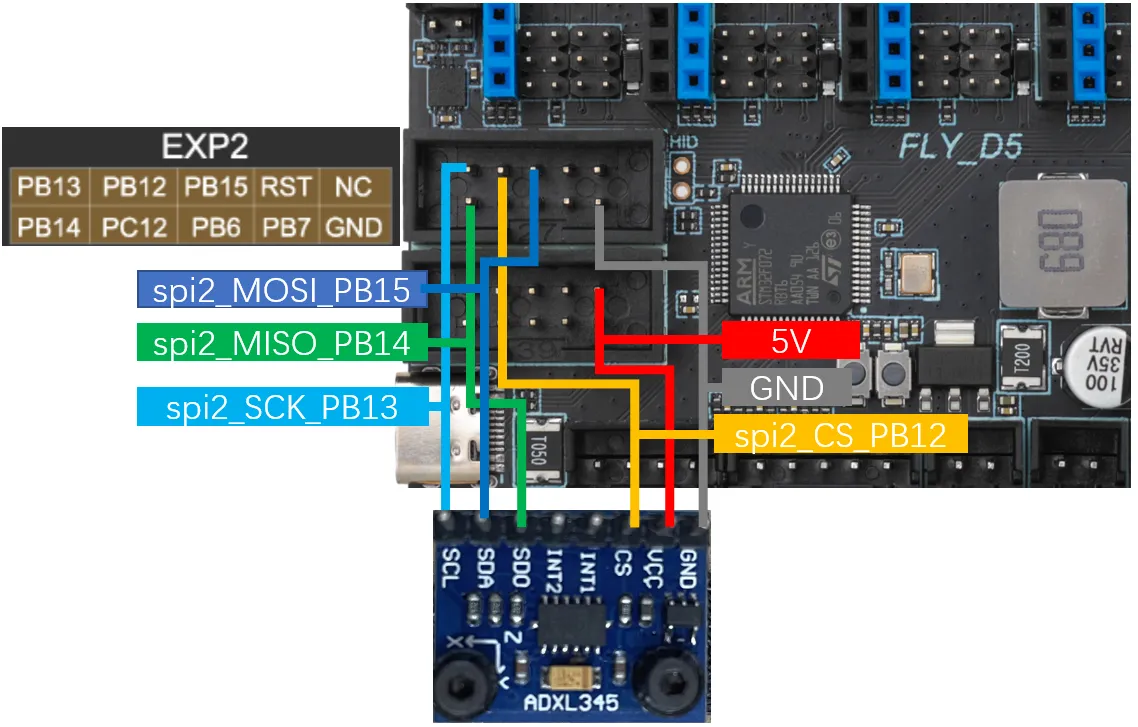
- The connection method of the accelerometer is shown in the following figure
Reference Configuration
[adxl345]
cs_pin: PB12
spi_bus: spi2 # hard spi, choose between hard spi and soft spi. Default is hard spi
# spi_software_mosi_pin: PB15 # soft spi, choose between hard spi and soft spi. Default is hard spi
# spi_software_miso_pin: PB14
# spi_software_sclk_pin: PB13

[resonance_tester]
accel_chip: adxl345
#accel_chip_y: adxl345 bed
probe_points:
    100, 100, 20  # Usually the center of the heated bed, please modify according to the actual situation of your machine
Usage Tutorial
Dependency Package Installation
warning
Notes
- If your device is already running the FlyOS-FAST system, the required dependencies are pre-installed, and you can skip this step.
- If using a non-FLY host computer, please be sure to complete the installation steps below.
- It is recommended to connect using SSH tools such as MobaXterm or PuTTY.
Installation Steps
- Execute the following commands in sequence to install the dependency packages.
- Installation time depends on CPU performance and network conditions; usually takes 10–20 minutes, please wait patiently until installation completes.
- If the device has insufficient memory (RAM), the installation may fail.
Install system dependencies:
sudo apt install python3-numpy python3-matplotlib libatlas-base-dev
Install Klipper virtual environment dependencies:
~/klippy-env/bin/pip install matplotlib numpy
Accelerometer Testing
Prerequisites
- The printer has performed the homing operation.
- Ensure the accelerometer is properly enabled in the Klipper configuration file.
Test Commands
Enter the following command in the Klipper console:
ACCELEROMETER_QUERY
If multiple accelerometers are connected, you can specify a chip for testing:
ACCELEROMETER_QUERY CHIP=<ADXL chip name>
Replace <ADXL chip name> with the actual accelerometer identifier (e.g., adxl345).
Troubleshooting
- First execution fails: Some Klipper versions may experience command recognition delays. If the first execution returns no data, please execute the same command again.
- Command not recognized: If the command is still unrecognized after multiple attempts, it may be due to an outdated Klipper version. We recommend:
- Updating Klipper to the latest version
- Or re-flashing the latest system version (e.g., latest FlyOS-FAST)
Result Interpretation
- Normal output: If a continuous stream of data is returned (as shown in the image below), the accelerometer is working normally and resonance compensation measurement can proceed.
- Error output: If timeout, no data, or communication errors are reported, please check in order:
- Whether the accelerometer wiring is secure
- Whether the sensor configuration and SPI in the configuration file are correct
- Whether the power supply is stable

- Note: Some older versions of
Klipperrequire executingACCELEROMETER_QUERYtwice before obtaining accelerometer values
Accelerometer Calibration
Calibration Steps
- Ensure the printer has been homed.
- Enter the following command in the console to start automatic calibration for the X and Y axes:
SHAPER_CALIBRATE - After calibration completes, save the configuration:
SAVE_CONFIG
Single Axis Calibration
If you need to calibrate only a single axis, use:
SHAPER_CALIBRATE AXIS=X
Or replace X with Y.
caution
Safety Tip
- The printer may generate intense vibrations during calibration. If vibrations become too strong, immediately press the emergency stop button or send the
M112command to stop urgently.
Adjusting Vibration Intensity
If the vibration during testing is too intense, you can reduce the accel_per_hz parameter value (default is 75):
[resonance_tester]
accel_per_hz: 50
Note: The steps above apply to most Klipper-based 3D printer resonance compensation configurations. Adjust according to your actual hardware and system environment.
Loading...