Installing BDsensor-m-m
Connecting the Sensor Cable to the Motherboard's EXP1 Interface
- If the sensor's cable is not long enough, you can use the delay line provided in the packaging.
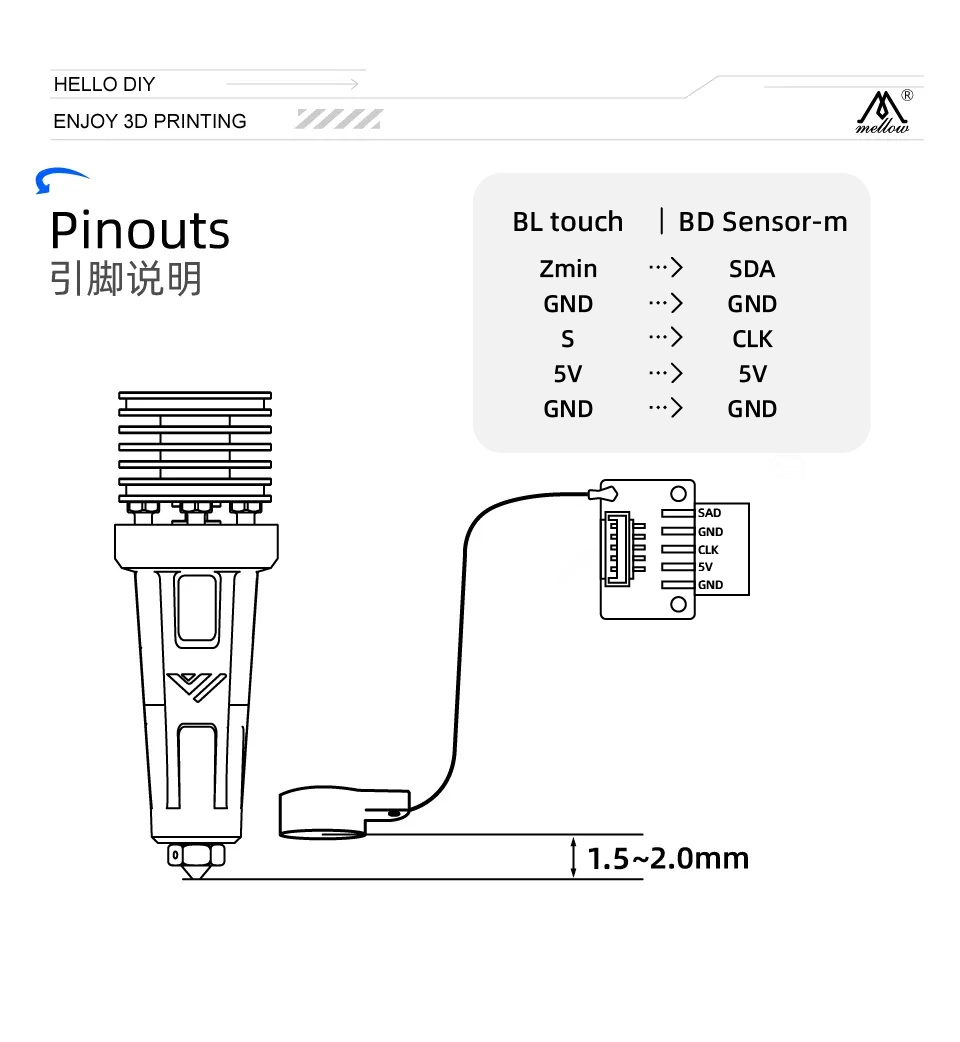
- The CKL and SDA lines of the BDsensor-m-m can be connected to any GPIO pin on the circuit board. You can also connect the BD sensor cable directly to the Bltouch port, for example:
BLtouch    |    BDsensor-m
5V       -->     5V
GND      -->     GND
S        -->     CLK/SCL    (Input)
GND      -->     GND
Zmin     -->     SDA    (Input/Output)
-
Since some pins in the motherboard connector may not be directly connected to the MCU's GPIOs (for example, they may have filtering capacitors or be isolated by MOSFETs, diodes, or optocouplers, but they can be used if they are isolated by resistors or resistor pull-ups/pull-downs), they cannot be used with the BDsensor-m. The firmware will report a connection error. For example:
-
The connectors for fans and heaters are isolated by MOSFETs,
-
The connectors for temperature thermistors and endstops/probes in some circuit boards are usually connected to GND through filtering capacitors,
-
Install the BD sensor near the hot end as shown in the figure below. STL of mount, STL_mount_VzBot_Goliath short
Installing the Patch to Marlin Firmware
The BD sensor has been integrated into Marlin2.1.x (since 2022.8.27).
You can download the release version. But it is now recommended to download the latest bug fix version: https://github.com/MarlinFirmware/Marlin
What you need to do is change the configuration file and pin file.
Editing configuration.h
-
Enable BD_SENSOR
Uncomment
#define BD_SENSOR
#define Z_SAFE_HOMING
#define BD_SENSOR_PROBE_NO_STOP //adding this new line for fast bed leveling without nozzle stop
Only
BD_SENSOR_PROBE_NO_STOPLatest Marlin bug fix: https://github.com/MarlinFirmware/Marlin
Description: https://github.com/MarlinFirmware/Marlin/pull/25847
-
Use Probe for Homing
Ensure
Z_MIN_PROBE_USES_Z_MIN_ENDSTOP_PINis disabled, and enableUSE_PROBE_FOR_Z_HOMINGas shown below//#define Z_MIN_PROBE_USES_Z_MIN_ENDSTOP_PIN
// Force the use of the probe for Z-axis homing
#define USE_PROBE_FOR_Z_HOMING -
Slow Down the Second Homing Z Speed
#define Z_PROBE_FEEDRATE_SLOW (Z_PROBE_FEEDRATE_FAST / 16)Here, we must slow down the bump homing speed and Z homing speed because the stopper read from the BDsensor-m process is not as real-time as a normal stopper.
Editing Configuration_adv.h
#define BABYSTEPPINGEnable this feature for real-time leveling function#define HOMING_BUMP_DIVISOR { 2, 2, 8 } // Re-Bump Speed Divisor (Divides the Homing Feedrate)
Editing pins_boardname.h
Configure the SDA and SCL pins of the BDsensor-m in the pin file pins_boardname.h (for example, pins_PANDA_PI_V29.h) by adding the following 3 lines:
#define  I2C_BD_SDA_PIN    PC6   // Please change to the actual number which the SDA wire is connected to your mainboard
#define  I2C_BD_SCL_PIN    PB2   // Please change to the actual number which the SCL wire is connected to your mainboard
#define  I2C_BD_DELAY  20      // default value is 20, should be in the range [20,50].
If you want to do automatic bed leveling probe (G29) like a normal BLtouch before printing, uncomment
#define AUTO_BED_LEVELING_BILINEAR
And edit the values as follows
#define Z_CLEARANCE_DEPLOY_PROBE   0 // Z Clearance for Deploy/Stow
#define Z_CLEARANCE_BETWEEN_PROBES  1 // Z Clearance between probe points
#define Z_CLEARANCE_MULTI_PROBE     1 // Z Clearance between multiple probes
Displaying BD Sensor Values on the LCD Screen
- For printers with a status display (support gcode M117), such as LCD12864 or some UART screens, like ender3V2 ...
Calibration
-
Clean the nozzle, then move the Z axis through the console until the nozzle just touches the bed (BDsensor-m will use this position as the 0 point, so no z_offset is needed, we set the value to 0).
-
Send the gcode command
M102 S-6, the printer will move the Z axis slowly upward by 0.1mm each time until it reaches 4mm. Do not run M102 S-6 before installing the sensor, nor turn off the printer power during calibration, otherwise the old calibration data will be deleted. If this happens, just calibrate again. -
You can send
M102 S-5to check if the BD sensor has been calibrated successfully, which will return the raw calibration data stored in the BD sensor.
There is also a calibration tool that can do this: https://github.com/markniu/Bed_Distance_sensor/raw/new/marlin/BD_Config_Tool_Marlin.zip 
Note: Data value 1015 or > 1010 indicates that it is out of the sensor range. If the first 5 points (0~0.5mm) or more are within the range of 0 to 1000, and the increased value delta is >=10, it indicates that the calibration is successful. Just like the chart shown above.
If M102 S-5 returns the first raw calibration data greater than 400, it means that the sensor is installed too high and needs to be reinstalled closer to the bed. Also, make sure that the second data value is more than 10 greater than the first data value.
Testing and Printing
Menu bed layer
Automatic bed leveling
There are two ways to automatically level the bed:
1. Use M102 to Level the First Few Layers in Real Time
We can easily enable or disable this automatic leveling by sending gcode commands or adding gcode to the gcode file.
To enable bed leveling in Cura, add the M28 gcode right below the G102 (home all axes) gcode in the "Start G-code" section of the printer machine settings. For example, below G28, which means it will only level the bed at a Z-axis height of 0.2mm or less. M102 S2
Send or disable bed leveling with BD sensor, by the way, it is disabled by default. M102 S0``G28``M18
M102   S-1     //Read sensor information, and we can use this for connection checking.
M102   S-2     //Read current distance value
M102   S-5     //Read raw Calibrate data
M102   S-6     //Start Calibrate, before that make sure the nozzle is just touched the bed, and then the printer restarted. don't home z axis before this.
M102   S4      //Set the adjustable Z height value, e.g. M102 S4 means it will do adjusting while the Z height <=0.4mm, disable it by M102 S0.
2. G29 Automatic Bed Leveling
Another method of automatic bed leveling is like G29 of BLtouch, just add a line G28 below G29.
Chris's Basement Installation Video
Checking Z Endstop M119
Do not home Z before checking this step, otherwise the nozzle may hit the print bed.
This is the return message after sending the M119 command (report endstop status).
Send: M119
Recv: x:open y:open z:open
If z min is not open, check your configuration. #define Z_MAX_ENDSTOP_HIT_STATE HIGH
- Ensure the Z motor is off/unlocked
- Move the Z axis down by hand until the nozzle touches the bed
- Send
M102 S-2, the return value should be 0.00mm, then send M119 again, you can see that the z endstop is now triggered.
Send: M119
Recv: x:open y:open z:TRIGGERED
Checking Connection
Check the connection with M102 S-1. This is an example of the return message, please check if the connection and wire order return blank or other strings.
Send: M102 S-1
Recv: V1.0 pandapi3d.com