Static IP Configuration
Purpose and Function of Static IP
-
Ensures Fixed Reachability for Devices
A static IP keeps the device with the same IP address at all times, making it easier to access, communicate, and control remotely (such as for Web servers, MQTT, PLCs, etc.). -
Facilitates Network Configuration and Management
In LAN or industrial networks, devices such as cameras, sensors, controllers, etc., must have fixed IPs to ensure other systems can connect correctly. -
Avoids Dependency on DHCP Server
Some embedded systems deployed in environments without DHCP services (such as industrial control, edge computing) must use static IPs to enable normal communication. -
Simplifies Debugging and Testing Processes
During development and debugging, fixed IPs make it easier to locate devices and facilitate repeated connections. -
Supports Device Discovery Mechanisms
Some systems access devices through preset IP ranges; static IPs ensure they respond as needed.Advantages Description ✅ Stable and Reliable The IP does not change, ensuring more stable communication, suitable for long-term running devices. ✅ Suitable for Environments Without Graphical Interfaces Embedded devices typically lack desktop environments; after configuring static IPs, manual connection and search are unnecessary. ✅ Easier Remote Control and Maintenance Connecting to devices via SSH, Web, APIs, etc., is more efficient with a fixed IP. ✅ Convenient for Deployment in Closed Networks Industrial or dedicated networks often lack DHCP, so static IPs must be used. ✅ Adaptable for Automation Scripts Various automatic deployment, monitoring, or update scripts can rely on consistent IP addresses to run.
System Settings
- Please note that when assigning an IP address, both the motherboard and the opposite PC should avoid using
0,1,254,255, etc., which are close to the maximum and minimum values. For example, using192.168.1.254may cause conflicts with other system applications, leading to intermittent connectivity issues.
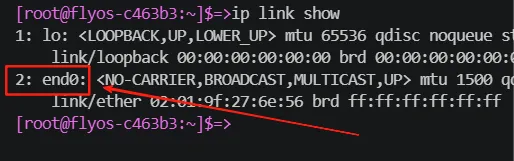
- Connect to the system SSH terminal.
- Execute the command
ip link showto view the current network card name, such aseth0,end0.
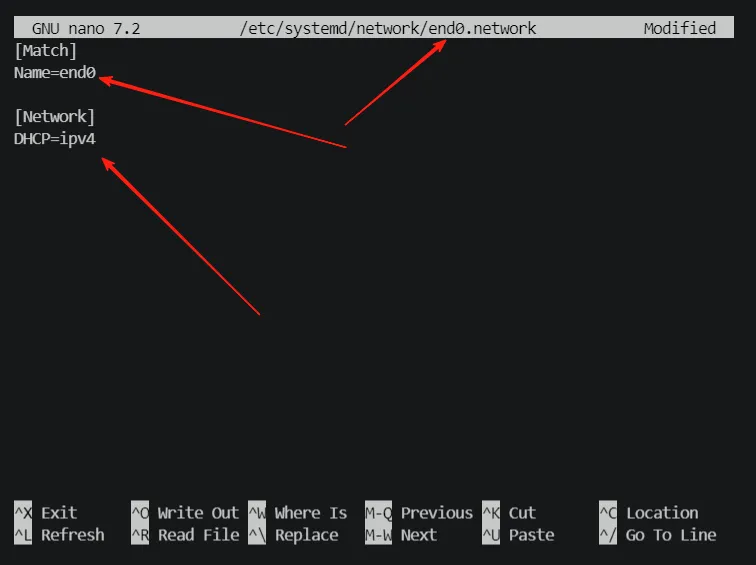
- Execute the command
nano /etc/systemd/network/end0.networkto edit the configuration file; the file name is the network card name. - After opening, the default is to enable the DHCP service, which needs to be changed to static IP.
-
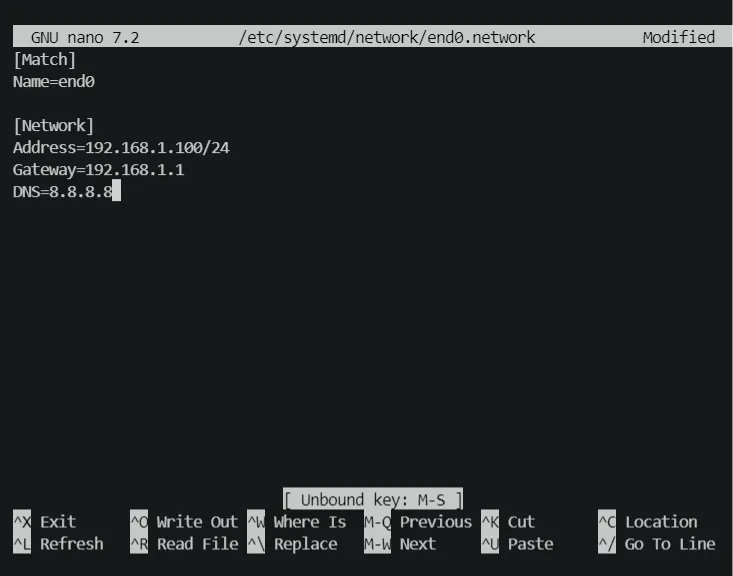
Modify it as shown below, where the IP address and gateway address should be filled in according to actual circumstances.
[Match]
# Matches the network card named end0
Name=end0

[Network]
# Set static IP address, /24 indicates a subnet mask of 255.255.255.0
Address=192.168.1.100/24
# Set the default gateway address
Gateway=192.168.1.1
# Set the DNS server
DNS=8.8.8.8
-
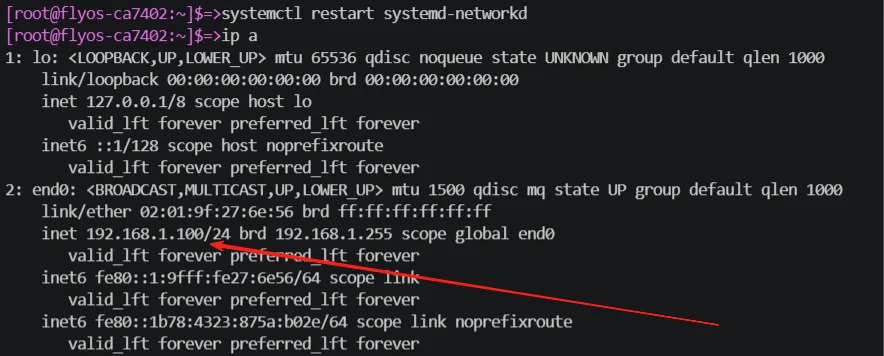
Press
CTRL + Sto save,CTRL + Xto exit the file, and execute the commandsystemctl restart systemd-networkdto restart the network service. -
Verify success by confirming the connection after plugging in the Ethernet cable and executing the command
ip a. If it displays as shown below, then the setting is successful.
PC Settings
- If the computer needs to connect to the motherboard with a static IP, please use the following parameters:
- Local IP:
192.168.1.xxx, only needs to be in the same segment as the motherboard IP. - Gateway:
192.168.1.1, must match the motherboard settings. - Subnet Mask:
255.255.255.0, since the motherboard IP is set to /24, the subnet mask is fixed, which is also the default value in common systems. - DNS Server:
8.8.8.8,114.114.114.144, etc., which are commonly used.